Spring Reference Guide Table of Content
Spring Study Guide – Testing
Do you use Spring in a unit test?
You don’t necessarily need spring for unit tests.
@RunWith(SpringRunner.class)
@SpringBootTest
public class SidecarApiNotificationApplicationTests {
        @Autowired
        UserService userService;

	@Test
        public void testLoadAllUsers() {

          List<User> users = userService.getAllUsers();

          assertNotNull(users);
       }

}
What type of tests typically use Spring?
- Spring provides mock objects and testing support classes for Unit Testing.
- Tests one unit of functionality
- Keeps dependencies minimal
- Isolate from the environment (including Spring)
- Spring provides first-class support for integration testing.
- Tests the interaction of multiple units working together
- Integrates infrastructure like database
How can you create a shared application context in a JUnit integration test?
Spring’s integration testing support has the following primary goals:
- To manage Spring IoC container caching between tests. By default, once loaded, the configured ApplicationContext is reused for each test.
- To provide Dependency Injection of test fixture instances.
- To provide transaction management appropriate to integration testing.
- To supply Spring-specific base classes that assist developers in writing integration tests.
To access the Context with the TestContext Framework in JUnit, two options to access the managed application context.
1. The first option is by implementing the ApplicationContextAware interface or using @Autowired on a field of the ApplicationContext type. You can specify this in the @RunWith annotation at the class level.
@RunWith(SpringRunner.class)
 @ContextConfiguration(classes = BankConfiguration.class)
 public class AccountServiceJUnit4ContextTests implements ApplicationContextAware { }
- The
SpringRunnerclass, which is an alias forSpringJUnit4ClassRunner, is a custom JUnit runner helping to load the Spring ApplicationContext by using@ContextConfiguration(classes=AppConfig.class). In JUnit, you can simply run your test with the test runnerSpringRunnerto have a test context manager integrated. - By default, the application context will be cached and reused for each test method, but if you want it to be reloaded after a particular test method, you can annotate the test method with the @DirtiesContext annotation so that the application context will be reloaded for the next test method.
- Inject Test Fixtures with the TestContext Framework in JUnit. In JUnit, you can specify SpringRunner as your test runner without extending a support class.
@RunWith(SpringRunner.class)
  @ContextConfiguration(classes = BankConfiguration.class)
  public class AccountServiceJUnit4ContextTests { }
2. The second option to access the managed application context is by extending the TestContext support class specific to JUnit: AbstractJUnit4SpringContextTests.
Note that if you extend this support class, you don’t need to specify SpringRunner in the @RunWith annotation because this annotation is inherited from the parent.
@ContextConfiguration(classes = BankConfiguration.class)
 public class AccountServiceJUnit4ContextTests extends AbstractJUnit4SpringContextTests { }
When and where do you use @Transactional in testing?
- At method level: the annotated test method(s) will run, each in its own transaction. By default, automatically rolled back after completion of the test.You can alter this behavior by disabling the
defaultRollbackattribute of@TransactionConfiguration. - At class level: each test method within that class hierarchy runs within a transaction.You can override this class-level rollback behavior at the method level with the
@Rollbackannotation, which requires a Boolean value,@Rollback(false), This is equivalent to another annotation introduced in Spring@Commit.
How are mock frameworks such as Mockito or EasyMock used?
Mockito lets you write tests by mocking the external dependencies with the desired behavior. Mock objects have the advantage over stubs in that they are created dynamically and only for the specific scenario tested.
Steps of using Mockito:
- Declare and create the mock
- Inject the mock
- Define the behavior of the mock
- Test
- Validate the execution
public class SimpleReviewServiceTest {

  private ReviewRepo reviewMockRepo = mock(ReviewRepo.class); // (1)
  private SimpleReviewService simpleReviewService;

  @Before
  public void setUp(){
    simpleReviewService = new SimpleReviewService();
    simpleReviewService.setRepo(reviewMockRepo); //(2)
  }

  @Test
  public void findByUserPositive() {
    User user = new User();
    Set<Review> reviewSet = new HashSet<>();
    when(reviewMockRepo.findAllForUser(user)).thenReturn(reviewSet);// (3)
    Set<Review> result = simpleReviewService.findAllByUser(user); // (4)
    assertEquals(result.size(), 1); //(5)
  }
}
Mockito with Annotations
@Mock: Creates mock instance of the field it annotates@InjectMockshas a behavior similar to the Spring IoC, because its role is to instantiate testing object instances and to try to inject fields annotated with@Mockor@Spyinto private fields of the testing object.- Use Mockito
- Either:
@RunWith(MockitoJUnitRunner.class)to initialize the mock objects. - OR:
MockitoAnnotations.initMocks(this)in the JUnit@Beforemethod.
- Either:
public class MockPetServiceTest {

  @InjectMocks
  SimplePetService simplePetService;

  @Mock
  PetRepo petRepo;

  @Before
  public void initMocks() {
    MockitoAnnotations.initMocks(this);
  }

  @Test p
  ublic void findByOwnerPositive() {
    Set<Pet> sample = new HashSet<>();
    sample.add(new Pet());
    Mockito
      .when(petRepo.findAllByOwner(owner))
      .thenReturn(sample);

    Set<Pet> result = simplePetService.findAllByOwner(owner);

    assertEquals(result.size(), 1); }
  }
}
Mockito in Spring Boot
@MockBean
- It is a Spring Boot annotation,
- used to define a new Mockito mock bean or replace a Spring bean with a mock bean and inject that into their dependent beans.
- The annotation can be used directly on test classes, on fields within your test, or on @Configuration classes and fields.
- When used on a field, the instance of the created mock is also injected
- Mock beans will be automatically reset after each test method.
- If your test uses one of Spring Boot’s test annotations (such as
@SpringBootTest), this feature is automatically enabled.
How is @ContextConfiguration used?
In spring-test library, @ContextConfiguration is a class-level annotation, that defines the location configuration file, which will be loaded for building up the application context for integration tests.
if @ContextConfiguration is used without any attributes defined, the default behavior of spring is to search for a file named {testClassName}-context.xml in the same location as the test class and load bean definitions from there if found.
@RunWith(SpringJUnit4ClassRunner.class)
@ContextConfiguration(classes={KindergartenConfig.class, HighschoolConfig.class}) @ActiveProfiles("kindergarten")
public class ProfilesJavaConfigTest {

  @Autowired
  FoodProviderService foodProviderService;
}
Spring Boot provides a @SpringBootTest annotation, which can be used as an alternative to the standard spring-test @ContextConfiguration annotation when you need Spring Boot features. The annotation works by creating the ApplicationContext used in your tests through SpringApplication.
@RunWith(SpringRunner.class)
@SpringBootTest(properties = "spring.main.web-application-type=reactive")
public class MyWebFluxTests { }
How does Spring Boot simplify writing tests?
spring-boot-starter-test pulls in the following all within test scope:
- JUnit: De-facto standard for testing Java apps
- JSON Path: XPath for JSON
- AssertJ: Fluent assertion library
- Mockito: Java mocking library
- Hamcrest: Library of matcher objects
- JSONassert: Assertion library for JSON
- Spring Test and Spring Boot Test: Test libraries provided by the Spring Framework and Spring Boot.
testCompile('org.springframework.boot:spring-boot-starter-test')
What does @SpringBootTest do? How does it interact with @SpringBootApplication and @SpringBootConfiguration?
Spring Boot features like loading external properties and logging, are available only if you create ApplicationContext using the SpringApplication class, which you’ll typically use in your entry point class. These additional Spring Boot features won’t be available if you use @ContextConfiguration.
@SpringBootTest uses SpringApplication behind the scenes to load ApplicationContext so that all the Spring Boot features will be available.
- If no ContextLoader is specified with
@ContextConfiguration, it usesorg. springframework.boot.test.context.SpringBootContextLoaderby default. - Automated search for a Spring Boot configuration when nested
@Configurationclasses are used. - Loading environment-specific properties via the properties attribute.
- Registering a
org.springframework.boot.test.web.client.TestRestTemplatebean for use in web tests that use a fully running container.
@RunWith(SpringRunner.class)
@SpringBootTest(
  webEnvironment = SpringBootTest.WebEnvironment.RANDOM_PORT,
  properties = {"app.port=9090"})
public class CtxControllerTest { }
How to define a testing class in Spring?
In order to define a test class for running in a Spring context, the following have to be done:
- annotate the test class with
@RunWith(SpringJUnit4ClassRunner.class) - annotate the class with
@ContextConfigurationin order to tell the runner class where the bean definitions come from - use
@Autowiredto inject beans to be tested.
Spring Study Guide – Rest
1. What does REST stand for?
REpresentational State Transfer. It is for stateless communication between a client(Web, Mobile, Server, etc) and a server.
2. What is a resource?
An entity, model, or data that you interact with. It is basically any information, like data, Json, xml, html, file, image, etc.
Resource can be identified by a Uniform Resource Identifier (URI).
3. What does CRUD mean?
C – create
R – read
U – update
D – delete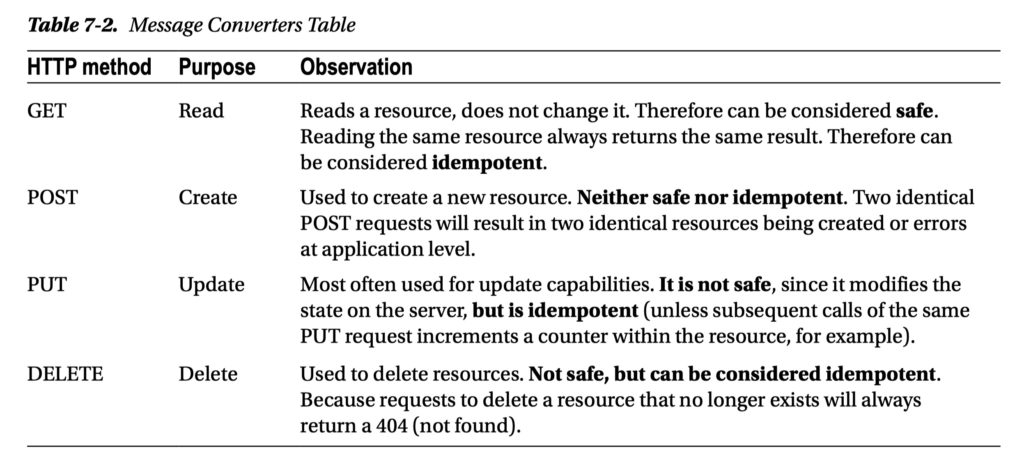
4. Is REST secure? What can you do to secure it?
REST is not secure by default.
To secure it, can use:
- HTTPS
- Basic Authentication
- JSON Web Tokens (JWT)
- OAuth2
We also use Spring Security to secure our REST API.
5. What are safe REST operations?
Safe methods are HTTP methods that do not modify resources. Spring Security implements CSRF protection with a synchronizer token. Statechanging requests(not safe methods) will be intercepted and checked for a CSRF token.
- GET
- HEAD
- OPTIONS
- TRACE
Not Safe:
- POST: Two identical POST requests will result in two identical resources being created or errors at application level.
- PUT: it modifies the state on the server
- DELETE
6. What are idempotent operations? Why is idempotency important?
Idempotent means you can repeat these operations over and over again, but the end result should be the same.
Idempotency operations:
- GET
- PUT
- DELETE
Idempotency is important for understanding the limits of effect some operation has on resources.
7. Is REST scalable and/or interoperable?
Because of the stateless nature of REST, it is easily scalable and due to its HTTP usage, it is highly interoperable because many systems support HTTP.
Scalability
REST is scalable, because it is stateless, its Cacheability and layered system.
-
Statelessness ensures that requests can be processed by any node in a cluster of services without having to consider server-side state
-
Cacheability allows for creating responses from cached information without the request having to proceed to the actual service, which improves network efficiency and reduces the load on the service.
-
A layered system allows for introducing intermediaries such as a load balancer without clients having to modify their behavior as far as sending requests to the service is concerned. The load balancer can then distribute the requests between multiple instances of the service in order to increase the request-processing capacity of the service.
Interoperability
The ability to exchange and make use of information.
- REST service supports all formats of data: xml, json, file html
- Resource can be identified by a Uniform Resource Identifier (URI). No special language needed
- CRUD standard operation
8. Which HTTP methods does REST use?
- GET – for read
- PUT – for update/replace
- POST – for create
- PATCH – for update/modify
- DELETE – for delete
9. What is an HttpMessageConverter?
HttpMessageConverters convert HTTP requests to objects and back from objects to HTTP responses. Spring has a list of converters that is registered by default but it is customizable – additional implementations may be plugged in.
- The resource representation can have different formats: XML, JSON, HTML, etc.
- The client must know the format to use, or request a resource with a representation it understands form the server.
- Representations are converted to HTTP requests and from HTTP responses by implementations
HttpMessageConverterinterface.- Convert a
HttpInputMessageto an object of specified type. - Convert an object to a
HttpOutputMessage.
- Convert a
- Message converters are automatically detected and used by Spring
- JSON format, so MappingJackson2HttpMessageConverter is used.
- the
consumesandproducesannotation attributes of the@RequestMapping- The consumes attribute defines
-
the consumable media types of the mapped request (defined on the server)
-
the value of the Content-Type header (defined on the client side) must match at least one of the values of this property in order for a method to handle a specific REST request.
-
- The produces attribute defines the producible media types of the mapped request, narrowing the primary mapping, and the value of the Accept header (on the client side) must match at least one of the values of this property in order for a method to handle a specific REST request.
- The consumes attribute defines
@Configuration
@EnableWebMvc
@ComponentScan(basePackages = {"com.ps.web", "com.ps.exs"})
public class WebConfig extends WebMvcConfigurerAdapter {

  @Override
  public void configureMessageConverters(List<HttpMessageConverter<?>> converters) {
    super.configureMessageConverters(converters);
    converters.add(mappingJackson2HttpMessageConverter());
  }

  @Bean
  public MappingJackson2HttpMessageConverter mappingJackson2HttpMessageConverter() {
    MappingJackson2HttpMessageConverter mappingJackson2HttpMessageConverter = new MappingJackson2HttpMessageConverter(); // when client is a browser JSON response is displayed indented
    mappingJackson2HttpMessageConverter.setPrettyPrint(true); //set encoding of the response
    mappingJackson2HttpMessageConverter.setDefaultCharset (StandardCharsets.UTF_8);
    mappingJackson2HttpMessageConverter.setObjectMapper(objectMapper());
    return mappingJackson2HttpMessageConverter;
  }
}
10. Is REST normally stateless?
REST is stateless because according to its definition it HAS to be stateless; meaning each request must contain all the required information to interact with the server without the server needing to store some context between requests. The same can be said about authentication – each request holds the authentication info required for interacting with the server.
11. What does @RequestMapping do?
@RequestMapping defines a handler method or class to process HTTP calls.
-
Annotate both for class and handler methods.
-
@RequestMappingmehtods are handler method, it provides information regarding when method should be called. -
Has various attributes to match by:
- URL,
- HTTP method,
- request parameters,
- headers,
- produces: media types,
- consumes: media type
12. Is @Controller a stereotype? Is @RestController a stereotype?
@Controller is a stereotype whilst @RestController is not and is declared in a different package.
What is a stereotype annotation? What does that mean?
Stereotype annotations are annotations that are applied to classes that fulfills a certain, distinct, role.
- The main stereotype annotation is
@Component. - Both
@Controllerand@RestControllerare stereotypes @Controller+@ResponseBody=@RestController
13. What is the difference between @Controller and @RestController?
@Controller result is passed to a view.
@RestController result is processed by a HttpMessageConverter.
For a @Controller to act as a @RestController it has to be combined with @ResponseBody.
14. When do you need @ResponseBody?
@ResponseBody is required when you want a controller result to pass to a message converter rather than to a view resolver. For example, you want a JSON object instead of a view.
With Spring 4.0, the @ResponseBody annotation has been moved to the type level, so it can be added to interfaces, classes, or other annotations.
-
on class: the controller becomes restcontroller.
-
on method: return serialized data througth HttpMessageConverter to response body, rather than passing the model and view.
@RequestMapping(value="/test",
  produces = {MediaType.APPLICATION_JSON_UTF8_VALUE})
public @ResponseBody List<Journal> getJournal(){
  return repo.findAll();
}

@ResponseStatus(HttpStatus.OK)
@RequestMapping(value = "/listdata", method = RequestMethod.GET)
@ResponseBody
public Singers listData() {
  return new Singers(singerService.findAll());
}
15. What does @PathVariable do?
@PathVariable maps a part of the URL, an URI template variable, to a handler method argument.
@GetMapping("/api/employees/{id}/{name}")
@ResponseBody
public String getEmployeesByIdAndName(@PathVariable String id, @PathVariable String name) {
    return "ID: " + id + ", name: " + name;
}
@GetMapping(value = { "/api/employeeswithrequired", "/api/employeeswithrequired/{id}" })
@ResponseBody
public String getEmployeesByIdWithRequired(@PathVariable String id) {
    return "ID: " + id;
}
@GetMapping(value = { "/api/employeeswithoptional", "/api/employeeswithoptional/{id}" })
@ResponseBody
public String getEmployeesByIdWithOptional(@PathVariable Optional<String> id) {
    if (id.isPresent()) {
        return "ID: " + id.get();
    } else {
        return "ID missing";
    }
}
16. What are the HTTP status return codes for a successful GET, POST, PUT or DELETE operation?
200 for success
400 for error
HTTP response codes
- 1XX: information. Request hs been received and processing of it continues.
- 2XX: Successful. Successfully received, understood and accepted.
- 3XX: Redirection. Further action is needed to complete the request.
- 4XX: Client error. Request is invalid.
- 5XX: Server error. Server is unavailable for a valid request.
HTTP method
- GET: 200 OK
- POST: 200 OK, 201 Created, 204 No Content
- PUT: 200 OK, 201 Created, 204 No Content
- DELETE: 204 No Content, 202 Accepted, 205 Reset Content (not performed)
17. When do you need @ResponseStatus?
@ResponseStatus will prevent DispatcherServlet from trying to find a view for the result and will set a status for the response. So when you need another form of response instead of a view you use @ResponseStatus.
It’s always a good idea to use @ResponseStatus where appropriate to communicate the most descriptive and accurate HTTP status code to the client.
18. Where do you need @ResponseBody? What about @RequestBody? Try not to get these muddled up!
@ResponseBody is required when you want a controller result to be passed to a message converter rather than to a view resolver.
@RequestBody annotation maps the HttpRequest body to a transfer or domain object, enabling automatic deserialization of the inbound HttpRequest body onto a Java object.
@PostMapping("/signup")
public ResponseEntity<SessionDTO> signUp(@Valid @RequestBody MemberSignupCreateDTO memberCreateDTO){
		...
}
@RequestBody
@RequestBodyto have the web request body read and deserialized into an Object through anHttpMessageConverterto method parameter.@RequestBodycan be combined with@Validated.
@ResponseBody
- To have the return serialized to the response body through an
HttpMessageConverter. @ResponseStatuscan be combined to specify response status.
If you saw example Controller code, would you understand what it is doing? Could you tell if it was annotated correctly?
yes
@RestController
@RequestMapping(value = "/singer")
public class SingerController {

  final Logger logger = LoggerFactory.getLogger(SingerController.class);

  @Autowired
  private SingerService singerService;

  @ResponseStatus(HttpStatus.OK)
  @GetMapping(value = "/listdata")
  public List<Singer> listData() {
    return singerService.findAll();
  }

  @ResponseStatus(HttpStatus.OK)
  @GetMapping(value = "/{id}")
  public Singer findSingerById(@PathVariable Long id) {
    return singerService.findById(id);
  }

  @ResponseStatus(HttpStatus.CREATED)
  @PostMapping(value="/")
  public Singer create(@RequestBody Singer singer) {

    logger.info("Creating singer: " + singer);
    singerService.save(singer);
    logger.info("Singer created successfully with info: " + singer);
    return singer;
  }

  @PostMapping
  public Book create(@RequestBody Book book, UriComponentsBuilder uriBuilder) {

    Book created = bookService.create(book);
    URI newBookUri = uriBuilder
      .path("/books/{isbn}")
      .build(created.getIsbn());

    return ResponseEntity
      .created(newBookUri)
      .body(created);
  }
}
19. Do you need Spring MVC in your classpath?
Yes. Spring MVC is the core component of REST.
- The
spring-mvc.jaris not part ofspring-core. spring-webmodule must be present on the classpath.
20. What Spring Boot starter would you use for a Spring REST application?
spring-boot-starter-web: “Starter for building web, including RESTful, applications using Spring MVC.”
21. What are the advantages of the RestTemplate?
RestTemplate is used to make HTTP Rest Calls (REST Client).
Without RestTemplate, If we want to make an HTTP call, we need to create an HttpClient, pass request and form parameters, setup accept headers and perform unmarshalling of response, all by yourself. Spring RestTemplate tries to take that pain away by abstracting all these details from you.
RestTemplate has methods specific to HTTP methods:
- DELETE
- GET
- HEAD
- OPTIONS
- POST
- PUT
So it is very convenient for REST calls.
RestTemplate implements a synchronous HTTP client that simplifies sending requests and also enforces RESTful principles.
- Provides a higher-level API to perform HTTP requests compared to traditional HTTP client libraries.
- Supports URI templates
- Automatically encodes URI templates. For example, a space character in an URI will be replaced with
%20using percent-encoding. - Supports automatic detection of content type
- Supports automatic conversion between objects and HTTP messages.
- Allows for easy customization of response errors. A custom ResponseErrorHandler can be registered on the RestTemplate.
- Provides methods for conveniently sending common HTTP request types and also provides methods that allow for increased detail when sending requests. Examples of the former method type are: delete, getForObject, getForEntity, headForHeaders, postForObject and put.
22. If you saw an example using RestTemplate would you understand what it is doing?
yes.
String uriTemplate = "http://example.com/hotels/{hotel}";
URI uri = UriComponentsBuilder.fromUriString(uriTemplate).build(42);

RequestEntity<Void> requestEntity = RequestEntity.get(uri)
        .header(("MyRequestHeader", "MyValue")
        .build();

ResponseEntity<String> response = template.exchange(requestEntity, String.class);

String responseHeader = response.getHeaders().getFirst("MyResponseHeader");
String body = response.getBody();
Security

1. What are authentication and authorization? Which must come first?
- Authentication – Establishing that a principal’s credentials are valid
- Authorization – Deciding if a principal is allowed to perform an action
Authentication comes first before Authorization because the authorization process needs a principal object with authority votes to decide the user is allowed to perform an action for the secured resource.
Authentication is the process of establishing that a principal is who they claim to be (a “principal” generally means a user, device or some other system which can perform an action in your application). Usually, a user authenticates to a system by using his username and password.
Authorization refers to the process of deciding whether a principal is allowed to perform an action within your application. To arrive at the point where an authorization decision is needed, the identity of the principal has already been established by the authentication process. For example, certain endpoints in your API can only be accessed by certain roles. When you call these endpoints with a role that does not have the privilege, the endpoint should throw an exception.
2. Is security a cross-cutting concern? How is it implemented internally?
Yes, security is a cross-cutting concern. Spring Security internally is implemented using AOP – the same way as Transactions management.
The cross-cutting concern is a concern which is applicable throughout the application and it affects the entire application. For example: logging, security and transactions.
- Yes, security is a cross-cutting concern.
Spring Security tackles security from two angles:
- To secure web requests and restrict access at the URL level, Spring Security is based entirely on standard servlet filters.
- It doesn’t use servlets or any other servlet-based frameworks (such as Spring MVC) internally, so it has no strong links to any particular web technology.
- It deals in
HttpServletRequests andHttpServletResponses and doesn’t care whether the requests come from a browser, a web service client, or AJAX. - Spring Security’s web infrastructure should only be used by delegating to an instance of
FilterChainProxy.
- Spring Security can also secure method invocations using Spring AOP, proxying objects and applying advice to ensure that the user has the proper authority to invoke secured methods.
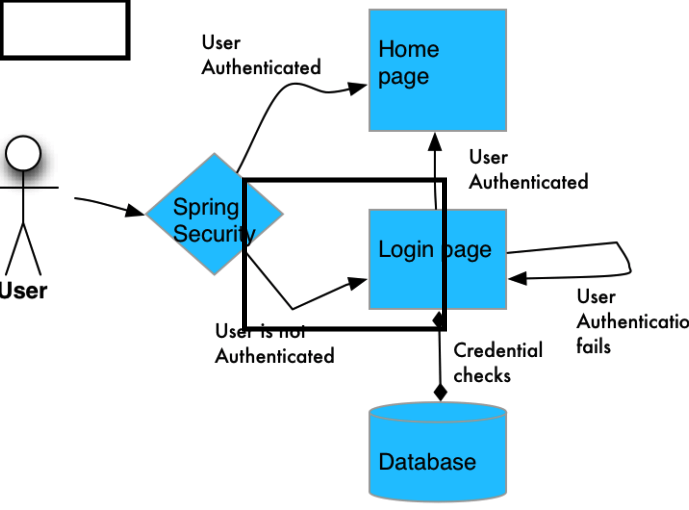
Spring Security Configuration
Spring Security WebMvc under the hood
-
A user tries to access the application by making a request. The application requires the user to provide the credentials so it can be logged in.
-
The credentials are verified by the Authenticaltion Manager and the user is granted access to the application. The authorization rights for this user are loaded into the Spring Security context.
-
The user makes a resource request (view, edit, insert, or delete information) and the Security Interceptor intercepts the request before the user accesses a protected/secured resource.
-
The Security Interceptor extracts the user authorization data from the security context and…
-
…delegates the decision to the Access Decision Manager.
-
The Access Decision Manager polls a list of voters to return a decision regarding the rights of the authenticated user to system resources.
-
Access is granted or denied to the resource based on the user rights and the resource attributes.
Securing RESTful-WS three-step process:
-
a security filter named springSecurityFilterChain needs to be added, the filter is replaced by a class extending
AbstractSecurityWebApplicationInitializer. This class registersDelegatingFilterProxyto usespringSecurityFilterChainbefore any other registered Filter. -
add a Spring configuration class for security where we will declare who can access the application and what they are allowed to do. In the case of this application, things are easy: we are using in-memory authentication for teaching purposes, so add a user named prospring5 with the password prospring5 and the role REMOTE.
@Configuration
 @EnableWebSecurity //enable secured behavior
 public class SecurityConfig extends WebSecurityConfigurerAdapter {

     private static Logger logger = LoggerFactory.getLogger(SecurityConfig.class);

     @Autowired
     protected void configureGlobal(AuthenticationManagerBuilder auth) throws Exception {
         auth.inMemoryAuthentication()
             .withUser("prospring5")
             .password("prospring5")
             .roles("REMOTE");
     }

     @Override
     protected void configure(HttpSecurity http) throws Exception {
         http.sessionManagement()
         .sessionCreationPolicy(SessionCreationPolicy.STATELESS)
         .and()
         .authorizeRequests()
         .antMatchers("/**")
         .permitAll()
         .antMatchers("/rest/**")
         .hasRole("REMOTE")
         .anyRequest()
         .authenticated()
         .and()
         .formLogin()
         .and()
         .httpBasic()
         .and()
         .csrf()
         .disable();
     }

 }
3. add the rest application context, besides adding SecurityConfig to the root context application.
public class WebInitializer extends AbstractAnnotationConfigDispatcherServletInitializer {

     @Override
     protected Class<?>[] getRootConfigClasses() {
         return new Class<?>[]{ DataServiceConfig.class, SecurityConfig.class};
     }

     @Override
     protected Class<?>[] getServletConfigClasses() {
         return new Class<?>[]{ WebConfig.class};
     }

     @Override
     protected String[] getServletMappings() {
         return new String[]{"/rest/**"};
     }
 }
Securing a Web Application //todo
Spring Security in Sprint Boot
If library spring-boot-starter-security is in the classpath, Spring Boot automatically secures all HTTP endpoints with basic authentication. This will add the
- spring-security-core,
- spring-security-config, and
- springsecurity-web
dependencies to your project.
3. What is the delegating filter proxy?
DelegatingFilterProxy is the entry point for spring security. The DelegatingFilterProxy is a servlet filter and It should delegate the request to the spring managed bean that must implement the servlet Filter interface.
Delegating filter proxy is a servlet filter registered with the web container that delegates the requests to a Filter implementation on the Spring context side. That is there a 2 places servlet filters are attached to:
- Web container
- Spring context
As of Spring Security, all requests pass through delegating filter proxy that is registered with the container and then goes to FilterChainProxy (another filter but this time on the Spring context side).
Delegating filter proxy may be declared in 2 ways:
- In web.xml (from WEB-INF folder)
- By extending AbstractSecurityWebApplicationInitializer
Delegating filter proxy will pass requests to the filter whose name is springSecurityFilterChain.

4. What is the security filter chain?
Spring Security provides a number of filters by default, and most of the time, these are enough.
Spring uses a chain of filters that is customizable by pulling in and taking out some filters as well as customizing them. This chain of filters is called the security filter chain (bean from the Spring context is called springSecurityFilterChain). Filters that build the chain are created when you enable web security.
Mandatory Filter Name Main Purpose?
- SecurityContextIntegrationFilter – Establishes SecurityContext and maintains between HTTP requests
- LogoutFilter – Clears SecurityContextHolder when logout requested
- UsernamePasswordAuthenticationFilter – Puts Authentication into the SecurityContext on the login request
- ExceptionTranslationFilter – Converts SpringSecurity exceptions into HTTP response or redirect
- FilterSecurityInterceptor – Authorizes web requests based on config attributes and authorities
5. What is the security context?
The security context in Spring Security includes details of the principal currently using the application. The security context is always available to methods in the same thread of execution, even if the security context is not explicitly passed around as an argument to those methods. This information includes details about the principal. Context is held in the SecurityContextHolder.
There are several ways to determine who the user is. These are a few of the most common ways:
- Inject a Principal object into the controller method.
- Inject an Authentication object into the controller method.
- Use SecurityContextHolder to get at the security context.
- Use an
@AuthenticationPrincipalannotated method.
SecurityContextholds security information about the current thread of execution.- This information includes details about the principal.
- Context is held in the
SecurityContextHolder. - By default the
SecurityContextHolderuses a ThreadLocal to store these details, which means that the security context is always available to methods in the same thread of execution, even if the security context is not explicitly passed around as an argument to those methods.
Obtaining information about the current user:
Authentication authentication = SecurityContextHolder
    .getContext()
    .getAuthentication();

User user = (User) authentication.getPrincipal();
6. Why do you need the intercept-url?
<intercept-url/> from <http/> is used to define the URL for the requests that we want to have some security constraints. This tag has a pattern attribute that accepts either ant style paths or regex for matching the required resources. Access attribute accepts comma-separated roles that will be allowed to access the resource (any match will grant the access).
7. In which order do you have to write multiple intercept-url’s?
Most specific patterns must come first and most general last. When matching the specified patterns defined by element intercept-URL against an incoming request, the matching is done in the order in which the elements are declared. So the most specific patterns should come first and the most general should come last.
<intercept-url pattern='/secure/a/**' access='ROLE_A'/>
<intercept-url pattern='/secure/b/**' access='ROLE_B'/>
<intercept-url pattern='/secure/**' access='ROLE_USER'/>
8. What does the ** pattern in an antMatcher or mvcMatcher do?
antMatcher(String antPattern) Allows configuring the HttpSecurity to only be invoked when matching the provided Ant-style pattern.
/admin/**matches any path starting with/admin.- The
antMatcher(…)method is the equivalent of the<intercept-url.../>element from XML, and equivalent methods are available to replace the configuration for the login form, logout URL configuration, and CSRF token support.
mvcMatcher(String mvcPattern) Allows configuring the HttpSecurity to only be invoked when matching the provided Spring MVC pattern. Generally mvcMatcher is more secure than an antMatcher.
antMatchers("/secured")matches only the exact/securedURLmvcMatchers("/secured")matches/securedas well as/secured/,/secured.html,/secured.xyz
public class SecurityConfig extends WebSecurityConfigurerAdapter {
  @Override
  protected void configure(HttpSecurity http) throws Exception {
    http
      .authorizeRequests()
      .antMatchers("/users/show/*")
      .hasRole("ADMIN") ...
  }
}
@EnableWebSecurity
public class DirectlyConfiguredJwkSetUri extends WebSecurityConfigurerAdapter {

  protected void configure(HttpSecurity http) {

    http
      .authorizeRequests()
        .mvcMatchers("/contacts/**").hasAuthority("SCOPE_contacts") .mvcMatchers("/messages/**").hasAuthority("SCOPE_messages")
        .anyRequest().authenticated()
        .and()
      .oauth2ResourceServer() .jwt();
  }
}
9. Why is a mvcMatcher more secure than an antMatcher?
MvcMatcher()uses Spring MVC’sHandlerMappingIntrospectorto match the path and extract variables.- They both implement RequestMatcher interface
MvcMatchercan also restrict the URLs by HTTP method
In which order do you have to write multiple intercept-url’s?
- Patterns are always evaluated in the order they are defined.
- Most specific patterns must come first and most general last.
10. Does Spring Security support password hashing? What is salting?
Spring Security uses PasswordEncoder for encoding passwords. This interface has a Md5PasswordEncoder that allows for obtaining hashes of the password – that will be persisted. The problem is that there are “dictionaries” of hashes available on the internet and some hacker may just match the hash with a record from those dictionaries and gain unauthorized (from system’s point of view authorized) access. To avoid that you can add some “salt” to the pass before it is hashed. Perfectly that salt (which is some appended string) is some random value – a simpler implementation is to use the user id.
There is an implementation of PasswordEncoder – BCryptPasswordEncoder that generates the salt automatically and thus you don’t have to bother about this.
11. Why do you need method security? What type of object is typically secured at the method level (think of its purpose, not its Java type).
If we secure only the web layer there may be a way to access the service layer in case we expose some REST endpoints. That’s why usually services are secured at the method level.
To apply security to lower layers of an application, Spring Security uses AOP. The respective bean is wrapped in a proxy that before calling the target method, first checks the credentials of the user and calls the method only if the user is authorized to call it.
Spring Security provides three different kinds of security annotations:
- Spring Security’s own
@Secured - JSR-250’s
@RolesAllowed - Expression-driven annotations, with
@PreAuthorizeand@PostAuthorize,@PreFilter, and@PostFilter
The @Secured and @RolesAllowed annotations are the simplest options, restricting access based on what authorities have been granted to the user.
More flexibility in defining security rules on methods, Spring Security offers @PreAuthorize and @PostAuthorize. And @PreFilter/@PostFilter filter elements out of collections returned from or passed into a method.
@Secured
- Method-level security must be enabled by annotating a configuration class (good practice is to annotate the Security Configuration class to keep all configurations related to security in one place) with
@EnableGlobalMethodSecurity(secured Enabled = true). Methods must be secured by annotating them with Spring Security annotation@Secured. - When
securedEnabledis true, a pointcut is created such that the Spring Security aspects will wrap bean methods that are annotated with@Secured. - One drawback of the
@Securedannotation is that it’s a Spring-specific annotation. If you’re more comfortable using annotations defined in Java standards, then perhaps you should consider using@RolesAllowedinstead.
@Configuration
 @EnableWebSecurity
 @EnableGlobalMethodSecurity(securedEnabled = true)
 public class SecurityConfig extends WebSecurityConfigurerAdapter { }


@Service
 @Transactional(readOnly = true, propagation = Propagation.REQUIRED)
 public class UserServiceImpl implements UserService {

   @Secured("ROLE_ADMIN")
   public User findById(Long id) {
     return userRepo.findOne(id);
   }
 }
JSR-250 annotations
- Method-level security must be enabled by annotating a configuration class (good practice is to annotate the Security Configuration class to keep all configurations related to security in one place) with
@EnableGlobalMethodSecurity(jsr250Enabled = true). jsr250EnabledandsecuredEnabledcan be used together- Methods must be secured by annotating them with
JSR-250annotations. - With
jsr250Enabledset to true, a pointcut will be effected such that any methods annotated with @RolesAllowed will be wrapped with Spring Security’s aspects. - The JSR 250 annotations are standards-based and allow simple role-based constraints to be applied but do not have the power of Spring Security’s native annotations.
- The
@RolesAllowedannotation is equivalent to@Securedin almost every way
@Configuration
 @EnableWebSecurity
 @EnableGlobalMethodSecurity(jsr250Enabled = true)
 public class SecurityConfig extends WebSecurityConfigurerAdapter { }


@Service
 @Transactional(readOnly = true, propagation = Propagation.REQUIRED)
 public class UserServiceImpl implements UserService {
   @RolesAllowed("ROLE_ADMIN")
   public User findById(Long id) {
     return userRepo.findOne(id);
   }
 }
Use SpEL to enable more security constraints on methods
@PreAuthorize: Restricts access to a method before invocation based on the result of evaluating an expression@PostAuthorize: Allows a method to be invoked, but throws a security exception if the expression evaluates to false@PostFilter: Allows a method to be invoked, but filters the results of that method based on an expression@PreFilter: Allows a method to be invoked, but filters input prior to entering the method
@Secured, @PreAuthorize, or @RolesAllowed annotations at the class level as well!.
Each of these annotations accepts a SpEL expression for its value parameter. If the expression evaluates to true, then the security rule passes; otherwise, it fails. The implications of a passing versus failing security rule differ depending on which annotation is in use. You need to enable them by setting @EnableGlobalMethodSecurity’s prePostEnabled attribute to true:
@Configuration
 @EnableWebSecurity
 @EnableGlobalMethodSecurity(prePostEnabled = true)
 public class SecurityConfig extends WebSecurityConfigurerAdapter {}


@Service
 @Transactional(readOnly = true, propagation = Propagation.REQUIRED)
 public class UserServiceImpl implements UserService {
   @PreAuthorize("hasRole(’USER’)")
   public void create(User user){}
 }
12. What do @Secured and @RolesAllowed do? What is the difference between them?
@Secured and @RolesAllowed are the same the only difference is @RolesAllowed is a standard annotation (i.e. not only spring security) whereas @Secured is spring security only.
There are annotations used to declare some methods as secured. The difference between them is that @Secured is a Spring annotation while @RolesAllowed is a JSR250 annotation. For enabling @Secured annotation you have to set the securedEnabled attribute of @EnagleGlobalMethodSecurity to true:
@Configuration
@EnableWebSecurity
@EnableGlobalMethodSecurity(securedEnabled=true) // for JSR-250 use jsr250enabled="true"
public class SecurityConfig {
.....
}
13. What do @PreAuthorized and @RolesAllowed do? What is the difference between them?
@Secured and @RolesAllowed prevent a method from being executed unless the user has the required authority. But their weakness is that they’re only able to make their decisions based on the user’s granted authorities.
With SpEL expressions guiding access decisions, far more advanced security constraints can be written.
@PreAuthorize( "(hasRole('ROLE_SPITTER') and #spittle.text.length() <= 140) or hasRole('ROLE_PREMIUM')")
public void addSpittle(Spittle spittle) { }
14. In which security annotation are you allowed to use SpEL?
- @PreAuthorize
- @PostAuthorize
- @PreFilter
- @PostFilter
For them to be accessible you have to enable the pre-post-attribute to “enabled” in the <global-method-security/> element.
hasRole(role): Returns true if the current user has the specified role.hasAnyRole(role1,role2): Returns true if the current user has any of the supplied roles.isAnonymous(): Returns true if the current user is an anonymous user.isAuthenticated(): Returns true if the user is not anonymous.isFullyAuthenticated(): Returns true if the user is not an anonymous or Remember-Me user.
15. Is it enough to hide sections of my output (e.g. JSP-Page or Mustache template)?
- You can use a special tag for hiding or not generating parts of JSP depending on the access level.
- You can also verify the user has access to the URL and only allow accessing to the view based on the user.
16. Spring Security offers a security tag library for JSP, would you recognize it if you saw it in an example?
Spring Security Taglibs provides basic support for accessing security information.
Enable it:
- Add
spring‐security‐taglibsdependency. - Declare it in the JSP page
 <-- before use, need to import the taglib at the top of our JSP file: -->
 <%@ taglib prefix="sec" uri="http://www.springframework.org/security/tags" %>
Tags - Authorize Tag
The authorize tag is used to determine whether the content written between the<sec:authorize>tags should be evaluated by the JSP. It can be used to display individual HTML elements—such as buttons—in the page, according to the granted authorities of the current user.- url attribute
ifAllGranted,ifNotGrantedandifAnyGrantedwere recently deprecated in favor of access attribute. “`jsp
- authenticate tag is
authenticationTheauthenticatetag is used to access the contents of the current Authentication token in SecurityContext. It can be used to display information about the current user in the page.<sec:authentication property="principal.username"/> <sec:authorize access="isAuthenticated()"> Welcome Back, <sec:authentication property="name"/> </sec:authorize>
Web Layer
1. MVC is an abbreviation for a design pattern. What does it stand for and what is the idea behind it?
Model–View–Controller software architectural pattern is designed to decouple three components, each of them can be easily swapped with a different implementation, and together they provide a fully functional user interface.
- Model: holds the current data and business logic.
- View: presenting data. User interacts with view.
- Controller: accept requests from view, issues commands to model; manipulate data from model, interacts with view.
Advantages:
- separation of concerns
- decoupling among MVC
- reuse of model and controllers with different views
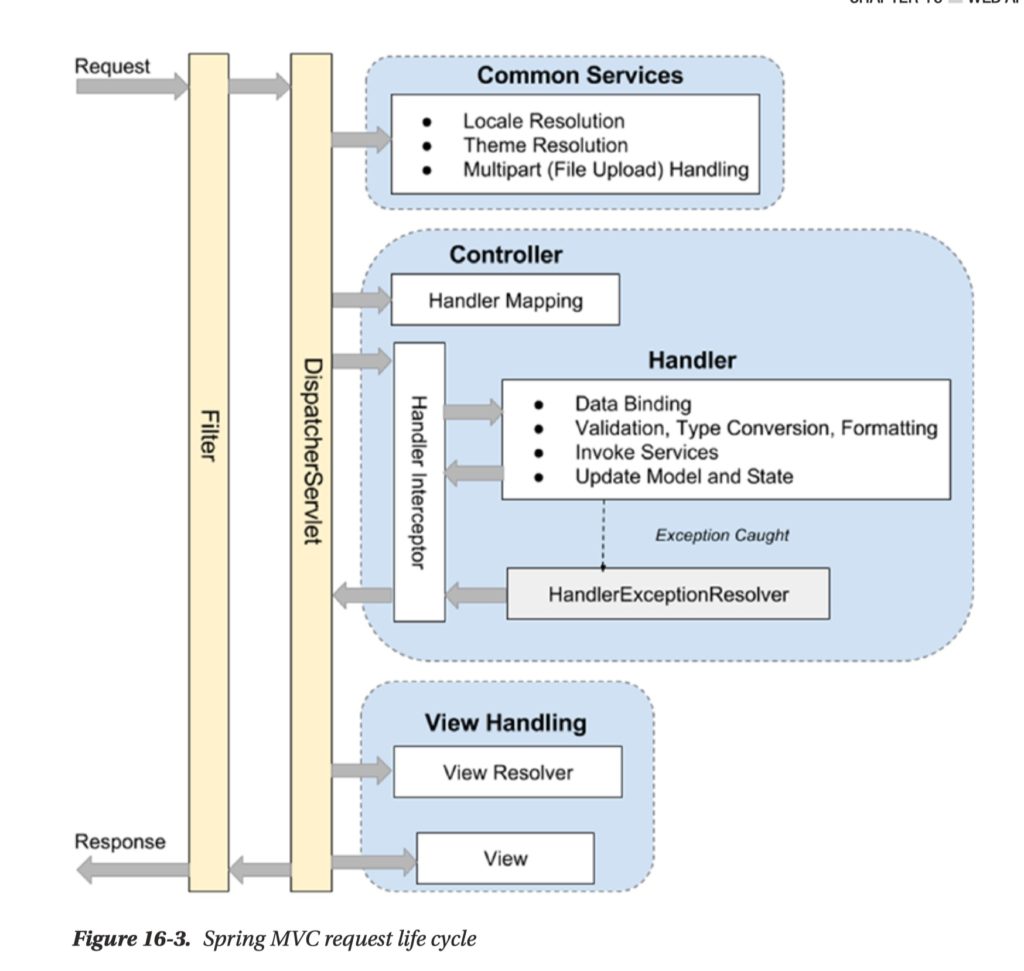
- Filter: The filter applies to every request. There are several commonly used filters.
- Dispatcher servlet: The servlet analyzes the requests and dispatches them to the appropriate controller for processing. This is where DispatcherServlet implement Front Controller design pattern.
- Common services: The common services will apply to every request to provide supports including i18n, theme, and file upload. Their configuration is defined in the DispatcherServlet’s WebApplicationContext.
- Handler mapping: This maps incoming requests to handlers (a method within a Spring MVC controller class). Spring MVC will automatically register a HandlerMapping implementation maps handlers based on HTTP paths expressed through the
@RequestMapping annotation at the type or method level within controller classes. - Handler interceptor: In Spring MVC, you can register interceptors for the handlers for implementing common checking or logic. For example, a handler interceptor can check to ensure that only the handlers can be invoked during office hours.
- Handler exception resolver: to deal with unexpected exceptions thrown during request processing by handlers.
- View Resolver: Spring MVC’s ViewResolver interface supports view resolution based on a logical name returned by the controller.
2. Do you need spring-mvc.jar in your classpath or is it part of spring-core?
- Yes, you do need this jar.
- It’s not part of Spring Core.
- It inclues Spring Core.
3. What is the DispatcherServlet and what is it used for?
DispatcherServlet is a front controller that receives all requests and delegates them to all the required controllers. But it is involved in more steps than just the first one. Among these are:
- receiving the initial request and handling it to the required controller
- checking for the required controller using handler mappings
- receiving the model and the view name from the controller and handling that to the required view after checking for that view with the view resolver (there are various types of resolvers for different view technologies – JSP, ThymeLeaf etc.)
- calling the view resolver
This servlet initializes a WebApplicationContext that is a child of root ApplicationContext.
Front controller pattern stands for a single servlet delegates responsibility for a request to other components of an application, to perform actual processing.Following front controller pattern, Spring MVC provides DispatcherServlet receiving all the requests and delegates the processing to request handlers (controllers). Once the processing is done, ViewResolver will render a view based on the view name.
A Spring web application may define multiple dispatcher servlets, each of which has its own namespace, its own Spring application context and its own set of mappings and handlers.
Used for- Recerives requests and delegates them to registered handlers
- Resolve views by mapping view-names to view instances
- Resolves exceptions
- Configuring the root
WebApplicationContext - Configuring the servlet filters required by Spring MVC
- Configuring the dispatcher servlets within the application
public class DemoWebAppInitializer
  extends AbstractAnnotationConfigDispatcherServletInitializer {

  @Override
  protected String[] getServletMappings() {
    return new String[] { "/" }; // Map DispatcherServlet to /
  }

  @Override
  protected Class<?>[] getRootConfigClasses() {
    return new Class<?>[] { SecurityConfig.class, DataServiceConfig.class };
  }

  @Override
  protected Class<?>[] getServletConfigClasses() { // Specify configuration class
    return new Class<?>[] { WebConfig.class };
  }

  @Override
  protected Filter getServletFilters() {
    CharacterEncodingFilter cef = new CharacterEncodingFilter();
    cef.setEncoding("UTF-8");
    cef.setForceEncoding(true);
    return new Filter{ new HiddenHttpMethodFilter(), cef};
  }
}
To make things more practical, Spring class AbstractAnnotationConfigDispatcherServletInitializer, an implementation of WebApplicationInitializer, was extended because it contains concrete implementations of methods needed for the configuration of Spring web applications that use Java-based Spring configuration.
getRootConfigClasses(): A root application context of typeAnnotationConfigWebApplicationContextwill be created.getServletConfigClasses(): A web application context of type AnnotationConfigWebApplicationContext will be createdgetServletMappings(): The DispatcherServelt’s mappings (context) are specified by the array of strings returned by this method.getServletFilters(): As the name of the methods says, this one will return an array of implementations of javax.servlet.Filter that will be applied to every request
By providing an empty class that extends AbstractSecurityWebApplicationInitializer, you are basically telling Spring that you want DelegatingFilterProxy enabled, so springSecurityFilterChain will be used before any other registered javax.servlet.Filter.
- Any class that extends
AbstractAnnotationConfigDispatcherServletInitializerwill automatically be used to configureDispatcherServletand the Spring application context in the application’s servlet context. - This initializer create a
DispatcherServletand aContextLoaderListener. getServletMappings()identifies one or more paths that DispatcherServlet will be mapped to. It will handle all requests coming into the application.getRootConfigClasses()is called internally, and the configuration classes are used to create the root application context, which will become the parent ApplicationContext that contains bean definitions shared by all child (DispatcherServlet) contexts.
- /static
- /public
- /resources
- /META-INF/resources
4. Is the DispatcherServlet instantiated via an application context?
DispatcherServlet can be instantiated in 2 different ways and in both it is initialized by the servlet container:- Defining it in XML, specifically in the web.xml of the project.
- Using Java – since Servlet 3.0 you can use the ServletContext.addServlet() method for registering the DispatcherServlet in ServletContext. This is Done in more ways; the one I like is extending AbstractAnnotationConfigDispatcherServletInitializer which allows you to specify the web configuration class and the root application class at one time.
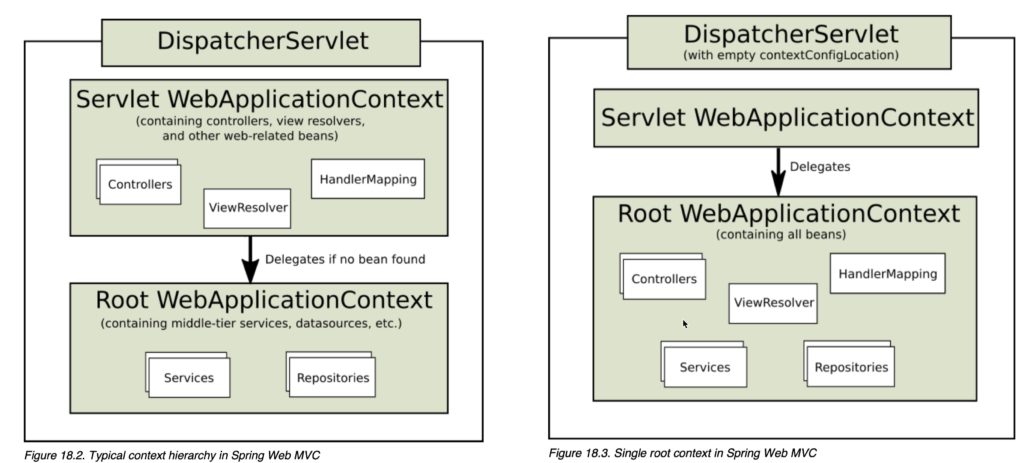
In short: the DispatcherServlet is not instantiated via an application context. It is instantiated before any application context is created. parent ApplicationContext is creted by ContextLoaderListener, child ApplicationContext is created by Spring MVC DispatcherServlet.
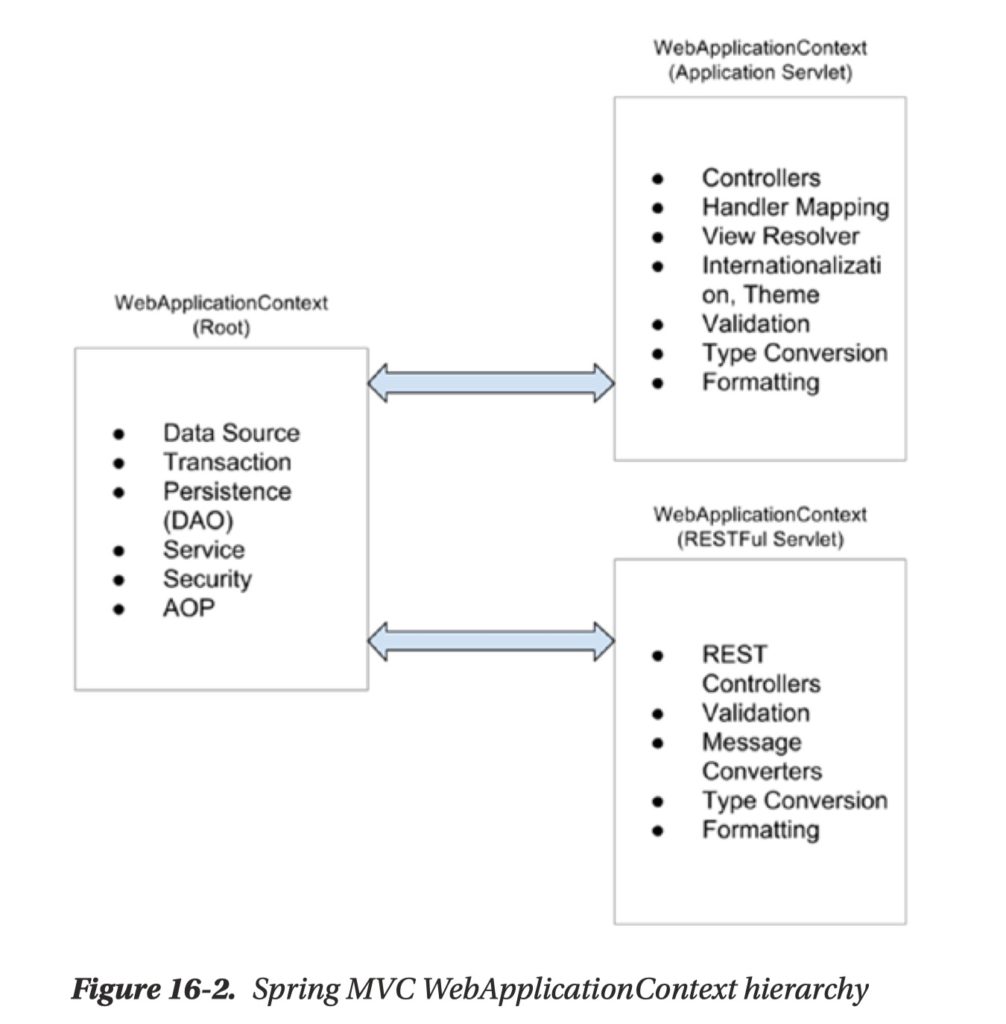
Parent ApplicationContext
- It is also called RootApplicationContext.
- In a web application, parent ApplicationContext is usually created using
org.springframework.web.context.ContextLoaderListener. - it includes the application-level configurations such as the back-end data source, security, and service and persistence layer configuration.
- Say, it contains all non-web beans.
- It’s available to all servlet-level WebApplicationContexts.
- It is also called the web context or the DispatcherServletContext.
- It is created by Spring MVC
DispatcherServlet. - Beans in the web context can access the beans in the parent context, but not conversely.
- One servlet supports the user interface (called the application servlet), and
- the other provides services in the form of RESTful-WS to other applications (called the RESTful servlet).
DispatcherServlet can be instantiated in 2 different ways and in both it is initialized by the servlet container:
- XML
- Java bean
5. What is a web application context? What extra scopes does it offer?
WebApplicationContext is a Spring application context for web applications.Comparing to ApplicationContext
- WebApplicationContext has all the properties of a regular Spring application contex, given that the
WebApplicationContextinterface extends theApplicationContextinterface - WebApplicationContext can access the Servlet Context.
- You can always look up the WebApplicationContext using static methods from ServletContext.
- request: each http request
- session: each http session
- application: per
ServletContext
WebApplicationContext can also access the Servlet Context by implementing the ServletContextAware interface
public interface ServletContextAware extends Aware {
  void setServletContext(ServletContext servletContext);
}
6. What is the @Controller annotation used for?
@Controller annotation is used to mark a class as a controller to be used by the DispatcherServlet to process requests. @Controller annotation is annotated by @Component so in case your DispatcherServlet creates a WebApplicationContext that is configured by component-scanning, that configuration will pick @Controller annotated classes automatically.
You can define controllers without component-scanning and in that case, you will have to implement the Controller interface and override handleRequest() method.
The core interface in Spring MVC is Controller. Spring simply requires that- you implement the Controller interface
- or annotate your controller class with the @Controller annotation
The @EnableWebMvc annotation enables the annotation support for Spring MVC, that is, the @Controller annotation.
7. How is an incoming request mapped to a controller and mapped to a method?
When a request is issued to the application:
- DispatcherServlet of the application receives the request.
- DispatcherServlet maps the request to a method in a controller.
- DispatcherServlet holds a list of classes implementing the
HandlerMappinginterface. - DispatcherServlet dispatches the request to the controller.
- The method in the controller is executed.
8. What is the difference between @RequestMapping and @GetMapping?
@GetMapping equals to ` @RequestMapping(method = RequestMethod.GET)`
9. What is @RequestParam used for?
The request parameter can be retrieved through a method argument annotated with@RequestParam
You can use the @RequestParam annotation to bind Servlet request parameters.
By default, method parameters that use this annotation are required, but you can specify that a method parameter is optional by
- setting the
@RequestParamannotation’s required flag tofalseor - by declaring the argument with an
java.util.Optionalwrapper.
NB. use of @RequestParam is optional. By default, any argument that is a simple value type (as determined by BeanUtils#isSimpleProperty) and is not resolved by any other argument resolver, is treated as if it were annotated with @RequestParam.
10. What are the differences between @RequestParam and @PathVariable?
@PathVariable instructs Spring MVC to bind the path variable within the URL – for example, http:// localhost:8080/singer/1 into the id argument of the findSingerById() method. – Note that for the id argument, the type is Long, while Spring’s type conversion system will automatically handle the conversion from String to Long for us.
@RequestMapping(value = "/{userId}", method = RequestMethod.GET)
public String show(@PathVariable("userId") Long id, Model model) {
  // ...
}
Differences:
http://localhost:8080/greeting?firstName=dammy&lastName=goodhttp://localhost:8080/firstname/dammy/lastname/good
11. What are some of the parameter types for a controller method?
- WebRequest
- ServletRequest
- ServletResponse
- HttpSession
- Principle
- HttpMethod
- Locale
- TimeZone
- java.io
- HttpEntity
- Collections, like Map<>
- Errors
- BindingResult
- SessionStatus
- UriComponentsbuilder
12. What other annotations might you use on a controller method parameter? (You can ignore form-handling annotations for this exam)
- @PathVariable
- @MatrixVariable: key-value pair in url
- @RequestParam
- @CookieValue
- @RequestBody
- @RequestHeader
- @RequestPart: “multipart/form-data”
- @ModelAttribute
- @SessionAttribute
- @SessionAttributes
- @RequestAttribute
13. What are some of the valid return types of a controller method?
- HttpEntity
- ResponseEntity
- HttpHeaders
- String
- View
- Map<>
- ModelAndView
- void
- CompletableFuture | CompletionStage: Asynchronous
14. What is a View and what’s the idea behind supporting different types of View?
View is responsible for presenting the data of the application to the user.
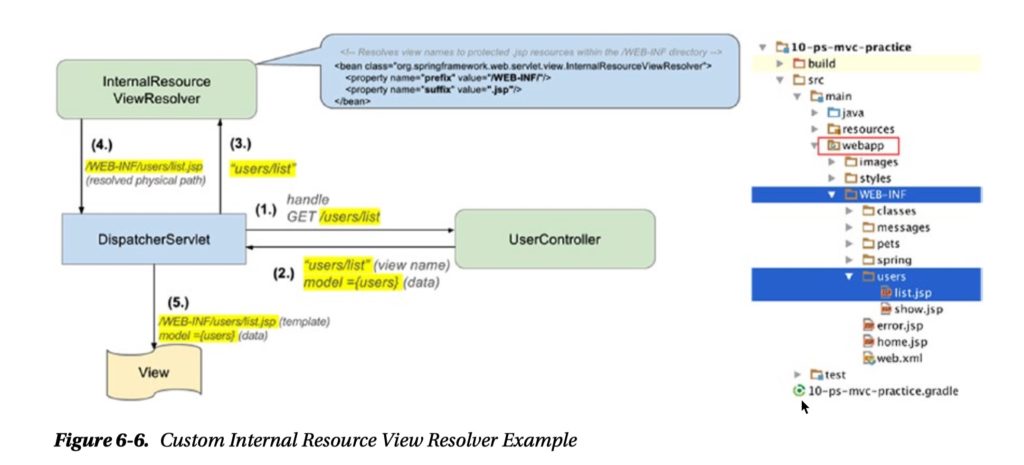
The user interacts with the view. The core view resolver provided by Spring is theInternalResourceViewResolver; it is the default view resolver.
Inside spring-webmvc.jar there is a file called DispatcherServlet.properties, and in it all default infrastructure beans are declared.
Spring MVC provides several view resolvers to support multiple view technologies, such as JSP, Velocity, FreeMarker, JSF, Tiles, Thymeleaf, and so on.
supporting different types of views:
- Present model in different formats
- Adapt view to different platforms
- Use different view-technology
15. How is the right View chosen when it comes to the rendering phase?
View Resolution Sequence- Controller returns logical view name to
DispatcherServlet ViewResolversare asked in sequence (based on their Order)- If ViewResolver matches the logical view name then returns which View should be used to render the output. If not, it returns null and the chain continues to the next ViewResolver
- Dispatcher Servlet passes the model to the Resolved View and it renders the output
- If the view-name cannot be resolved, then an exception.
16. What is the Model?
- An instance of an object that implements the Model interface from the Spring framework
- It is a collection of key-value pairs.
- The contents of the model represents the state of the application and contains information that will be used when rendering the view.
- The value-objects contained in the model may also contain business logic implemented in the classes instantiated to create those objects.
17. Why do you have access to the model in your View? Where does it come from?
- It contains information that will be used when rendering the view.
- The model is passed as a parameter to the view when the dispatcher servlet asks the selected view to render itself as part of processing a request.
18. What is the purpose of the session scope?
A session-scoped Spring bean exists for the lifetime of a HTTP session. This enables creating, for instance, a session-scoped Spring bean that contains a shopping cart. The bean instance will remain the same during all requests the user makes within one and the same HTTP session.19. What is the default scope in the web context?
Singleton Scope is default scope.20. Why are controllers testable artifacts?
The goal of Spring MVC Test is to provide an effective way to test controllers by performing requests and generating responses through the actual DispatcherServlet.
The Spring MVC Test Framework also provide full Spring MVC runtime behavior for tests without running in a servlet container.
@RunWith(SpringRunner.class)
@WebMvcTest(HomeController.class)
public class HomeControllerTest {

  @Autowired
  private MockMvc mockMvc;// Injects MockMvc

  @Test public void testHomePage() throws Exception {

    mockMvc.perform(get("/"))
      .andExpect(status().isOk())
      .andExpect(view().name("home"))
      .andExpect(content().string( containsString("Welcome to...")));
  }
}
21. What does a ViewResolver do?
- A
ViewResolver, that is a class implementing the ViewResolver interface, attempts to, given a view name and a locale, find a View. - A
ViewResolverattempts to map a view name to a View. - The core view resolver provided by Spring is the
InternalResourceViewResolver; it is the default view resolver.
@Configuration
public class AppConfig {

  @Bean
  InternalResourceViewResolver viewResolver(){
    InternalResourceViewResolver resolver = new InternalResourceViewResolver();
    resolver.setPrefix("/WEB-INF/views");
    resolver.setSuffix(".jspx" );
    resolver.setRequestContextAttribute("requestContext");

    return resolver;
  }
}
Spring Boot
1. What is Spring Boot?
Spring Boot is a preconfigured framework that works on top of the Spring Framework. It simplifies configuration for a Spring application by combining a group of common or related dependencies into single dependencies. Spring Boot is NOT a framework but rather, an easy way of creating stand-alone applications with little or no configurations.

Spring Boot Starters is one of the major key features or components of the Spring Boot Framework. The main responsibility of Spring Boot Starter is to combine a group of common or related dependencies into single dependencies. We need to define a lot of dependencies in our build files. It is a very tedious task for a Developer.

Spring Boot is an opinionated framework that helps developers build stand-alone and production-grade Spring-based applications quickly and easily.
The primary goals of Spring Boot
- Provide a radically faster and widely accessible getting-started experience for all Spring development.
- Be opinionated out of the box but get out of the way quickly as requirements start to diverge from the defaults.
- Provide a range of non-functional features that are common to large classes of projects, such as
- embedded servers,
- security,
- metrics,
- health checks,
- externalized configuration
- Absolutely no code generation and no requirement for XML configuration.
The key features include:
- Spring Boot starters, easy dependency management
- Spring Boot autoconfiguration, with sensible defaults
- Elegant configuration management
- Spring Boot actuator
- Easy-to-use embedded servlet container support
- ApplicationRunner or CommandLineRunner
ApplicationRunner or CommandLineRunner
Spring Boot allows you to execute code before your application starts. Spring Boot has the ApplicationRunner and the CommandLineRunner interfaces that expose the run methods. Both interfaces offer a single run method, which is called just before SpringApplication.run(…) completes.
CommandLineRunner exposes the public void(String... args) method
$ ./mvnw spring-boot:run -Drun.arguments="arg1,arg2"
ApplicationRunner exposes the public void run(ApplicationArguments args) method. if you want to have more control over the arguments, implement this interface.
$ ./mvnw spring-boot:run -Drun.arguments="arg1,arg2"
@SpringBootApplication
public class SpringBootSimpleApplication implements CommandLineRunner, ApplicationRunner{

  public static void main(String[] args) throws IOException {
    SpringApplication.run(SpringBootSimpleApplication.class, args);
  }

  @Override
  public void run(ApplicationArguments args) throws Exception {
    args.getNonOptionArgs()
      .forEach(file -> log.info(file));
  }

  @Override
  public void run(String... args) throws Exception {
    for(String arg:args) {
      log.info(arg);
    }
  }
}
2. What are the advantages of using Spring Boot?
-
Spring Boot starters
These starters are pre-configured with the most commonly used library dependencies so you don’t have to search for the compatible library versions and configure them manually. E.g., thespring-boot-starter-data-jpastarter module includes all the dependencies required to use Spring Data JPA, along with Hibernate library dependencies, as Hibernate is the most commonly used JPA implementation. - Spring Boot autoconfiguration. Spring Boot configures various components automatically, by registering beans based on various criteria. The criteria can be:
- Availability of a particular class in a classpath
- Presence or absence of a Spring bean
- Presence of a system property
- Absence of a configuration file
For example, if you have the spring-webmvc dependency in your classpath, Spring Boot assumes you are trying to build a SpringMVC-based web application and automatically tries to register DispatcherServlet if it is not already registered.
- Elegant configuration management
- Spring supports externalizing configurable properties using the
@PropertySourceconfiguration - Spring Boot takes it even further by using the sensible defaults and powerful type-safe property binding to bean properties
- Spring Boot supports having deparate configuration files for different profiles without requiring much configuration.
- Spring supports externalizing configurable properties using the
- Spring Boot actuator. It provides a wide variety of such production-ready features:
- Can view the application bean configuration details
- Can view the application URL mappings, environment details, and configuration parameter values
- Can view the registered health check metrics
- Easy-to-use embedded servlet container support.
It creates a JAR type module and embed the servlet container in the application to be a self-contained deployment unit.
3. Why is it “opinionated”?
It makes assumptions and configures things for your application based on the dependencies in your classpath. By doing this, developers don’t have to waste time on configuration but instead, use their time on developing features.
- It follows the “Convention Over Configuration” approach.
- It pre-configures Spring app by reasonable defaults.
- It’s highly customizable
Most of Spring application configuration is based on a common application.properties or application.yml file. If none is specified, it already has those property’s values as defaults.
4. What things affect what Spring Boot sets up?
Starters that are added to dependencies – only if @EnableAutoConfiguration or @SpringBoot application are used.
- Spring applications need complex configuration
- Spring Boot addresses the problem by eliminating the need to manually set up the boilerplate configuration.
- Spring Boot takes an opinionated view of the application and configures various components automatically, by registering beans based on various criteria. The criteria can be:
- Availability of a particular class in a classpath:
@ConditionalOnClass, on the other hand@ConditionalOnMissingBean - Presence of a system property
- Absence of a configuration file
- Presence or absence of a Spring bean
@ConditionalOnBean,@ConditionalOnMissingBean
- Availability of a particular class in a classpath:
How does it work? How does it know what to configure?
It scans dependencies in the classpath and then initializes “maybe” required beans. For example, if you have spring data on your classpath, then Spring Boot will create JPA repository bean.
Spring Boot provides many custom @Conditional annotations to meet developers’ autoconfiguration needs based on various criteria, each of which can be used to control the creation of Spring beans.
- A specific class is present in the classpath
- A Spring bean of a certain type isn’t already registered in the ApplicationContext
- A specific file exists in a location
- A specific property value is configured in a configuration file
- A specific system property is present/absent
- Example:
@ConditionalOnClass@ConditionalOnMissingClass@ConditionalOnBean@ConditionalOnMissingBean@ConditionalOnProperty@ConditionalOnResource@ConditionalOnWebApplication@ConditionalOnNotWebApplication
5. How are properties defined? Where is Spring Boot’s default property source?
Properties are usually defined in property files. Spring Boot default property source is application.properties or application.yml
6. Would you recognize common Spring Boot annotations and configuration properties if you saw them in the exam?
Spring Boot annotations include:
- @SpringBootAnnotation – is sum of 3 annotation: @Configuration, @EnableAutoConfiguration, @ComponentScan
- @EnableAutoConfiguration
7. What is the difference between an embedded container and a WAR?
An embedded container is a server that comes with the resulting application whereas WAR is an archive that can be deployed on an external container.
A Standalone app uses your resources, web app executes on the server, rendering is done on your system.
An embedded container is packaged in the application JAR-file and will contain only one single application.
A WAR-file will need to be deployed to a web container, such as Tomcat, before it can be used. The web container to which the WAR-file is deployed may contain other applications.
Deployable WAR
- The first thing you do is change the
packagingtype.<packaging>war</packaging>in Mavenapply plugin: 'war'in Gradle
-
you need to add
spring-boot-starter-tomcatas the provided scope so that it won’t get packaged inside the WAR file. - Finally, you need to provide a
SpringBootServletInitializersub-class and override itsconfigure()method. You can simply make your application’s entry point class extendSpringBootServletInitializer.@SpringBootApplication public class SpringbootWebDemoApplication extends SpringBootServletInitializer { @Override protected SpringApplicationBuilder configure(SpringApplicationBuilder application) { return application.sources(SpringbootWebDemoApplication.class); } }Now running the Maven/Gradle build tool will produce a WAR file that can be deployed on an external server.
8. What embedded containers does Spring Boot support?
- Tomcat,
- Jetty,
- Undertow servers.
Use Jettry rather than Tomcat
<dependencies>
    <dependency>
        <groupId>org.springframework.boot</groupId>
        <artifactId>spring-boot-starter-web</artifactId>
        <exclusions>
            <exclusion>
                <groupId>org.springframework.boot</groupId>
                <artifactId>spring-boot-starter-tomcat</artifactId>
            </exclusion>
        </exclusions>
    </dependency>
    <dependency>
        <groupId>org.springframework.boot</groupId>
        <artifactId>spring-boot-starter-jetty</artifactId>
    </dependency>
</dependencies>
9. What does @EnableAutoConfiguration do?
@EnableAutoConfiguration – turns on Spring Boot autoconfiguration. It auto-configures the beans that are present in the classpath. This simplifies the developer’s work by guessing the required beans from the classpath and configure it to run the application. This annotation is part of the spring boot project.
For example, if you have the tomcat jar file in the classpath, then Spring Boot will configure the tomcat server. As a developer, you don’t have to do anything.
Auto-configuration tries to be as intelligent as possible and will back-away as you define more of your own configuration.
It’s a Spring Boot specific annotation. It enables the autoconfiguration of Spring ApplicationContext by:
- scanning the classpath components and
- registering the beans that match various conditions.
Spring Boot provides various autoconfiguration classes in spring-boot-autoconfigure{version}.jar, and they are typically:
- annotated with
@Configurationto mark it as a Spring configuration class and - annotated with
@EnableConfigurationPropertiesto bind the customization properties and one or more conditional bean registration methods.
10. What about @SpringBootApplication?
@SpringBootApplication does 3 things:
- turns on autoconfig
- enables auto-scanning
- defines a configuration class
The package of the class that is annotated with @EnableAutoConfiguration, usually via @SpringBootApplication, has specific significance and is often used as a ‘default’. For example, it will be used when scanning for @Entity classes. It is generally recommended that you place @EnableAutoConfiguration (if you’re not using @SpringBootApplication) in a root package so that all sub-packages and classes can be searched.
It’s a top-level annotation designed to use only at class level. It’s a convenience annotation that equivalent to declaring the following three:
-
@EnableAutoConfiguration: enable Spring Boot’s auto-configuration mechanism -
@ComponentScan: enable @Component scan on the package where the application is located -
@Configuration: allow to register extra beans in the context or import additional configuration classes
11. Does Spring Boot do component scanning? Where does it look by default?
Yes, Spring Boot does component scanning. Spring Boot scans all sub-packages from the root package. It also scans packages that have at least one configuration class.
-
@ComponentScanor@SpringBootApplicationenables component scanning. -
If no component scanning attribute defined, it will scan only the package in which the class annotated.
-
The base package(s) which to scan for components can be specified using the basePackages element in the
@ComponentScanannotation or by specifying one or more classes that are located in the base package(s)
@SpringBootApplication(scanBasePackageClasses = HelloWorld.class)
public class OrdersDBConfig {}


@Configuration
@EnableAutoConfiguration
@ComponentScan(basePackages = "com.mycompany.myproject")
@EntityScan(basePackageClasses=Person.class)
public class Application {
  public static void main(String[] args) {
    SpringApplication.run(Application.class, args);
  }
}
12. What is a Spring Boot starter POM? Why is it useful?
Starter POM is a set of dependencies that work as some templates for dependencies used for different tasks.
Starter POMs are that all the dependencies needed to get started with a certain technology have been gathered.
A developer can rest assured that there are no dependencies missing and that all the dependencies have versions that work well together.
All official starters follow a similar naming pattern: spring-boot-starter-*, where * is a particular type of application.
Spring Boot supports both Java properties and YML files. Would you recognize and understand them if you saw them?
Java properties files come in application.properties file; YAML come in application.yml
Can you control logging with Spring Boot? How?
Yes. First you add the required dependencies to the classpath and then configure the required framework using application.properties or framework-specific configuration file placed in the classpath.
Spring Boot has no mandatory logging dependency, except for the Commons Logging API, which is typically provided by Spring Framework’s spring-jcl module.
Spring Boot uses Commons Logging internally by default, but it leaves the underlying implementation open.
Default configurations are provided for
- Java Util Logging,
- Log4J2, and
- Logback
By default, if you use the “Starters”, Logback is used for logging.
By default, ERROR, WARN, and INFO level messages are logged. In application.properties add: debug=true to enable debug level logging.
Logging is initialized before the application context, so it is impossible to control logging from using @PropertySources in @Configuration classes.
System properties and conventional Spring Boot external configuration files should be used. Depending on the logging system that is used, Spring Boot will look for the specific configuration files.
The logfile name to use by default by Spring Boot can be configured using the logging.file Spring Environment variable.