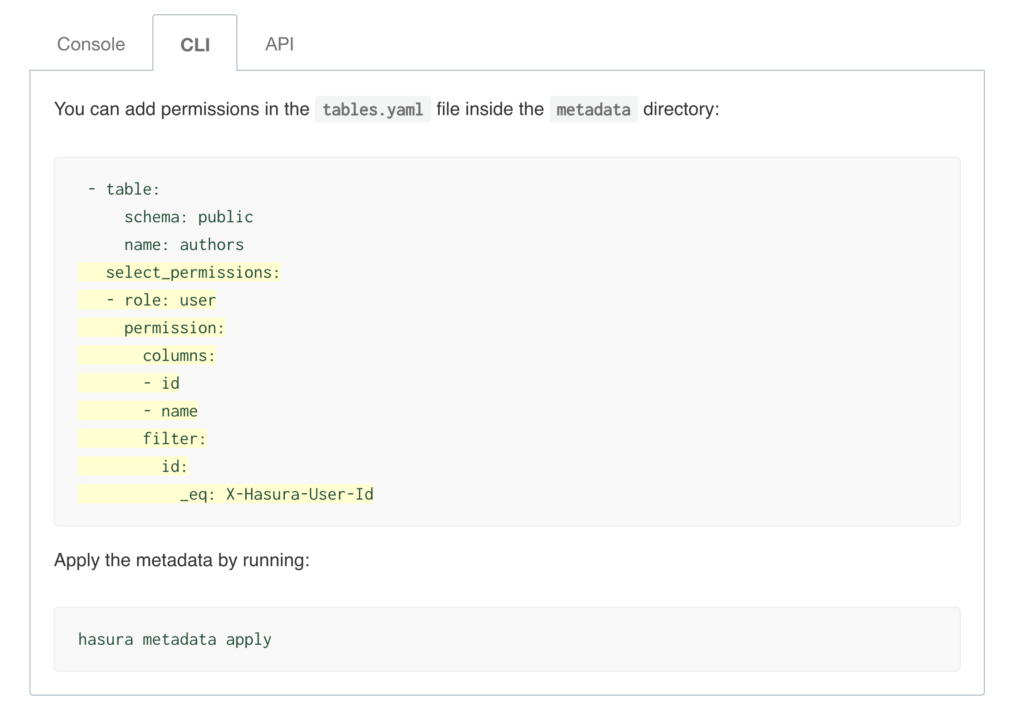
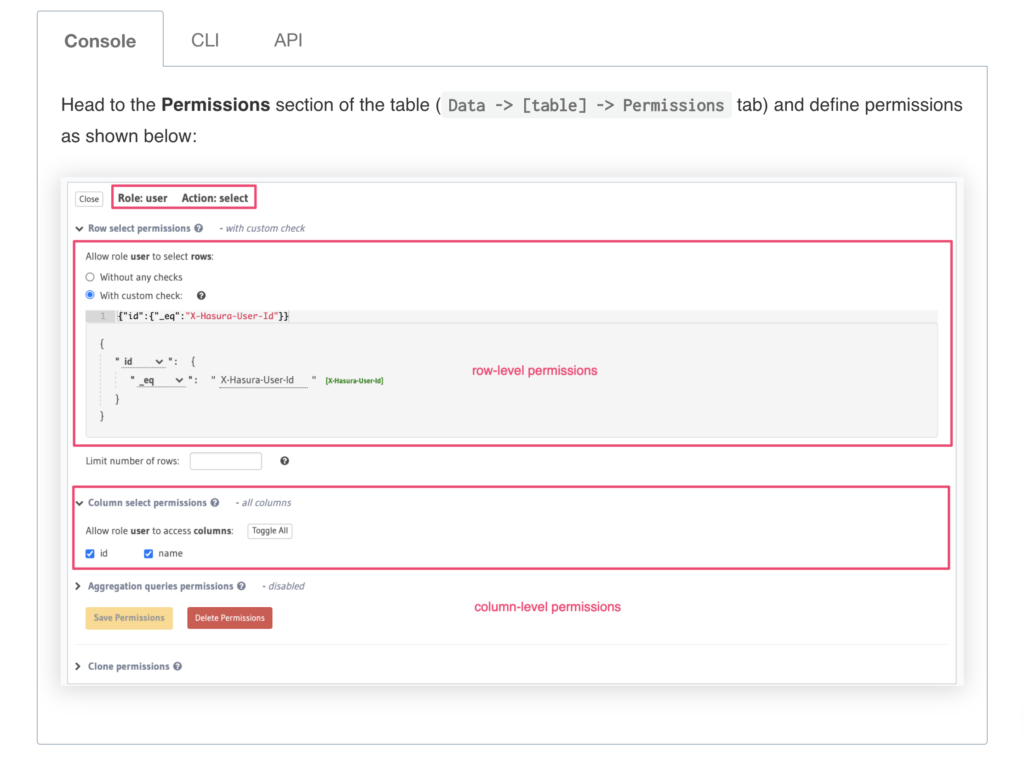
Hasura allows you to define role-based access control rules for each of the models/tables that you use. Access control rules help in restricting querying on a table based on certain conditions.
log4j
Logging is a very important part of software development. A well-written logging code offers quick debugging, easy maintenance, and structured storage of an application’s runtime information.
Logging does have its drawbacks also. It can slow down an application. If too verbose, it can cause scrolling blindness. To alleviate these concerns, log4j is designed to be reliable, fast and extensible.
Since logging is rarely the main focus of an application, the log4j API strives to be simple to understand and to use.
Log4j is fast, threadsafe, uses multiple levels, namely ALL, TRACE, DEBUG, INFO, WARN, ERROR and FATAL and more.
In this tutorial, we are going to learn how to use log4j in your application.
Include the log4j jar file in your classpath or include this dependency in your maven file
<dependency>
    <groupId>log4j</groupId>
    <artifactId>log4j</artifactId>
    <version>1.2.17</version>
</dependency>
Create a log4j property file and put it into the root folder.
log4j.rootLogger=TRACE, consoleAppender, fileAppender

log4j.appender.consoleAppender=org.apache.log4j.ConsoleAppender
log4j.appender.consoleAppender.layout=org.apache.log4j.PatternLayout
log4j.appender.consoleAppender.layout.ConversionPattern=[date: %d{yyyy-MM-dd HH:mm:ss}] [priority: %-5p] [thread: %t] [memberUuid: %X{memberUuid}]  [class&line: %c{2}.%M:%L] [msg: %m]%n

# log to file
log4j.appender.fileAppender=org.apache.log4j.RollingFileAppender
log4j.appender.fileAppender.layout=org.apache.log4j.PatternLayout
log4j.appender.fileAppender.layout.ConversionPattern=[date: %d{yyyy-MM-dd HH:mm:ss}] [priority: %-5p] [thread: %t] [memberUuid: %X{memberUuid}]  [class&line: %c{2}.%M:%L] [msg: %m]%n
log4j.appender.fileAppender.File=application.log
But let’s break down the ConversionPattern layout. You can refer to its documentation here.
%d{yyyy-MM-dd HH:mm:ss} = Date and time format, refer to SimpleDateFormat JavaDoc.
%-5p = The logging priority, like DEBUG or ERROR. The -5 is optional, for the pretty print format.
%c{1} = The logging name we set via getLogger(), refer to log4j PatternLayout guide.
%M = Used to output the method name where the logging request was issued. WARNING Generating caller location information is extremely slow and should be avoided unless execution speed is not an issue.
%L = The line number from where the logging request.
%t = Used to output the name of the thread that generated the logging event.
%m%n = The message to log and line break.
%X = Used to output the MDC (mapped diagnostic context) associated with the thread that generated the logging event. The X conversion character must be followed by the key for the map placed between braces, as in %X{clientNumber} where clientNumber is the key. The value in the MDC corresponding to the key will be output.
For an application to have appropriate logs, you must have at least a console logs and a file containing logs. You can see the logs at real time while debugging and also you can go back to a previous log for a specific point in time.
You can even save your logs into a database
# Define the root logger with appender file
log4j.rootLogger = DEBUG, DB

# Define the DB appender
log4j.appender.DB=org.apache.log4j.jdbc.JDBCAppender

# Set JDBC URL
log4j.appender.DB.URL=jdbc:mysql://localhost/DBNAME

# Set Database Driver
log4j.appender.DB.driver=com.mysql.jdbc.Driver

# Set database user name and password
log4j.appender.DB.user=user_name
log4j.appender.DB.password=password

# Set the SQL statement to be executed.
log4j.appender.DB.sql=INSERT INTO LOGS VALUES('%x','%d','%C','%p','%m')

# Define the layout for file appender
log4j.appender.DB.layout=org.apache.log4j.PatternLayout
create a database table
CREATE TABLE LOGS
   (USER_ID VARCHAR(20)    NOT NULL,
    DATED   DATE           NOT NULL,
    LOGGER  VARCHAR(50)    NOT NULL,
    LEVEL   VARCHAR(10)    NOT NULL,
    MESSAGE VARCHAR(1000)  NOT NULL
);
Create a Logger field.
Logger log = Logger.getLogger(MainLog.class);
Log levels
Trace – Designates finer-grained informational events than the DEBUG.
Debug – Designates fine-grained informational events that are most useful to debug an application.
Info – Designates informational messages that highlight the progress of the application at coarse-grained level.
Warn – Designates potentially harmful situations.
Error – Designates error events that might still allow the application to continue running.
Fatal – Designates very severe error events that will presumably lead the application to abort.
All – All levels including custom levels.
Off – The highest possible rank and is intended to turn off logging.
import org.apache.log4j.PropertyConfigurator;

import org.apache.log4j.Logger;
import org.apache.log4j.PropertyConfigurator;

public class MainLog {

    static Logger log = Logger.getLogger(MainLog.class);

    public static void main(String[] args) {

        PropertyConfigurator.configure("log4j.properties");

        log.trace("Trace Message Logged !!!");
        log.debug("Debug Message Logged !!!");
        log.info("Info Message Logged !!!");
        log.error("Error Message Logged !!!");
        log.fatal("Fatal Message Logged !!!");

    }

}
[date: 2020-10-18 01:58:20] [priority: TRACE] [thread: main] [memberUuid: ]  [class&line: lovemesomecoding.MainLog.main:16] [msg: Trace Message Logged !!!]
[date: 2020-10-18 01:58:20] [priority: DEBUG] [thread: main] [memberUuid: ]  [class&line: lovemesomecoding.MainLog.main:17] [msg: Debug Message Logged !!!]
[date: 2020-10-18 01:58:20] [priority: INFO ] [thread: main] [memberUuid: ]  [class&line: lovemesomecoding.MainLog.main:18] [msg: Info Message Logged !!!]
[date: 2020-10-18 01:58:20] [priority: ERROR] [thread: main] [memberUuid: ]  [class&line: lovemesomecoding.MainLog.main:19] [msg: Error Message Logged !!!]
[date: 2020-10-18 01:58:20] [priority: FATAL] [thread: main] [memberUuid: ]  [class&line: lovemesomecoding.MainLog.main:20] [msg: Fatal Message Logged !!!]
Hasura – Authorization
Roles
Every table/view can have permission rules for users based on their role. By default, there is an admin role that can perform any operation on any table. You can define roles and then create permissions for each of those roles.
Permission rules can also refer to as session variables. Session variables are key-value pairs in the JWT custom claims. These session variables are used to defined permissions for rows and columns of a table. Permissions are essentially a combination of boolean expressions and column selections that impose constraints on the data being returned or modified.
Row level permission
Limit access to a subset of the rows in the table based on this permission. Row-level permissions are essentially boolean expressions that, when evaluated against any row, determine access to it. These permissions are constructed from the values in columns, session variables and static values to build this boolean expression.
Column level permission
For the rows that are accessible based on the above, limit access to a subset of the columns based on this permission rule.


You can also allow users to have access all rows and all columns of a particular table. You can do that by selecting “Without any checks” option
Hasura – Triggers
Has
Hasura – Deployment
Deploying or Running Hasura on AWS ECS Fargate
Create a Task Definition
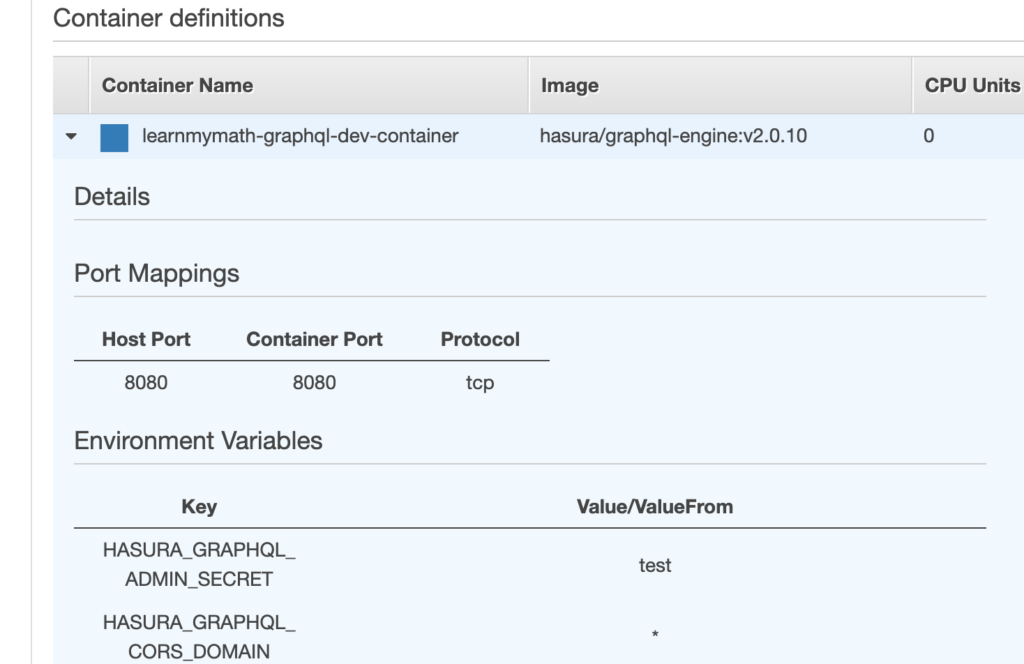
- Use the right hasura docker image

- Environment variables must be present
- Host port and Container port must be the same to work. I tried having container port different from host port and that did not work for me
- Size

- Leave “Operating system family” alone.
- Leave entrypoint or any command alone.
- Make sure that the ecs execution role has previliges to access other aws parties your app needs. Things such as secret manager, sqs, email, etc.
Create a Service using your Task Definition
- Fill in the Service details
- For security group, create a new security and make sure that group has access to and from database, third party APIs, or other aws services that call your service
- Make sure you only include AZ zones that are allowed by your load balancer.
- Add load balancer
- Add health check /ping
- Allow your server to boot up and be healthy before load balancer starts checking for its health
Hasura – Query