Hasura – Authentication
Handling authentication correctly is a key step in ensuring the security of your application in production. This is a very important component of any backend system. There are multiple ways to be authenticated but in this post I will focus on JWT authentication.
Ways to authenticate users for your application:
- JSON web tokens (JWT) based authentication: Use this method if you are authenticating your end-users using a JWT based authentication provider like Auth0 or Firebase or AWS Cognito.
- Webhook based authentication: Use this method if you need to roll out a custom authentication solution.
- Unauthenticated access: Use this method if you want to provide anonymous access to some data, for example if you want to make a public feed of events.
- Admin secret based authentication: Use this method if you are doing server to server communication and the client is a trusted client.
JWT based authentication
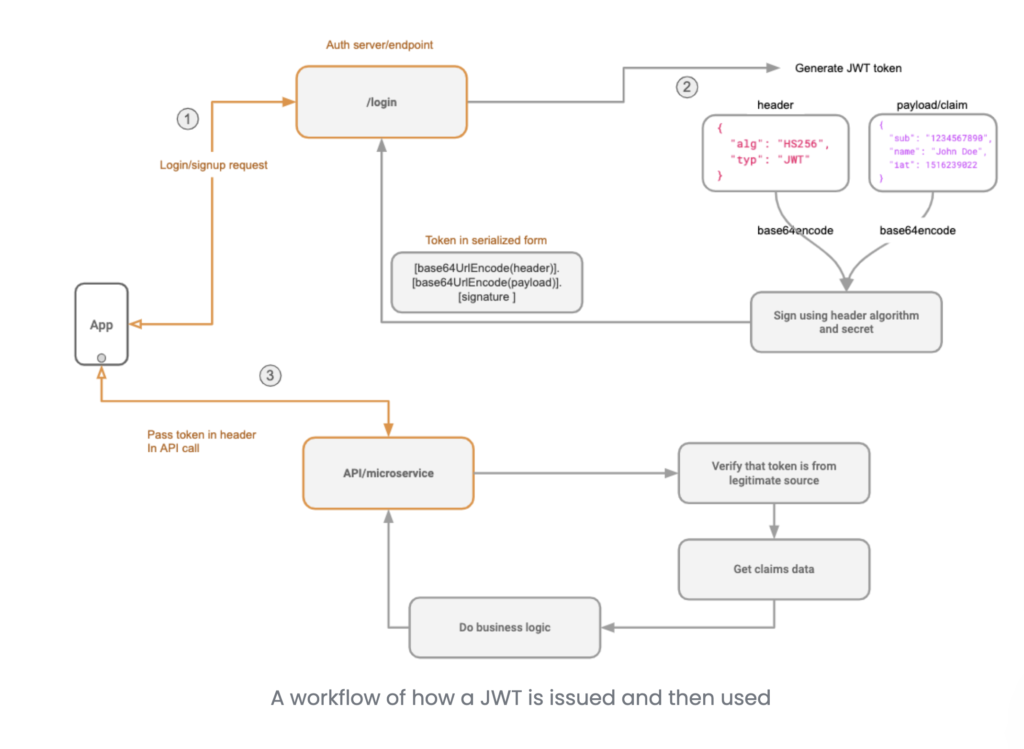
We assume you are familiar with what a JWT is. If you are new to JWT’s here is a guide we have put together explaining how JWT’s work in the context of front end GraphQL clients. It also covers the security aspects of using a JWT for authentication.
Here’s how JWT based authentication works:
- An end-user is authenticated to the app by your authentication server(sign up or sign in)
- On successful authentication, the authentication server returns a JWT to the app with the user and role information embedded in the claims section
- On subsequent calls to Hasura, app passes the JWT in the
Authorizationheader. - Hasura validates the token and extracts the user and role information
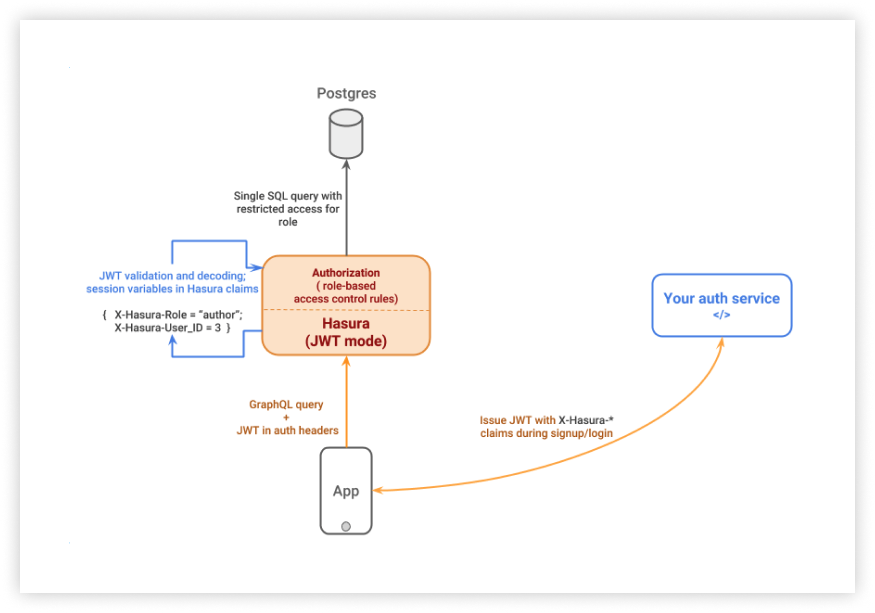
Validating the JWT Token in step 4. above requires a JWT secret. You can enable JWT mode by using the --jwt-secret flag or HASURA_GRAPHQL_JWT_SECRET environment variable while starting Hasura. The the value of the flag or environment variable must be a JSON object.
{
   "type":"HS256",
   "key":"testtesttesttesttesttesttesttest",
   "claims_namespace":"hasura",
   "audience":"folautech-api",
   "issuer":"folautech-api"
}
Note that key must be equal to or more than 32 characters.

JWT Payload
{
  "iss" : "folautech-api",
  "jti" : "5c16f712-7ded-4479-9c90-266501b003d0-PfAdAIEeLz",
  "sub" : "3",
  "aud" : "folautech-meal-plan",
  "iat" : "2021-03-16T09:02:12.955Z",
  "exp" : "2021-03-16T10:42:12.955Z",
  "admin" : false,
  "name" : "Laulau Kaveinga",
  "hasura" : {
    "x-hasura-default-role" : "user",
    "x-hasura-user-id" : "3",
    "x-hasura-allowed-roles" : [ "user" ]
  }
}
- A
x-hasura-default-rolefield : indicating the default role of that user i.e. the role that will be used in casex-hasura-roleheader is not passed. - A
x-hasura-allowed-rolesfield : a list of allowed roles for the user i.e. acceptable values of thex-hasura-roleheader. Thex-hasura-default-rolespecified should be a member of this list. - A
x-hasura-user-idfield : id of the authenticated user which is used to authorized user to access database tables. - A
x-hasura-customfield : you can add custom hasura properties which can be used to query database
Hasura – Introduction
Hasura is a GraphQL engine that makes your data instantly accessible over a real-time GraphQL API, so you can build and ship modern apps and APIs faster. Hasura connects to your databases, REST servers, GraphQL servers, and third party APIs to provide a unified realtime GraphQL API across all your data sources.
Hasura is great for performing CRUD against your Postgresql database. It also has webhook triggers for business logic.
As of now 02/18/2021, Hasura only supports Postgresql but Mysql is in the works.
CSS with SASS
What is SASS?
- Sass stands for Syntactically Awesome Stylesheet
- Sass is an extension to CSS
- Sass is a CSS pre-processor
- Sass is completely compatible with all versions of CSS
- Sass reduces repetition of CSS and therefore saves time
- Sass was designed by Hampton Catlin and developed by Natalie Weizenbaum in 2006
- Sass is free to download and use
Why use SASS?
Stylesheets are getting larger, more complex, and harder to maintain. This is where a CSS pre-processor can help. Sass lets you use features that do not exist in CSS, like variables, nested rules, mixins, imports, inheritance, built-in functions, and other stuff.
Once you start tinkering with Sass, it will take your preprocessed Sass file and save it as a normal CSS file that you can use in your website.
npm install -g sass
Once Sass is installed, you can compile your Sass to CSS using the sass command. You’ll need to tell Sass which file to build from, and where to output CSS to. For example, running sass input.scss output.css from your terminal would take a single Sass file, input.scss, and compile that file to output.css.
You can also watch individual files or directories with the --watch flag. The watch flag tells Sass to watch your source files for changes, and re-compile CSS each time you save your Sass. If you wanted to watch (instead of manually build) your input.scss file, you’d just add the watch flag to your command, like so:
sass --watch input.scss output.css
You can watch and output to directories by using folder paths as your input and output, and separating them with a colon. In this example:
sass --watch app/sass:public/stylesheets
Sass would watch all files in the app/sass folder for changes, and compile CSS to the public/stylesheets folder.
Variables
Variables are used to store information that you can re-use in many places. An advantage of using variables is that you can change them in one place instead of many places. Sass uses the $ symbol to make a variable.
Things that can be stored in variables are:
- strings
- numbers
- colors
- booleans
- lists
- nulls
$myFont: Helvetica, sans-serif;
$myColor: gray;
$myFontSize: 18px;
$myWidth: 680px;


#variable {
    font-family: $myFont;
    font-size: $myFontSize;
    color: $myColor;
}
The default behavior for variable scope can be overridden by using the !global switch. !global indicates that a variable is global, which means that it is accessible on all levels.
$myFont: Helvetica, sans-serif;
$myColor: gray;
$myFontSize: 18px;
$myWidth: 680px;


#variable {
    font-family: $myFont;
    font-size: $myFontSize;
    color: $myColor;

    $myColor: red !global;
}

#nesting{
    text-align: center;
    color: $myColor;
    img{
        width: 50%;
    }

    div{
        padding-top: 10px;
        padding-bottom: 20px;
    }
}
Nesting
Sass lets you nest CSS selectors in the same way as HTML.
$myColor: gray;

#nesting{
    text-align: center;
    color: $myColor;
    img{
        width: 50%;
    }

    div{
        padding-top: 10px;
        padding-bottom: 20px;
    }
}
@use
You don’t have to write all your Sass in a single file. You can split it up however you want with the @use rule. This rule loads another Sass file as a module, which means you can refer to its variables, mixins, and functions in your Sass file with a namespace based on the filename. Using a file will also include the CSS it generates in your compiled output!
@use "profile";

$myFont: Helvetica, sans-serif;
$myColor: gray;
$myFontSize: 18px;
$myWidth: 680px;


#variable {
    font-family: $myFont;
    font-size: $myFontSize;
    color: $myColor;

    $myColor: red !global;
}

// _profile.scss
#profile{
    font-weight: bold;

    .address{
        text-decoration: wavy;
    }
}
@mixin
A mixin lets you make groups of CSS declarations that you want to reuse throughout your site. You can even pass in values to make your mixin more flexible. A good use of a mixin is for vendor prefixes. The @include directive is created to let you use (include) the mixin.
style.scss
@mixin important-text {
    color: red;
    font-size: 25px;
    font-weight: bold;
    border: 1px solid blue;
}

#nesting{
    @include important-text;
    text-align: center;
    color: $myColor;
    img{
        width: 50%;
    }

    div{
        padding-top: 10px;
        padding-bottom: 20px;
    }
}
style.css
#nesting {
  color: red;
  font-size: 25px;
  font-weight: bold;
  border: 1px solid blue;
  text-align: center;
  color: red;
}
@extend
The @extend directive lets you share a set of CSS properties from one selector to another. The @extend directive is useful if you have almost identically styled elements that only differ in some small details.
style.scss
%msg-shared {
  border: 1px solid #ccc;
  padding: 10px;
  color: #333;
}
.success {
  @extend %message-shared;
  border-color: green;
}

.error {
  @extend %message-shared;
  border-color: red;
}
style.css
.message, .success, .error {
  border: 1px solid #ccc;
  padding: 10px;
  color: #333;
}

.success {
  border-color: green;
}

.error {
  border-color: red;
}
CSS Functions
Css has functions that can be used to set values.
The attr()function can be used with any CSS property, but support for properties other than content is experimental, and support for the type-or-unit parameter is sparse. The attr() CSS function is used to retrieve the value of an attribute of the selected element and use it in the stylesheet.
<div class="col-9">
   <p id="mySite"><a href="https://lovemesomecoding.com">Visit lovemesomecoding</a></p>
</div>

<style>
   #mySite > a:after {content: " (" attr(href) ")";}
</style>
The calc() CSS function allows you to perform calculations when specifying CSS property values. The calc() function takes a single expression as its parameter, with the expression’s result used as the value. The expression can be any simple expression combining the following operators, using standard operator precedence rule.
<div class="col-9">
    <p id="myMessage">Learning css functions</p>
</div>

<style>
       #myMessage{
            background-color: lightblue;
            width: calc(100% - 120px);
            text-align: center;
       }
 </style>
The var() CSS function can be used to insert the value of a custom property (sometimes called a “CSS variable”) instead of any part of a value of another property.
    <div class="col-9">
        <p id="myVar">Learning css functions</p>
    </div>

<style>
            :root {
                --favoriteColor: coral;
            }

           #myVar{
                background-color: var(--favoriteColor);
                width: calc(100% - 120px);
                text-align: center;
           }
        </style>
repeat-linear-gradient() function
The repeating-linear-gradient() CSS function creates an image consisting of repeating linear gradients. It is similar to linear-gradient() and takes the same arguments, but it repeats the color stops infinitely in all directions so as to cover its entire container.
    <div class="col-9">
        <p id="myLinearGradient">Learning css functions</p>
    </div>

<style>
           #myLinearGradient{
                background-image: repeating-linear-gradient(red, yellow 10%, green 20%);
                height: 300px;
                text-align: center;
           }
        </style>
CSS Fonts
Having the right font has a huge impact on how users experience a website. The right font can create a strong identity for your brand. Using a font that is easy to read are important. The font adds value to your text. It is also important to choose the correct color and text size for the font.
There are five generic font families:
- Serif fonts have a small stroke at the edges of each letter. They create a sense of formality and elegance.
- Sans-serif fonts have clean lines (no small strokes attached). They create a modern and minimalistic look.
- Monospace fonts – here all the letters have the same fixed width. They create a mechanical look.
- Cursive fonts imitate human handwriting.
- Fantasy fonts are decorative/playful fonts.
We use the font-family property to specify the font of a text. The font-family property should hold several font names as a “fallback” font, to ensure maximum compatibility between browsers/operating systems. Start with the font you want, and end with a generic family (to let the browser pick a similar font in the generic family, if no other fonts are available). The font names should be separated with comma.
If the font name is more than one word, it must be in quotation marks, like: “Times New Roman”.
<div class="row">
    <div class="col-3">
        Font Family
    </div>
    <div class="col-9 fontFam">
        I am learning css.
    </div>
</div>

<style>
            .fontFam {
                font-family: "Lucida Console", "Courier New", monospace;
            }
</style>
Font Style
The font-style property is mostly used to specify italic text.
<div class="row">
    <div class="col-3">
        Font Style
    </div>
    <div class="col-9 fontStyleNormal">
        This is font style normal
    </div>
    <div class="col-3">
    </div>
    <div class="col-9 fontStyleItalic">
        This is font style italic
    </div>
</div>

 <style>
            .fontStyleNormal {
                font-style: normal;
            }

            .fontStyleItalic {
                font-style: italic;
            }
        </style>
The font-weight property specifies the weight of a font. Values can be normal, bold, lighter, bolder, <number> from 100-1000.
<div class="row">
    <div class="col-3">
        Font Weight
    </div>
    <div class="col-9 fontWeight">
        This is font weight
    </div>
</div>

<style>
            .fontWeight{
                font-weight: 900;
            }
        </style>
The font-size property sets the size of the text. Being able to manage the text size is important in web design. However, you should not use font size adjustments to make paragraphs look like headings, or headings look like paragraphs. Always use the proper HTML tags, like <h1> – <h6> for headings and <p> for paragraphs.
The font-size value can be an absolute, or relative size.
Absolute size:
- Sets the text to a specified size
- Does not allow a user to change the text size in all browsers (bad for accessibility reasons)
- Absolute size is useful when the physical size of the output is known
Relative size:
- Sets the size relative to surrounding elements
- Allows a user to change the text size in browsers
Google Fonts
You can also use Google fonts if you want. They are free to use and many people use them.