AWS – Kubernetes on AWS
September 6, 2019Spring Boot Thread Pool
One technique would be to balance thread pool size based on individual demand for hardware. However it might be important to give priority to web clients over requests coming in via JMS and therefore you might balance the pools in that direction. Of course as you rebalance you’ll have to adjust the size of each pool to take into account the difference in hardware demanded.
Getting a proper configuration for a thread pool may not be easy but it’s also not rocket science. The mathematics behind the problem are well understood and are fairly intuitive in that we meet them all the time in our every day lives. What is lacking are the measurements (as witness by j.u.c.ExecutorService) needed to make a reasonable choice. Getting to a proper setting will be a bit fiddly as this is more like bucket chemistry than a precise science but spending a little bit of time fiddling can save you the headache of having to deal with a system that has been destabilized by higher than expected workloads.
Here is a Thread Pool configuration sample.
/*
	 * corePoolSize parameter is the amount of core threads which will be
	 * instantiated and kept in the pool. If all core threads are busy and more
	 * tasks are submitted, then the pool is allowed to grow up to a
	 * maximumPoolSize.
	 */

	@Bean(name = "taskExecutor")
	public ThreadPoolTaskExecutor taskExecutor() {
		ThreadPoolTaskExecutor executor = new ThreadPoolTaskExecutor();
		// initial number of threads
		executor.setCorePoolSize(20);

		// max number of threads
		executor.setMaxPoolSize(Integer.MAX_VALUE);

		// some tasks may be put into a queue to wait for their turn.
		executor.setQueueCapacity(500);
		executor.setThreadNamePrefix("Auth-Thread-");
		executor.setAllowCoreThreadTimeOut(true);
		executor.setKeepAliveSeconds(60);
		executor.setWaitForTasksToCompleteOnShutdown(true);
		executor.setAwaitTerminationSeconds(60);
		executor.setRejectedExecutionHandler(new ThreadPoolExecutor.CallerRunsPolicy());
		executor.initialize();

		return executor;
	}
Spring Boot Security Config
Java Security Configuration
Add dependency
<dependency>
    <groupId>org.springframework.boot</groupId>
    <artifactId>spring-boot-starter-security</artifactId>
</dependency>
Add SecurityConfig class
import org.springframework.beans.factory.annotation.Autowired;
import org.springframework.beans.factory.config.MethodInvokingFactoryBean;
import org.springframework.boot.web.servlet.FilterRegistrationBean;
import org.springframework.boot.web.servlet.RegistrationBean;
import org.springframework.context.annotation.Bean;
import org.springframework.context.annotation.Configuration;
import org.springframework.security.authentication.AuthenticationManager;
import org.springframework.security.config.annotation.authentication.builders.AuthenticationManagerBuilder;
import org.springframework.security.config.annotation.method.configuration.EnableGlobalMethodSecurity;
import org.springframework.security.config.annotation.web.builders.HttpSecurity;
import org.springframework.security.config.annotation.web.builders.WebSecurity;
import org.springframework.security.config.annotation.web.configuration.EnableWebSecurity;
import org.springframework.security.config.annotation.web.configuration.WebSecurityConfigurerAdapter;
import org.springframework.security.config.http.SessionCreationPolicy;
import org.springframework.security.core.context.SecurityContextHolder;
import org.springframework.security.crypto.bcrypt.BCryptPasswordEncoder;
import org.springframework.security.web.authentication.UsernamePasswordAuthenticationFilter;
import org.springframework.security.web.util.matcher.AntPathRequestMatcher;

import com.folaukaveinga.security.CustomAcccessDeniedHandler;
import com.folaukaveinga.security.CustomAuthenticationFilter;
import com.folaukaveinga.security.CustomAuthenticationProvider;
import com.folaukaveinga.security.CustomLoginFilter;
import com.folaukaveinga.security.CustomLogoutHandler;
import com.folaukaveinga.security.CustomLogoutSuccessHandler;
import com.folaukaveinga.utils.PathConstantUtil;

/**
 * Configure Security
 * @author fkaveinga
 *
 */
@Configuration
@EnableWebSecurity
@EnableGlobalMethodSecurity(securedEnabled = true, prePostEnabled = true)
public class SecurityConfig extends WebSecurityConfigurerAdapter {

    @Autowired
    private CustomAuthenticationProvider customAuthenticationProvider;

    @Autowired
    private CustomLogoutHandler customLogoutHandler;

    @Autowired
    private CustomLogoutSuccessHandler customLogoutSuccessHandler;

    @Autowired
    private CustomAcccessDeniedHandler customAcccessDeniedHandler;

    @Bean
    public CustomLoginFilter customUsernamePassworAuthenticationFilter() throws Exception {
        return new CustomLoginFilter(PathConstantUtil.LOGIN_URL,authenticationManagerBean());
    }

    @Bean
    public CustomAuthenticationFilter customAuthenticationFilter() {
        return new CustomAuthenticationFilter();
    }

    @Bean
    public RegistrationBean jwtAuthFilterRegister(CustomAuthenticationFilter customAuthenticationFilter) {
        FilterRegistrationBean<CustomAuthenticationFilter> registrationBean = new FilterRegistrationBean<CustomAuthenticationFilter>(
                customAuthenticationFilter);
        registrationBean.setEnabled(false);
        return registrationBean;
    }


    @Override
    protected void configure(HttpSecurity http) throws Exception {
        // rest call rules
        http
            .cors().and().csrf().disable()
            .authorizeRequests()
                .antMatchers(PathConstantUtil.PING_URL).permitAll()
                .antMatchers(PathConstantUtil.LOGIN_URL).permitAll()
                .antMatchers(PathConstantUtil.SIGNUP_URL).permitAll()
                .antMatchers(PathConstantUtil.PUBLIC_ENDPOINTS).permitAll()
                .anyRequest().permitAll();

        // logout
        http.logout()
            .logoutRequestMatcher(new AntPathRequestMatcher(PathConstantUtil.LOGOUT_URL))
            .addLogoutHandler(customLogoutHandler)
            .logoutSuccessHandler(customLogoutSuccessHandler);

        // Login filter
        http.addFilterBefore(customUsernamePassworAuthenticationFilter(),UsernamePasswordAuthenticationFilter.class);
        // Signup filter
        http.addFilterBefore(customAuthenticationFilter(), UsernamePasswordAuthenticationFilter.class);

        // stateless
        http.sessionManagement().sessionCreationPolicy(SessionCreationPolicy.STATELESS);

        // handler access denied calls
        http.exceptionHandling().accessDeniedHandler(customAcccessDeniedHandler);
    }

    @Override
    protected void configure(AuthenticationManagerBuilder builder) throws Exception {
        builder.authenticationProvider(customAuthenticationProvider);
    }

    @Override
    public void configure(WebSecurity web) throws Exception {
        web.ignoring()
            .antMatchers(PathConstantUtil.SIGNUP_URL)
            .antMatchers(PathConstantUtil.LOGIN_URL)
            .antMatchers(PathConstantUtil.PING_URL)
            .antMatchers(PathConstantUtil.AUTH_TOKEN_URL)
            .antMatchers(PathConstantUtil.SWAGGER_DOC_URLS)
            .antMatchers(PathConstantUtil.PUBLIC_ENDPOINTS)
            .antMatchers("/actuator/**");
    }

    @Bean
    @Override
    public AuthenticationManager authenticationManagerBean() throws Exception {
        return super.authenticationManagerBean();
    }

    @Bean
    public BCryptPasswordEncoder passwordEncoder() {
        BCryptPasswordEncoder encoder = new BCryptPasswordEncoder();
        return encoder;
    }

    @Bean
    public MethodInvokingFactoryBean methodInvokingFactoryBean() {
        MethodInvokingFactoryBean methodInvokingFactoryBean = new MethodInvokingFactoryBean();
        methodInvokingFactoryBean.setTargetClass(SecurityContextHolder.class);
        methodInvokingFactoryBean.setTargetMethod("setStrategyName");
        methodInvokingFactoryBean.setArguments(SecurityContextHolder.MODE_INHERITABLETHREADLOCAL);
        return methodInvokingFactoryBean;
    }
}
Springboot Rest File Upload
Posting a request of a DTO which has a file in it.
	/**
	 * User @ModelAttribute instead of @RequestBody
	 * @param userCreateDTO
	 * @return
	 */
	@ApiOperation(value = "Post file in DTO")
	@PostMapping(value="/withdto")
	public ResponseEntity<User> postWithDTO(@ApiParam(name = "user", required = true, value = "user") @ModelAttribute UserCreateDTO userCreateDTO){
		log.info("postWithDTO(..)");
		log.info("name: {}, email: {}",userCreateDTO.getName(),userCreateDTO.getEmail());
		log.info("file size:{}, name:{}", userCreateDTO.getFile().getSize(),userCreateDTO.getFile().getOriginalFilename());

		return new ResponseEntity<>(userService.create(new User(null,null,userCreateDTO.getName(),userCreateDTO.getEmail(),null)), HttpStatus.OK);
	}
Using @RequestPart
	/**
	 * post json object with a file using @RequestPart
	 */
	@ApiOperation(value = "Post file with RequestPart")
	@PostMapping("/withrequestpart")
	public ResponseEntity<User> postWithRequestPart(@ApiParam(name = "file", required = true, value = "file") @RequestPart(value = "file", required = true) MultipartFile file, @RequestPart("user") User user){
		log.info("postWithRequestPart(..)");
		log.info(user.toJson());
		log.info("file size:{}, name:{}", file.getSize(),file.getName());
		return new ResponseEntity<>(userService.create(user), HttpStatus.OK);
	}
Frontend Code
var formData = new FormData();

formData.append("file", document.forms["userForm"].file.files[0]);
formData.append('user', new Blob([JSON.stringify({
                "firstName": document.getElementById("firstName").value,
                "lastName": document.getElementById("lastName").value
            })], {
                    type: "application/json"
                }));
fetch('/upload', {
    method: 'post',
    body: formData
}).then(function (response) {
   if (response.status !== 200) {
      alert("There was an error!");
   } else {
      alert("Request successful");
   }
}).catch(function (err) {
   alert("There was an error!");
});;
August 31, 2019 AWS – Aurora
Aurora is a fully managed relational database engine that’s compatible with MySQL and PostgreSQL. It can deliver up to five times the throughput of MySQL and up to three times the throughput of PostgreSQL without requiring changes to most of your existing applications.
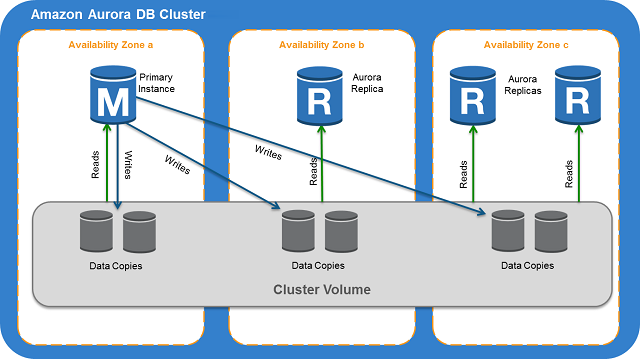
When connecting to Aurora instance, it is recommended that you use a custom endpoint(endpoint that does not change) instead of the instance endpoint in such cases. Doing so simplifies connection management and high availability as you add more DB instances to your cluster.
For clusters where high availability is important, where practical use the cluster endpoint for read-write connections and the reader endpoint for read-only connections. These kinds of connections manage DB instance failover better than instance endpoints do.
DB instance types: Aurora supports two types of instance classes: Memory-Optimized and Burstable Performance.
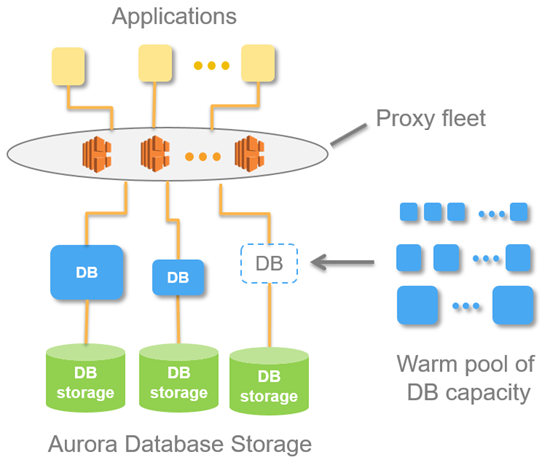
With Aurora Serverless, you can create a database endpoint without specifying the DB instance class size. You set the minimum and maximum capacity. With Aurora Serverless, the database endpoint connects to a proxy fleet that routes the workload to a fleet of resources that are automatically scaled. Because of the proxy fleet, connections are continuous as Aurora Serverless scales the resources automatically based on the minimum and maximum capacity specifications. Database client applications don’t need to change to use the proxy fleet. Aurora Serverless manages the connections automatically. Scaling is rapid because it uses a pool of “warm” resources that are always ready to service requests. Storage and processing are separate, so you can scale down to zero processing and pay only for storage.
You can specify the minimum and maximum ACU. The minimum Aurora capacity unit is the lowest ACU to which the DB cluster can scale down. The maximum Aurora capacity unit is the highest ACU to which the DB cluster can scale up. Based on your settings, Aurora Serverless automatically creates scaling rules for thresholds for CPU utilization, connections, and available memory.
Aurora Serverless manages the warm pool of resources in an AWS Region to minimize scaling time. When Aurora Serverless adds new resources to the Aurora DB cluster, it uses the proxy fleet to switch active client connections to the new resources. At any specific time, you are only charged for the ACUs that are being actively used in your Aurora DB cluster.
- Aurora DB clusters must be created in an Amazon Virtual Private Cloud (VPC). To control which devices and Amazon EC2 instances can open connections to the endpoint and port of the DB instance for Aurora DB clusters in a VPC, you use a VPC security group. You can make these endpoint and port connections using Transport Layer Security (TLS) / Secure Sockets Layer (SSL). In addition, firewall rules at your company can control whether devices running at your company can open connections to a DB instance.
- To authenticate logins and permissions for an Amazon Aurora DB cluster, you can use the same method as MySQL.
- Configure AWS Secrets Manager to automatically rotate the secrets for Amazon Aurora.
- Rotate your IAM credentials regularly.
- Grant each user the minimum set of permissions required to perform his or her duties.
Aurora clusters across regions
- You can create an Amazon Aurora MySQL DB cluster as a Read Replica in a different AWS Region than the source DB cluster. Taking this approach can improve your disaster recovery capabilities, let you scale read operations into an AWS Region that is closer to your users, and make it easier to migrate from one AWS Region to another.
- In a cross-region scenario, there is more lag time between the source DB cluster and the Read Replica due to the longer network channels between regions.
- You can run multiple concurrent create or delete actions for Read-Replicas that reference the same source DB cluster. However, you must stay within the limit of five Read Replicas for each source DB cluster.
- For replication to operate effectively, each Read Replica should have the same amount of computing and storage resources as the source DB cluster. If you scale the source DB cluster, you should also scale the Read Replicas.
- Both your source DB cluster and your cross-region Read Replica DB cluster can have up to 15 Aurora Replicas, along with the primary instance for the DB cluster. By using this functionality, you can scale read operations for both your source AWS Region and your replication target AWS Region.