Hasura allows you to define role-based access control rules for each of the models/tables that you use. Access control rules help in restricting querying on a table based on certain conditions.
Python Advanced – Numpy Arrays
Introduction
NumPy (Numerical Python) is the foundational library for numerical computing in Python. If you’ve worked with data science, machine learning, image processing, or scientific computing in Python, you’ve almost certainly used NumPy — whether directly or through libraries built on top of it like pandas, scikit-learn, TensorFlow, and OpenCV.
Here’s why NumPy matters:
- Performance — NumPy arrays are stored in contiguous memory blocks and operations are implemented in optimized C code. This makes NumPy 10x to 100x faster than equivalent Python list operations.
- Vectorized operations — You can perform element-wise computations on entire arrays without writing explicit loops, leading to cleaner and faster code.
- Foundation for the ecosystem — pandas DataFrames, scikit-learn models, matplotlib plotting, and TensorFlow tensors all rely on NumPy arrays under the hood.
- Broadcasting — NumPy’s broadcasting rules let you perform operations on arrays of different shapes without manually reshaping or copying data.
- Rich mathematical toolkit — Linear algebra, Fourier transforms, random number generation, statistical functions — NumPy has it all built in.
In this tutorial, we’ll go deep on NumPy arrays — from creation to manipulation, from indexing to linear algebra. By the end, you’ll have a solid, practical understanding of the library that underpins nearly all of Python’s data stack.
Installation
NumPy is available via pip. If you don’t have it installed yet:
pip install numpy
If you’re using Anaconda, NumPy comes pre-installed. You can verify your installation:
import numpy as np
print(np.__version__)
The convention of importing NumPy as np is universal in the Python ecosystem. Stick with it — every tutorial, Stack Overflow answer, and library documentation assumes this alias.
Creating Arrays
NumPy arrays (ndarray objects) are the core data structure. There are several ways to create them, each suited to different situations.
From Python Lists — np.array()
The most straightforward way to create a NumPy array is from an existing Python list or tuple:
import numpy as np

# 1D array
a = np.array([1, 2, 3, 4, 5])
print(a)
# Output: [1 2 3 4 5]

# 2D array (matrix)
b = np.array([[1, 2, 3],
              [4, 5, 6]])
print(b)
# Output:
# [[1 2 3]
#  [4 5 6]]

# 3D array
c = np.array([[[1, 2], [3, 4]],
              [[5, 6], [7, 8]]])
print(c.shape)
# Output: (2, 2, 2)

# Specifying data type explicitly
d = np.array([1, 2, 3], dtype=np.float64)
print(d)
# Output: [1. 2. 3.]
Zero-Filled and One-Filled Arrays — np.zeros(), np.ones()
When you need arrays pre-filled with zeros or ones (common for initializing weight matrices, accumulators, or masks):
# 1D array of zeros
zeros_1d = np.zeros(5)
print(zeros_1d)
# Output: [0. 0. 0. 0. 0.]

# 2D array of zeros (3 rows, 4 columns)
zeros_2d = np.zeros((3, 4))
print(zeros_2d)
# Output:
# [[0. 0. 0. 0.]
#  [0. 0. 0. 0.]
#  [0. 0. 0. 0.]]

# 1D array of ones
ones_1d = np.ones(4)
print(ones_1d)
# Output: [1. 1. 1. 1.]

# 2D array of ones with integer type
ones_int = np.ones((2, 3), dtype=np.int32)
print(ones_int)
# Output:
# [[1 1 1]
#  [1 1 1]]

# Full array with a custom fill value
filled = np.full((2, 3), 7)
print(filled)
# Output:
# [[7 7 7]
#  [7 7 7]]

# Identity matrix
eye = np.eye(3)
print(eye)
# Output:
# [[1. 0. 0.]
#  [0. 1. 0.]
#  [0. 0. 1.]]
Ranges and Sequences — np.arange(), np.linspace()
np.arange() works like Python’s range() but returns an array. np.linspace() creates evenly spaced values between two endpoints — extremely useful for plotting and numerical methods.
# arange: start, stop (exclusive), step
a = np.arange(0, 10, 2)
print(a)
# Output: [0 2 4 6 8]

# arange with float step
b = np.arange(0, 1, 0.2)
print(b)
# Output: [0.  0.2 0.4 0.6 0.8]

# linspace: start, stop (inclusive), number of points
c = np.linspace(0, 1, 5)
print(c)
# Output: [0.   0.25 0.5  0.75 1.  ]

# linspace is ideal for generating x-values for plots
x = np.linspace(0, 2 * np.pi, 100)  # 100 points from 0 to 2π
Random Arrays — np.random
NumPy’s random module is essential for simulations, testing, and machine learning initialization:
# Uniform random values between 0 and 1
rand_uniform = np.random.rand(3, 3)
print(rand_uniform)
# Output: 3x3 matrix of random floats in [0, 1)

# Standard normal distribution (mean=0, std=1)
rand_normal = np.random.randn(3, 3)
print(rand_normal)
# Output: 3x3 matrix of values from normal distribution

# Random integers
rand_int = np.random.randint(1, 100, size=(2, 4))
print(rand_int)
# Output: 2x4 matrix of random ints between 1 and 99

# Reproducible random numbers with seed
np.random.seed(42)
reproducible = np.random.rand(3)
print(reproducible)
# Output: [0.37454012 0.95071431 0.73199394]

# Using the newer Generator API (recommended for new code)
rng = np.random.default_rng(seed=42)
values = rng.random(5)
print(values)
# Output: [0.77395605 0.43887844 0.85859792 0.69736803 0.09417735]

# Random choice from an array
choices = rng.choice([10, 20, 30, 40, 50], size=3, replace=False)
print(choices)
# Output: 3 random elements without replacement
Array Properties
Understanding array properties is essential for debugging and writing correct NumPy code. Every ndarray carries metadata about its structure:
import numpy as np

arr = np.array([[1, 2, 3, 4],
                [5, 6, 7, 8],
                [9, 10, 11, 12]])

# shape: dimensions as a tuple (rows, columns)
print(f"Shape: {arr.shape}")
# Output: Shape: (3, 4)

# ndim: number of dimensions (axes)
print(f"Dimensions: {arr.ndim}")
# Output: Dimensions: 2

# size: total number of elements
print(f"Total elements: {arr.size}")
# Output: Total elements: 12

# dtype: data type of elements
print(f"Data type: {arr.dtype}")
# Output: Data type: int64

# itemsize: size of each element in bytes
print(f"Bytes per element: {arr.itemsize}")
# Output: Bytes per element: 8

# nbytes: total memory consumed
print(f"Total bytes: {arr.nbytes}")
# Output: Total bytes: 96

# Practical example: understanding memory usage
large_arr = np.zeros((1000, 1000), dtype=np.float64)
print(f"Memory: {large_arr.nbytes / 1024 / 1024:.1f} MB")
# Output: Memory: 7.6 MB

# Same array with float32 uses half the memory
small_arr = np.zeros((1000, 1000), dtype=np.float32)
print(f"Memory: {small_arr.nbytes / 1024 / 1024:.1f} MB")
# Output: Memory: 3.8 MB
The dtype attribute is particularly important. NumPy supports many data types: int8, int16, int32, int64, float16, float32, float64, complex64, complex128, bool, and more. Choosing the right dtype can significantly impact both memory usage and computation speed.
Indexing and Slicing
NumPy’s indexing is more powerful than Python list indexing. Mastering it will save you from writing unnecessary loops.
1D Indexing and Slicing
arr = np.array([10, 20, 30, 40, 50, 60, 70, 80])

# Basic indexing (0-based)
print(arr[0])     # 10
print(arr[-1])    # 80
print(arr[-2])    # 70

# Slicing: start:stop:step
print(arr[2:5])       # [30 40 50]
print(arr[:3])        # [10 20 30]
print(arr[5:])        # [60 70 80]
print(arr[::2])       # [10 30 50 70] — every other element
print(arr[::-1])      # [80 70 60 50 40 30 20 10] — reversed
2D Indexing and Slicing
matrix = np.array([[1,  2,  3,  4],
                   [5,  6,  7,  8],
                   [9,  10, 11, 12],
                   [13, 14, 15, 16]])

# Single element: [row, col]
print(matrix[0, 0])    # 1
print(matrix[2, 3])    # 12

# Entire row
print(matrix[1])        # [5 6 7 8]
print(matrix[1, :])     # [5 6 7 8] — equivalent

# Entire column
print(matrix[:, 2])     # [ 3  7 11 15]

# Sub-matrix (rows 0-1, columns 1-2)
print(matrix[0:2, 1:3])
# Output:
# [[2 3]
#  [6 7]]

# Every other row, every other column
print(matrix[::2, ::2])
# Output:
# [[ 1  3]
#  [ 9 11]]
Boolean Indexing
Boolean indexing is one of NumPy’s most powerful features. You create a boolean mask and use it to filter elements:
arr = np.array([15, 22, 8, 41, 3, 67, 29, 55])

# Elements greater than 20
mask = arr > 20
print(mask)
# Output: [False  True False  True False  True  True  True]

print(arr[mask])
# Output: [22 41 67 29 55]

# Shorthand — most common pattern
print(arr[arr > 20])
# Output: [22 41 67 29 55]

# Combining conditions (use & for AND, | for OR, ~ for NOT)
print(arr[(arr > 10) & (arr < 50)])
# Output: [15 22 41 29]

print(arr[(arr < 10) | (arr > 50)])
# Output: [ 8  3 67 55]

# Boolean indexing on 2D arrays
matrix = np.array([[1, 2], [3, 4], [5, 6]])
print(matrix[matrix % 2 == 0])
# Output: [2 4 6] — returns a flat array of even numbers
Fancy Indexing
Fancy indexing lets you use arrays of indices to access multiple elements at once:
arr = np.array([10, 20, 30, 40, 50])

# Select elements at indices 0, 2, and 4
indices = np.array([0, 2, 4])
print(arr[indices])
# Output: [10 30 50]

# Works with 2D arrays too
matrix = np.array([[1,  2,  3],
                   [4,  5,  6],
                   [7,  8,  9],
                   [10, 11, 12]])

# Select specific rows
print(matrix[[0, 2, 3]])
# Output:
# [[ 1  2  3]
#  [ 7  8  9]
#  [10 11 12]]

# Select specific elements: (row0,col1), (row1,col2), (row2,col0)
rows = np.array([0, 1, 2])
cols = np.array([1, 2, 0])
print(matrix[rows, cols])
# Output: [2 6 7]
Array Operations
NumPy’s real power shows up in array operations. Everything is vectorized — no loops needed.
Element-wise Operations
a = np.array([1, 2, 3, 4])
b = np.array([10, 20, 30, 40])

# Arithmetic is element-wise
print(a + b)      # [11 22 33 44]
print(a - b)      # [ -9 -18 -27 -36]
print(a * b)      # [ 10  40  90 160]
print(b / a)      # [10. 10. 10. 10.]
print(a ** 2)     # [ 1  4  9 16]

# Comparison operators return boolean arrays
print(a > 2)      # [False False  True  True]
print(a == b)     # [False False False False]

# Scalar operations are broadcast to every element
print(a + 100)    # [101 102 103 104]
print(a * 3)      # [ 3  6  9 12]
Broadcasting
Broadcasting is the mechanism that lets NumPy perform operations on arrays of different shapes. It’s one of the most important concepts to understand:
# Broadcasting a scalar across an array
arr = np.array([[1, 2, 3],
                [4, 5, 6]])
print(arr * 10)
# Output:
# [[10 20 30]
#  [40 50 60]]

# Broadcasting a 1D array across rows of a 2D array
row = np.array([100, 200, 300])
print(arr + row)
# Output:
# [[101 202 303]
#  [104 205 306]]

# Broadcasting a column vector across columns
col = np.array([[10],
                [20]])
print(arr + col)
# Output:
# [[11 12 13]
#  [24 25 26]]

# Practical example: centering data (subtracting column means)
data = np.array([[1.0, 200, 3000],
                 [2.0, 400, 6000],
                 [3.0, 600, 9000]])

col_means = data.mean(axis=0)
print(f"Column means: {col_means}")
# Output: Column means: [2.000e+00 4.000e+02 6.000e+03]

centered = data - col_means
print(centered)
# Output:
# [[-1.000e+00 -2.000e+02 -3.000e+03]
#  [ 0.000e+00  0.000e+00  0.000e+00]
#  [ 1.000e+00  2.000e+02  3.000e+03]]
Broadcasting rules:
- If arrays have different numbers of dimensions, the shape of the smaller array is padded with ones on the left.
- Arrays with a size of 1 along a particular dimension act as if they had the size of the array with the largest shape along that dimension.
- If sizes don’t match and neither is 1, broadcasting fails with a
ValueError.
Aggregation Functions
arr = np.array([[1, 2, 3],
                [4, 5, 6],
                [7, 8, 9]])

# Global aggregations
print(f"Sum: {arr.sum()}")          # 45
print(f"Mean: {arr.mean()}")        # 5.0
print(f"Min: {arr.min()}")          # 1
print(f"Max: {arr.max()}")          # 9
print(f"Std Dev: {arr.std():.4f}")  # 2.5820

# Aggregation along axes
# axis=0 → collapse rows (compute across rows → one value per column)
# axis=1 → collapse columns (compute across columns → one value per row)

print(f"Column sums: {arr.sum(axis=0)}")    # [12 15 18]
print(f"Row sums: {arr.sum(axis=1)}")       # [ 6 15 24]
print(f"Column means: {arr.mean(axis=0)}")  # [4. 5. 6.]
print(f"Row means: {arr.mean(axis=1)}")     # [2. 5. 8.]

# Other useful aggregations
print(f"Cumulative sum: {np.array([1,2,3,4]).cumsum()}")
# Output: [ 1  3  6 10]

print(f"Product: {np.array([1,2,3,4]).prod()}")
# Output: 24

# argmin and argmax — index of min/max value
scores = np.array([82, 91, 76, 95, 88])
print(f"Best score index: {scores.argmax()}")    # 3
print(f"Worst score index: {scores.argmin()}")   # 2
Reshaping Arrays
Reshaping lets you change the dimensions of an array without changing its data. This is critical when preparing data for machine learning models or matrix operations.
reshape()
arr = np.arange(12)
print(arr)
# Output: [ 0  1  2  3  4  5  6  7  8  9 10 11]

# Reshape to 3 rows × 4 columns
reshaped = arr.reshape(3, 4)
print(reshaped)
# Output:
# [[ 0  1  2  3]
#  [ 4  5  6  7]
#  [ 8  9 10 11]]

# Reshape to 4 rows × 3 columns
print(arr.reshape(4, 3))
# Output:
# [[ 0  1  2]
#  [ 3  4  5]
#  [ 6  7  8]
#  [ 9 10 11]]

# Use -1 to let NumPy infer one dimension
print(arr.reshape(2, -1))   # 2 rows, auto-compute columns → (2, 6)
print(arr.reshape(-1, 3))   # auto-compute rows, 3 columns → (4, 3)

# Reshape to 3D
print(arr.reshape(2, 2, 3).shape)
# Output: (2, 2, 3)

# IMPORTANT: total elements must match
# arr.reshape(3, 5)  # ValueError: cannot reshape array of size 12 into shape (3,5)
flatten() and ravel()
matrix = np.array([[1, 2, 3],
                   [4, 5, 6]])

# flatten() — always returns a copy
flat = matrix.flatten()
print(flat)
# Output: [1 2 3 4 5 6]

flat[0] = 999
print(matrix[0, 0])   # 1 — original unchanged (it's a copy)

# ravel() — returns a view when possible (more memory efficient)
raveled = matrix.ravel()
print(raveled)
# Output: [1 2 3 4 5 6]

raveled[0] = 999
print(matrix[0, 0])   # 999 — original IS changed (it's a view)
Transpose
matrix = np.array([[1, 2, 3],
                   [4, 5, 6]])
print(f"Original shape: {matrix.shape}")
# Output: Original shape: (2, 3)

transposed = matrix.T
print(f"Transposed shape: {transposed.shape}")
# Output: Transposed shape: (3, 2)

print(transposed)
# Output:
# [[1 4]
#  [2 5]
#  [3 6]]

# np.transpose() and .T are equivalent for 2D arrays
# For higher dimensions, np.transpose() lets you specify axis order
arr_3d = np.arange(24).reshape(2, 3, 4)
print(arr_3d.shape)                         # (2, 3, 4)
print(np.transpose(arr_3d, (1, 0, 2)).shape)  # (3, 2, 4)
Stacking and Splitting
Combining and dividing arrays is a common operation when preparing datasets or assembling results.
Stacking Arrays
a = np.array([1, 2, 3])
b = np.array([4, 5, 6])

# Vertical stack — adds rows
vs = np.vstack([a, b])
print(vs)
# Output:
# [[1 2 3]
#  [4 5 6]]

# Horizontal stack — concatenates side by side
hs = np.hstack([a, b])
print(hs)
# Output: [1 2 3 4 5 6]

# 2D stacking
m1 = np.array([[1, 2], [3, 4]])
m2 = np.array([[5, 6], [7, 8]])

print(np.vstack([m1, m2]))
# Output:
# [[1 2]
#  [3 4]
#  [5 6]
#  [7 8]]

print(np.hstack([m1, m2]))
# Output:
# [[1 2 5 6]
#  [3 4 7 8]]

# np.concatenate — general purpose (specify axis)
print(np.concatenate([m1, m2], axis=0))  # same as vstack
print(np.concatenate([m1, m2], axis=1))  # same as hstack

# Column stack — treats 1D arrays as columns
c1 = np.array([1, 2, 3])
c2 = np.array([4, 5, 6])
print(np.column_stack([c1, c2]))
# Output:
# [[1 4]
#  [2 5]
#  [3 6]]
Splitting Arrays
arr = np.arange(16).reshape(4, 4)
print(arr)
# Output:
# [[ 0  1  2  3]
#  [ 4  5  6  7]
#  [ 8  9 10 11]
#  [12 13 14 15]]

# Split into 2 equal parts along rows (axis=0)
top, bottom = np.vsplit(arr, 2)
print("Top:\n", top)
# Output:
# [[0 1 2 3]
#  [4 5 6 7]]

print("Bottom:\n", bottom)
# Output:
# [[ 8  9 10 11]
#  [12 13 14 15]]

# Split into 2 equal parts along columns (axis=1)
left, right = np.hsplit(arr, 2)
print("Left:\n", left)
# Output:
# [[ 0  1]
#  [ 4  5]
#  [ 8  9]
#  [12 13]]

# Split at specific indices
first, second, third = np.split(arr, [1, 3], axis=0)
print(f"First (row 0): {first}")
print(f"Second (rows 1-2):\n{second}")
print(f"Third (row 3): {third}")
Mathematical Functions
NumPy provides a comprehensive set of mathematical functions — all vectorized and optimized.
Universal Functions (ufuncs)
arr = np.array([1, 4, 9, 16, 25])

# Square root
print(np.sqrt(arr))
# Output: [1. 2. 3. 4. 5.]

# Exponential (e^x)
print(np.exp(np.array([0, 1, 2])))
# Output: [1.         2.71828183 7.3890561 ]

# Natural logarithm
print(np.log(np.array([1, np.e, np.e**2])))
# Output: [0. 1. 2.]

# Log base 10 and base 2
print(np.log10(np.array([1, 10, 100, 1000])))
# Output: [0. 1. 2. 3.]

print(np.log2(np.array([1, 2, 4, 8])))
# Output: [0. 1. 2. 3.]

# Trigonometric functions
angles = np.array([0, np.pi/6, np.pi/4, np.pi/3, np.pi/2])
print(np.sin(angles))
# Output: [0.         0.5        0.70710678 0.8660254  1.        ]

print(np.cos(angles))
# Output: [1.00000000e+00 8.66025404e-01 7.07106781e-01 5.00000000e-01 6.12323400e-17]

# Absolute value
print(np.abs(np.array([-3, -1, 0, 2, 5])))
# Output: [3 1 0 2 5]

# Rounding
vals = np.array([1.23, 2.67, 3.5, 4.89])
print(np.round(vals, 1))    # [1.2 2.7 3.5 4.9]
print(np.floor(vals))       # [1. 2. 3. 4.]
print(np.ceil(vals))        # [2. 3. 4. 5.]
Dot Product and Matrix Multiplication
# Dot product of 1D arrays (scalar result)
a = np.array([1, 2, 3])
b = np.array([4, 5, 6])
print(np.dot(a, b))
# Output: 32  (1*4 + 2*5 + 3*6)

# Matrix multiplication
A = np.array([[1, 2],
              [3, 4]])
B = np.array([[5, 6],
              [7, 8]])

# Three equivalent ways to multiply matrices
print(np.dot(A, B))
print(A @ B)              # @ operator (Python 3.5+)
print(np.matmul(A, B))
# All output:
# [[19 22]
#  [43 50]]

# IMPORTANT: * is element-wise, NOT matrix multiplication
print(A * B)
# Output:
# [[ 5 12]
#  [21 32]]

# Cross product
print(np.cross(np.array([1, 0, 0]), np.array([0, 1, 0])))
# Output: [0 0 1]
Linear Algebra — np.linalg
A = np.array([[1, 2],
              [3, 4]])

# Determinant
print(f"Determinant: {np.linalg.det(A):.1f}")
# Output: Determinant: -2.0

# Inverse
A_inv = np.linalg.inv(A)
print(f"Inverse:\n{A_inv}")
# Output:
# [[-2.   1. ]
#  [ 1.5 -0.5]]

# Verify: A × A_inv = Identity
print(np.round(A @ A_inv))
# Output:
# [[1. 0.]
#  [0. 1.]]

# Eigenvalues and eigenvectors
eigenvalues, eigenvectors = np.linalg.eig(A)
print(f"Eigenvalues: {eigenvalues}")
print(f"Eigenvectors:\n{eigenvectors}")

# Matrix rank
print(f"Rank: {np.linalg.matrix_rank(A)}")
# Output: Rank: 2

# Norm
print(f"Frobenius norm: {np.linalg.norm(A):.4f}")
# Output: Frobenius norm: 5.4772
Comparison: NumPy vs Python Lists
Understanding why NumPy is faster than Python lists is important for making good design decisions.
Speed Benchmark
import numpy as np
import time

size = 1_000_000

# Python list approach
py_list = list(range(size))
start = time.time()
py_result = [x ** 2 for x in py_list]
py_time = time.time() - start
print(f"Python list:  {py_time:.4f} seconds")

# NumPy approach
np_arr = np.arange(size)
start = time.time()
np_result = np_arr ** 2
np_time = time.time() - start
print(f"NumPy array:  {np_time:.4f} seconds")

print(f"NumPy is {py_time / np_time:.0f}x faster")

# Typical output:
# Python list:  0.1654 seconds
# NumPy array:  0.0012 seconds
# NumPy is 138x faster
Memory Efficiency
import sys

# Python list of 1000 integers
py_list = list(range(1000))
py_size = sys.getsizeof(py_list) + sum(sys.getsizeof(x) for x in py_list)
print(f"Python list:  {py_size:,} bytes")

# NumPy array of 1000 integers
np_arr = np.arange(1000, dtype=np.int64)
print(f"NumPy array:  {np_arr.nbytes:,} bytes")

print(f"Python list uses {py_size / np_arr.nbytes:.1f}x more memory")

# Typical output:
# Python list:  36,056 bytes
# NumPy array:  8,000 bytes
# Python list uses 4.5x more memory
Why is NumPy faster?
- Contiguous memory — NumPy arrays are stored as continuous blocks of memory. Python lists store pointers to scattered objects.
- Fixed type — All elements have the same type, so no type-checking per element during operations.
- C-level loops — Operations loop in compiled C code, not interpreted Python.
- SIMD optimization — NumPy can use CPU vector instructions (SSE, AVX) to process multiple elements per clock cycle.
Practical Examples
Example 1: Image as a NumPy Array (Grayscale Manipulation)
Digital images are just NumPy arrays. A grayscale image is a 2D array; a color image is 3D (height × width × channels).
import numpy as np

# Simulate a small 5x5 grayscale image (values 0-255)
image = np.array([
    [50,  80,  120, 160, 200],
    [55,  85,  125, 165, 205],
    [60,  90,  130, 170, 210],
    [65,  95,  135, 175, 215],
    [70,  100, 140, 180, 220]
], dtype=np.uint8)

print(f"Image shape: {image.shape}")
print(f"Pixel value range: {image.min()} - {image.max()}")

# Invert the image (negative)
inverted = 255 - image
print(f"Inverted:\n{inverted}")

# Increase brightness (clamp to 255)
brightened = np.clip(image.astype(np.int16) + 50, 0, 255).astype(np.uint8)
print(f"Brightened:\n{brightened}")

# Threshold to binary (black/white)
threshold = 128
binary = (image > threshold).astype(np.uint8) * 255
print(f"Binary:\n{binary}")

# Normalize to [0, 1] range (common preprocessing step)
normalized = image.astype(np.float32) / 255.0
print(f"Normalized range: {normalized.min():.2f} - {normalized.max():.2f}")

# Simulate RGB image processing
rgb_image = np.random.randint(0, 256, size=(100, 100, 3), dtype=np.uint8)
print(f"RGB shape: {rgb_image.shape}")  # (100, 100, 3)

# Convert to grayscale using weighted average
weights = np.array([0.2989, 0.5870, 0.1140])  # Standard luminance weights
grayscale = np.dot(rgb_image[...,:3], weights).astype(np.uint8)
print(f"Grayscale shape: {grayscale.shape}")  # (100, 100)
Example 2: Statistical Analysis of a Dataset
import numpy as np

# Simulate exam scores for 5 subjects, 100 students
np.random.seed(42)
scores = np.random.normal(loc=72, scale=12, size=(100, 5))
scores = np.clip(scores, 0, 100).round(1)

subjects = ['Math', 'Science', 'English', 'History', 'Art']

print("=== Class Statistics ===\n")

# Per-subject statistics
for i, subject in enumerate(subjects):
    col = scores[:, i]
    print(f"{subject:>10}: mean={col.mean():.1f}, "
          f"std={col.std():.1f}, "
          f"min={col.min():.1f}, "
          f"max={col.max():.1f}, "
          f"median={np.median(col):.1f}")

print(f"\n{'Overall':>10}: mean={scores.mean():.1f}, std={scores.std():.1f}")

# Find top 5 students by average score
student_averages = scores.mean(axis=1)
top_5_indices = np.argsort(student_averages)[-5:][::-1]
print(f"\nTop 5 students (by index): {top_5_indices}")
for idx in top_5_indices:
    print(f"  Student {idx}: avg = {student_averages[idx]:.1f}")

# Correlation between subjects
correlation = np.corrcoef(scores.T)
print(f"\nCorrelation matrix shape: {correlation.shape}")
print(f"Math-Science correlation: {correlation[0, 1]:.3f}")

# Percentile analysis
print(f"\n90th percentile per subject:")
for i, subject in enumerate(subjects):
    p90 = np.percentile(scores[:, i], 90)
    print(f"  {subject}: {p90:.1f}")

# Students scoring above 90 in all subjects
high_achievers = np.all(scores > 90, axis=1)
print(f"\nStudents scoring >90 in ALL subjects: {high_achievers.sum()}")
Example 3: Linear Algebra — Solving a System of Equations
Solving systems of linear equations is a fundamental operation in engineering and data science. Consider:
import numpy as np

# Solve the system:
#   2x + 3y - z = 1
#   4x +  y + 2z = 2
#  -2x + 7y - 3z = -1

# Coefficient matrix
A = np.array([[2,  3, -1],
              [4,  1,  2],
              [-2, 7, -3]])

# Constants vector
b = np.array([1, 2, -1])

# Solve using np.linalg.solve (faster and more stable than computing inverse)
x = np.linalg.solve(A, b)
print(f"Solution: x={x[0]:.4f}, y={x[1]:.4f}, z={x[2]:.4f}")

# Verify the solution
residual = A @ x - b
print(f"Residual (should be ~0): {residual}")
print(f"Max error: {np.abs(residual).max():.2e}")

# Least squares solution for overdetermined systems
# (more equations than unknowns — common in data fitting)
# Fit y = mx + c to noisy data
np.random.seed(42)
x_data = np.linspace(0, 10, 50)
y_data = 2.5 * x_data + 1.3 + np.random.normal(0, 1, 50)

# Set up matrix A for y = mx + c
A_fit = np.column_stack([x_data, np.ones(len(x_data))])

# Solve via least squares
result, residuals, rank, sv = np.linalg.lstsq(A_fit, y_data, rcond=None)
m, c = result
print(f"\nLeast squares fit: y = {m:.4f}x + {c:.4f}")
print(f"(True values:      y = 2.5000x + 1.3000)")
Example 4: Data Normalization and Standardization
Normalization and standardization are essential preprocessing steps in machine learning. NumPy makes them trivial:
import numpy as np

# Sample dataset: 5 samples with 3 features of different scales
data = np.array([
    [25.0,  50000,  3.5],
    [30.0,  60000,  4.2],
    [22.0,  45000,  3.1],
    [35.0,  80000,  4.8],
    [28.0,  55000,  3.9]
])

feature_names = ['Age', 'Salary', 'GPA']
print("Original data:")
print(data)

# Min-Max Normalization: scale to [0, 1]
min_vals = data.min(axis=0)
max_vals = data.max(axis=0)
normalized = (data - min_vals) / (max_vals - min_vals)
print(f"\nMin-Max Normalized (range [0, 1]):")
for i, name in enumerate(feature_names):
    print(f"  {name}: min={normalized[:, i].min():.2f}, max={normalized[:, i].max():.2f}")
print(normalized)

# Z-Score Standardization: mean=0, std=1
mean_vals = data.mean(axis=0)
std_vals = data.std(axis=0)
standardized = (data - mean_vals) / std_vals
print(f"\nZ-Score Standardized (mean≈0, std≈1):")
for i, name in enumerate(feature_names):
    print(f"  {name}: mean={standardized[:, i].mean():.4f}, std={standardized[:, i].std():.4f}")
print(standardized)

# Robust scaling (using median and IQR — resistant to outliers)
median_vals = np.median(data, axis=0)
q75 = np.percentile(data, 75, axis=0)
q25 = np.percentile(data, 25, axis=0)
iqr = q75 - q25
robust_scaled = (data - median_vals) / iqr
print(f"\nRobust Scaled (using median and IQR):")
print(robust_scaled)
Common Pitfalls
Even experienced developers trip over these. Save yourself the debugging time.
Pitfall 1: View vs Copy
This is the single most common source of bugs in NumPy code:
import numpy as np

original = np.array([1, 2, 3, 4, 5])

# Slicing creates a VIEW, not a copy
view = original[1:4]
view[0] = 999
print(original)
# Output: [  1 999   3   4   5] — original is modified!

# To create an independent copy, use .copy()
original = np.array([1, 2, 3, 4, 5])
safe_copy = original[1:4].copy()
safe_copy[0] = 999
print(original)
# Output: [1 2 3 4 5] — original is safe

# How to check: use np.shares_memory()
a = np.array([1, 2, 3, 4, 5])
b = a[1:4]
c = a[1:4].copy()
print(np.shares_memory(a, b))  # True — b is a view
print(np.shares_memory(a, c))  # False — c is a copy

# Boolean and fancy indexing ALWAYS return copies
d = a[a > 2]
print(np.shares_memory(a, d))  # False
Pitfall 2: Broadcasting Shape Confusion
import numpy as np

a = np.array([[1, 2, 3],
              [4, 5, 6]])   # shape (2, 3)

# This works — (3,) broadcasts to (2, 3)
row = np.array([10, 20, 30])
print(a + row)

# This FAILS — shapes (2, 3) and (2,) are incompatible
col_wrong = np.array([10, 20])
try:
    print(a + col_wrong)
except ValueError as e:
    print(f"Error: {e}")
# Error: operands could not be broadcast together with shapes (2,3) (2,)

# Fix: reshape to column vector (2, 1)
col_right = np.array([[10], [20]])   # shape (2, 1)
print(a + col_right)
# Output:
# [[11 12 13]
#  [24 25 26]]

# Alternatively, use np.newaxis (or None — they're the same)
col_also_right = np.array([10, 20])[:, np.newaxis]
print(col_also_right.shape)   # (2, 1)
print(a + col_also_right)     # same result
Pitfall 3: Integer Overflow with Wrong dtype
import numpy as np

# int8 can only hold values from -128 to 127
arr = np.array([100, 120, 130], dtype=np.int8)
print(arr)
# Output: [100  120 -126] — 130 overflowed silently!

result = arr + np.int8(50)
print(result)
# Output: [-106  -86   -76] — completely wrong, no warning!

# Fix: use a larger dtype
arr_safe = np.array([100, 120, 130], dtype=np.int32)
result_safe = arr_safe + 50
print(result_safe)
# Output: [150 170 180] — correct

# Watch out with uint8 (common for image data, range 0-255)
img_pixel = np.array([250], dtype=np.uint8)
print(img_pixel + np.uint8(10))
# Output: [4] — wrapped around! (250 + 10 = 260 → 260 % 256 = 4)

# Fix: cast before arithmetic
print(img_pixel.astype(np.int16) + 10)
# Output: [260] — correct
Pitfall 4: Chained Indexing (Setting Values)
import numpy as np

arr = np.array([[1, 2, 3],
                [4, 5, 6]])

# DON'T: Chained indexing may not work for setting values
# arr[arr > 3][0] = 99   # This might NOT modify arr

# DO: Use direct indexing
arr[arr > 3] = 99
print(arr)
# Output:
# [[ 1  2  3]
#  [99 99 99]]

# Or use np.where for conditional replacement
arr2 = np.array([[1, 2, 3],
                 [4, 5, 6]])
result = np.where(arr2 > 3, 99, arr2)
print(result)
# Output:
# [[ 1  2  3]
#  [99 99 99]]
Best Practices
Follow these guidelines to write efficient, maintainable NumPy code.
1. Vectorize Instead of Looping
import numpy as np

data = np.random.rand(1_000_000)

# BAD: Python loop
result_slow = np.empty(len(data))
for i in range(len(data)):
    result_slow[i] = data[i] ** 2 + 2 * data[i] + 1

# GOOD: Vectorized operation (10-100x faster)
result_fast = data ** 2 + 2 * data + 1

# For custom functions, use np.vectorize (still not as fast as native ufuncs)
def custom_func(x):
    if x > 0.5:
        return x ** 2
    else:
        return 0

vectorized_func = np.vectorize(custom_func)
result = vectorized_func(data)

# BEST: Use np.where instead of vectorize
result_best = np.where(data > 0.5, data ** 2, 0)
2. Choose the Right dtype
import numpy as np

# Use the smallest dtype that fits your data
# Integers
small_ints = np.array([1, 2, 3, 4], dtype=np.int8)     # -128 to 127
medium_ints = np.array([1, 2, 3, 4], dtype=np.int32)    # -2B to 2B
big_ints = np.array([1, 2, 3, 4], dtype=np.int64)       # default, but 2x memory

# Floats — float32 is usually sufficient for ML
weights = np.random.randn(1000, 1000).astype(np.float32)  # 3.8 MB
# vs np.float64 which would be 7.6 MB

# Boolean arrays for masks
mask = np.zeros(1000, dtype=np.bool_)  # 1 byte per element vs 8 for int64
3. Use Broadcasting Instead of Tiling
import numpy as np

data = np.random.rand(1000, 3)
means = data.mean(axis=0)   # shape (3,)

# BAD: manually tiling to match shapes
means_tiled = np.tile(means, (1000, 1))   # creates unnecessary copy
centered_slow = data - means_tiled

# GOOD: let broadcasting handle it (no extra memory)
centered_fast = data - means   # (1000, 3) - (3,) → broadcasting
4. Preallocate Instead of Growing
import numpy as np

n = 10000

# BAD: growing an array with append (copies entire array each time)
result = np.array([])
for i in range(n):
    result = np.append(result, i ** 2)

# GOOD: preallocate and fill
result = np.empty(n)
for i in range(n):
    result[i] = i ** 2

# BEST: vectorize completely
result = np.arange(n) ** 2
5. Use In-Place Operations When Possible
import numpy as np

arr = np.random.rand(1_000_000)

# Creates a new array (uses extra memory)
arr = arr * 2

# In-place operation (modifies existing array, saves memory)
arr *= 2

# NumPy also provides in-place functions
np.multiply(arr, 2, out=arr)
np.add(arr, 1, out=arr)
Key Takeaways
- NumPy arrays vs Python lists — NumPy arrays are faster (10-100x), more memory efficient, and support vectorized operations. Always prefer NumPy when working with numerical data.
- Avoid Python loops — Think in terms of array operations, not element-by-element processing. Vectorized code is both faster and more readable.
- Understand broadcasting — It’s the key to writing concise, efficient code without manually reshaping arrays.
- Views vs copies — Know that slicing creates views (shared memory) while boolean/fancy indexing creates copies. Use
.copy()when you need independence. - Choose the right dtype — Using
float32instead offloat64halves memory usage. Watch out for integer overflow with small dtypes likeint8anduint8. - Master indexing — Boolean indexing and fancy indexing eliminate the need for most filtering loops. They’re the bread and butter of data manipulation.
- Use np.linalg for linear algebra —
np.linalg.solve()is faster and more numerically stable than computing matrix inverses manually. - Preallocate arrays — Never grow arrays with
np.append()in a loop. Preallocate withnp.empty()ornp.zeros(), or better yet, vectorize the computation entirely. - NumPy is the foundation — Understanding NumPy deeply will make you more effective with pandas, scikit-learn, TensorFlow, PyTorch, and virtually every other data library in Python.
NumPy is one of those libraries where the investment in learning it well pays dividends across your entire Python career. The patterns and concepts here — vectorization, broadcasting, memory-aware programming — are transferable to GPU computing, distributed computing, and any high-performance numerical work.
Python Advanced – Serialization
Introduction
Serialization is the process of converting an in-memory data structure (objects, dictionaries, lists) into a format that can be stored on disk, transmitted over a network, or cached for later retrieval. Deserialization is the reverse — reconstructing the original data structure from the serialized format.
If you have ever saved application state to a file, sent JSON to a REST API, or read a YAML configuration file, you have already been using serialization. It is one of the most fundamental operations in software engineering, and Python gives you several powerful modules to handle it.
Why serialization matters:
- Data persistence — Save program state between sessions (e.g., user preferences, application data)
- API communication — Exchange structured data between services over HTTP (JSON is the lingua franca of modern APIs)
- Caching — Store expensive computation results and reload them instantly
- Inter-process communication — Share data between different programs, languages, or machines
- Configuration management — Store and load application settings in human-readable formats
In this tutorial, we will cover the most important serialization formats and libraries in Python: JSON, pickle, YAML, XML, dataclasses, and marshmallow. Each has its strengths, trade-offs, and ideal use cases.
1. JSON Serialization
JSON (JavaScript Object Notation) is the most widely used serialization format on the web. It is human-readable, language-agnostic, and supported by virtually every programming language. Python’s built-in json module handles JSON serialization and deserialization out of the box.
1.1 — json.dumps() and json.loads() (Working with Strings)
Use json.dumps() to serialize a Python object to a JSON string, and json.loads() to deserialize a JSON string back to a Python object.
import json

# Serialize Python dict to JSON string
user = {
    "name": "Folau",
    "age": 30,
    "email": "folau@example.com",
    "skills": ["Python", "Java", "AWS"],
    "active": True
}

json_string = json.dumps(user)
print(json_string)
# {"name": "Folau", "age": 30, "email": "folau@example.com", "skills": ["Python", "Java", "AWS"], "active": true}

print(type(json_string))
# <class 'str'>

# Deserialize JSON string back to Python dict
parsed = json.loads(json_string)
print(parsed["name"])    # Folau
print(parsed["skills"])  # ['Python', 'Java', 'AWS']
print(type(parsed))      # <class 'dict'>
Notice that Python’s True becomes JSON’s true, and None becomes null. The json module handles these conversions automatically.
1.2 — json.dump() and json.load() (Working with Files)
When you need to write JSON directly to a file or read from one, use json.dump() and json.load() (without the trailing “s”).
import json

user = {
    "name": "Folau",
    "age": 30,
    "roles": ["admin", "developer"]
}

# Write to file
with open("user.json", "w") as f:
    json.dump(user, f, indent=2)

# Read from file
with open("user.json", "r") as f:
    loaded_user = json.load(f)

print(loaded_user)
# {'name': 'Folau', 'age': 30, 'roles': ['admin', 'developer']}
Tip: Always use with statements for file operations. It guarantees the file is properly closed even if an exception occurs.
1.3 — Pretty Printing, sort_keys, and indent
The json.dumps() function accepts several formatting options that make output more readable.
import json

config = {
    "database": {
        "host": "localhost",
        "port": 5432,
        "name": "myapp_db"
    },
    "cache": {
        "enabled": True,
        "ttl_seconds": 300
    },
    "debug": False
}

# Pretty print with 4-space indentation
pretty = json.dumps(config, indent=4)
print(pretty)

# Sort keys alphabetically
sorted_json = json.dumps(config, indent=2, sort_keys=True)
print(sorted_json)

# Compact output (minimize whitespace)
compact = json.dumps(config, separators=(",", ":"))
print(compact)
# {"database":{"host":"localhost","port":5432,"name":"myapp_db"},"cache":{"enabled":true,"ttl_seconds":300},"debug":false}
Use indent for config files and logs where readability matters. Use separators=(",", ":") when you need minimal payload size (e.g., sending data over a network).
1.4 — Handling Non-Serializable Types
The json module can only serialize basic Python types: dict, list, str, int, float, bool, and None. Anything else will raise a TypeError. This commonly happens with datetime objects, sets, custom classes, and bytes.
import json
from datetime import datetime

data = {
    "event": "deployment",
    "timestamp": datetime.now()
}

# This will FAIL
try:
    json.dumps(data)
except TypeError as e:
    print(f"Error: {e}")
    # Error: Object of type datetime is not JSON serializable
The simplest fix is the default parameter, which provides a fallback serializer for unsupported types.
import json
from datetime import datetime, date
from decimal import Decimal

def json_serializer(obj):
    """Custom serializer for objects not handled by default json encoder."""
    if isinstance(obj, (datetime, date)):
        return obj.isoformat()
    if isinstance(obj, Decimal):
        return float(obj)
    if isinstance(obj, set):
        return list(obj)
    if isinstance(obj, bytes):
        return obj.decode("utf-8")
    raise TypeError(f"Type {type(obj)} is not JSON serializable")

data = {
    "event": "deployment",
    "timestamp": datetime.now(),
    "cost": Decimal("49.99"),
    "tags": {"urgent", "production"},
    "payload": b"raw bytes here"
}

result = json.dumps(data, default=json_serializer, indent=2)
print(result)
1.5 — Custom JSONEncoder
For more control, subclass json.JSONEncoder. This is cleaner when you have complex serialization logic that you want to reuse across your application.
import json
from datetime import datetime, date
from decimal import Decimal

class AppJSONEncoder(json.JSONEncoder):
    """Custom JSON encoder for application-specific types."""

    def default(self, obj):
        if isinstance(obj, (datetime, date)):
            return obj.isoformat()
        if isinstance(obj, Decimal):
            return str(obj)
        if isinstance(obj, set):
            return sorted(list(obj))
        if isinstance(obj, bytes):
            return obj.decode("utf-8")
        # Let the base class raise TypeError for unknown types
        return super().default(obj)

data = {
    "user": "Folau",
    "created_at": datetime(2024, 1, 15, 10, 30, 0),
    "balance": Decimal("1250.75"),
    "permissions": {"read", "write", "admin"}
}

print(json.dumps(data, cls=AppJSONEncoder, indent=2))
When to use which approach:
defaultparameter — Quick one-off serializationJSONEncodersubclass — Reusable across your codebase, better for large projects
2. pickle Module — Binary Serialization
While JSON handles basic data types, Python’s pickle module can serialize almost any Python object — including classes, functions, nested structures, and even lambda expressions. The trade-off is that pickle output is binary (not human-readable) and Python-specific (other languages cannot read it).
2.1 — pickle.dumps()/loads() and dump()/load()
import pickle

# A complex Python object that JSON cannot handle
class User:
    def __init__(self, name, age, scores):
        self.name = name
        self.age = age
        self.scores = scores

    def average_score(self):
        return sum(self.scores) / len(self.scores)

    def __repr__(self):
        return f"User(name={self.name}, age={self.age})"

user = User("Folau", 30, [95, 88, 72, 90])

# Serialize to bytes
pickled = pickle.dumps(user)
print(type(pickled))  # <class 'bytes'>
print(len(pickled))   # varies

# Deserialize back to object
restored = pickle.loads(pickled)
print(restored)               # User(name=Folau, age=30)
print(restored.average_score())  # 86.25
import pickle

user = User("Folau", 30, [95, 88, 72, 90])

# Write to file (binary mode!)
with open("user.pkl", "wb") as f:
    pickle.dump(user, f)

# Read from file
with open("user.pkl", "rb") as f:
    loaded_user = pickle.load(f)

print(loaded_user.name)           # Folau
print(loaded_user.average_score())  # 86.25
Important: Always open pickle files in binary mode ("wb" and "rb"). Pickle produces bytes, not text.
2.2 — pickle vs JSON: When to Use Each
| Feature | JSON | pickle |
|---|---|---|
| Human-readable | Yes | No (binary) |
| Language support | Universal | Python only |
| Custom objects | Requires custom encoder | Works out of the box |
| Security | Safe to deserialize | Can execute arbitrary code |
| Speed | Moderate | Fast for Python objects |
| Best for | APIs, config files, data exchange | Caching, internal Python storage |
2.3 — Security Warning
WARNING: Never unpickle data from untrusted sources! Pickle can execute arbitrary code during deserialization. A malicious pickle payload can run system commands, delete files, or open network connections. Only use pickle with data you created yourself or from a fully trusted source.
import pickle
import os

# This is what a MALICIOUS pickle payload looks like.
# DO NOT run this — it demonstrates the danger.
class Malicious:
    def __reduce__(self):
        # This would execute a system command when unpickled!
        return (os.system, ("echo 'You have been hacked!'",))

# If someone sends you a pickle file, it could contain code like this.
# NEVER do: pickle.loads(untrusted_data)

# SAFE alternatives for untrusted data:
# - Use json.loads() for JSON data
# - Use yaml.safe_load() for YAML data
# - Use pickle only for data YOU created
3. YAML Serialization with PyYAML
YAML (YAML Ain’t Markup Language) is popular for configuration files because it is more human-friendly than JSON — no braces, no quotes around keys, and it supports comments. Python uses the PyYAML library to work with YAML.
# Install first: pip install pyyaml
import yaml

# Python dict to YAML string
config = {
    "database": {
        "host": "localhost",
        "port": 5432,
        "name": "myapp_db",
        "credentials": {
            "username": "admin",
            "password": "secret"
        }
    },
    "logging": {
        "level": "INFO",
        "file": "/var/log/app.log"
    },
    "features": ["auth", "caching", "rate_limiting"]
}

yaml_string = yaml.dump(config, default_flow_style=False, sort_keys=False)
print(yaml_string)
Output:
database:
  host: localhost
  port: 5432
  name: myapp_db
  credentials:
    username: admin
    password: secret
logging:
  level: INFO
  file: /var/log/app.log
features:
- auth
- caching
- rate_limiting
3.1 — Reading YAML Files (Always Use safe_load)
import yaml

yaml_content = """
server:
  host: 0.0.0.0
  port: 8080
  workers: 4

database:
  url: postgresql://localhost:5432/myapp
  pool_size: 10
  # Timeout in seconds
  timeout: 30

features:
  - authentication
  - rate_limiting
  - caching
"""

# ALWAYS use safe_load, never yaml.load() without a Loader
config = yaml.safe_load(yaml_content)

print(config["server"]["port"])      # 8080
print(config["database"]["url"])     # postgresql://localhost:5432/myapp
print(config["features"])            # ['authentication', 'rate_limiting', 'caching']
3.2 — Config File Use Case
import yaml
import os

def load_config(config_path="config.yaml"):
    """Load application configuration from YAML file."""
    if not os.path.exists(config_path):
        raise FileNotFoundError(f"Config file not found: {config_path}")

    with open(config_path, "r") as f:
        config = yaml.safe_load(f)

    # Override with environment variables if set
    if os.environ.get("DB_HOST"):
        config["database"]["host"] = os.environ["DB_HOST"]
    if os.environ.get("DB_PASSWORD"):
        config["database"]["password"] = os.environ["DB_PASSWORD"]

    return config

def save_config(config, config_path="config.yaml"):
    """Save configuration back to YAML file."""
    with open(config_path, "w") as f:
        yaml.dump(config, f, default_flow_style=False, sort_keys=False)

# Usage
# config = load_config("config.yaml")
# print(config["database"]["host"])
Why YAML over JSON for config? YAML supports comments, is easier to read and edit by hand, and does not require quotes around string keys. JSON is better for data interchange because it is stricter and more widely supported programmatically.
4. XML Basics with ElementTree
XML (eXtensible Markup Language) is less common for new projects but still widely used in enterprise systems, SOAP APIs, and legacy codebases. Python’s standard library includes xml.etree.ElementTree for working with XML.
import xml.etree.ElementTree as ET

# Create XML programmatically
root = ET.Element("users")

user1 = ET.SubElement(root, "user", id="1")
ET.SubElement(user1, "name").text = "Folau"
ET.SubElement(user1, "email").text = "folau@example.com"
ET.SubElement(user1, "role").text = "admin"

user2 = ET.SubElement(root, "user", id="2")
ET.SubElement(user2, "name").text = "Jane"
ET.SubElement(user2, "email").text = "jane@example.com"
ET.SubElement(user2, "role").text = "developer"

# Convert to string
xml_string = ET.tostring(root, encoding="unicode", xml_declaration=True)
print(xml_string)
import xml.etree.ElementTree as ET

# Parse XML string
xml_data = """
<users>
    <user id="1">
        <name>Folau</name>
        <email>folau@example.com</email>
        <role>admin</role>
    </user>
    <user id="2">
        <name>Jane</name>
        <email>jane@example.com</email>
        <role>developer</role>
    </user>
</users>
"""

root = ET.fromstring(xml_data)

for user in root.findall("user"):
    user_id = user.get("id")
    name = user.find("name").text
    email = user.find("email").text
    role = user.find("role").text
    print(f"ID: {user_id}, Name: {name}, Email: {email}, Role: {role}")

# Output:
# ID: 1, Name: Folau, Email: folau@example.com, Role: admin
# ID: 2, Name: Jane, Email: jane@example.com, Role: developer
When to use XML: SOAP web services, configuration files for Java-based systems (Maven pom.xml, Android manifests), RSS/Atom feeds, and legacy integrations. For new Python projects, JSON or YAML are almost always better choices.
5. dataclasses and Serialization
Python’s dataclasses module (introduced in Python 3.7) provides a clean way to define data-holding classes. Combined with the dataclasses.asdict() function, they integrate well with JSON serialization.
import json
from dataclasses import dataclass, asdict, field
from typing import List

@dataclass
class Address:
    street: str
    city: str
    state: str
    zip_code: str

@dataclass
class Employee:
    name: str
    age: int
    department: str
    skills: List[str] = field(default_factory=list)
    address: Address = None

    def to_json(self):
        """Serialize to JSON string."""
        return json.dumps(asdict(self), indent=2)

    @classmethod
    def from_json(cls, json_string):
        """Deserialize from JSON string."""
        data = json.loads(json_string)
        # Handle nested Address object
        if data.get("address"):
            data["address"] = Address(**data["address"])
        return cls(**data)

# Create and serialize
employee = Employee(
    name="Folau",
    age=30,
    department="Engineering",
    skills=["Python", "AWS", "Docker"],
    address=Address("123 Main St", "San Francisco", "CA", "94102")
)

json_output = employee.to_json()
print(json_output)

# Deserialize back
restored = Employee.from_json(json_output)
print(restored.name)              # Folau
print(restored.address.city)      # San Francisco
print(restored.skills)            # ['Python', 'AWS', 'Docker']
Why dataclasses for serialization?
- Type hints serve as documentation for your data structure
asdict()provides automatic conversion to a dictionary (ready forjson.dumps())- Default values, field factories, and frozen instances are built in
- No external dependencies required
6. marshmallow — Schema-Based Serialization
For production applications that need validation, type coercion, and well-defined schemas, the marshmallow library is the gold standard. It separates your data model from your serialization logic, which keeps things clean as your application grows.
# Install first: pip install marshmallow
from marshmallow import Schema, fields, validate, post_load

class User:
    def __init__(self, name, email, age, role="viewer"):
        self.name = name
        self.email = email
        self.age = age
        self.role = role

    def __repr__(self):
        return f"User(name={self.name}, email={self.email}, role={self.role})"

class UserSchema(Schema):
    name = fields.Str(required=True, validate=validate.Length(min=1, max=100))
    email = fields.Email(required=True)
    age = fields.Int(required=True, validate=validate.Range(min=0, max=150))
    role = fields.Str(validate=validate.OneOf(["admin", "editor", "viewer"]))

    @post_load
    def make_user(self, data, **kwargs):
        return User(**data)

schema = UserSchema()

# Deserialize (load) — validates and creates object
user_data = {"name": "Folau", "email": "folau@example.com", "age": 30, "role": "admin"}
user = schema.load(user_data)
print(user)  # User(name=Folau, email=folau@example.com, role=admin)

# Serialize (dump) — converts object to dict
output = schema.dump(user)
print(output)  # {'name': 'Folau', 'email': 'folau@example.com', 'age': 30, 'role': 'admin'}

# Validation error example
try:
    bad_data = {"name": "", "email": "not-an-email", "age": -5}
    schema.load(bad_data)
except Exception as e:
    print(f"Validation errors: {e}")
Key benefits of marshmallow:
- Validation — Enforce constraints on incoming data
- Type coercion — Automatically convert strings to integers, dates, etc.
- Nested schemas — Handle complex, nested data structures
- Partial loading — Allow updates with only some fields
- Custom fields — Define your own field types and validators
7. Practical Examples
7.1 — REST API Data Processing
This is one of the most common real-world serialization tasks: fetching data from a REST API, processing it, and serializing the results.
import json
import urllib.request
from dataclasses import dataclass, asdict
from typing import List, Optional

@dataclass
class Todo:
    id: int
    title: str
    completed: bool
    user_id: int

    @classmethod
    def from_api_response(cls, data: dict) -> "Todo":
        """Create Todo from API response dict."""
        return cls(
            id=data["id"],
            title=data["title"],
            completed=data["completed"],
            user_id=data["userId"]
        )

def fetch_todos(limit: int = 10) -> List[Todo]:
    """Fetch todos from JSONPlaceholder API."""
    url = f"https://jsonplaceholder.typicode.com/todos?_limit={limit}"
    with urllib.request.urlopen(url) as response:
        data = json.loads(response.read().decode())
    return [Todo.from_api_response(item) for item in data]

def save_todos(todos: List[Todo], filepath: str):
    """Serialize todos to JSON file."""
    data = [asdict(todo) for todo in todos]
    with open(filepath, "w") as f:
        json.dump(data, f, indent=2)
    print(f"Saved {len(todos)} todos to {filepath}")

def load_todos(filepath: str) -> List[Todo]:
    """Deserialize todos from JSON file."""
    with open(filepath, "r") as f:
        data = json.load(f)
    return [Todo(**item) for item in data]

# Fetch from API, process, and save
todos = fetch_todos(limit=5)
completed = [t for t in todos if t.completed]
print(f"Completed: {len(completed)} / {len(todos)}")

save_todos(todos, "todos.json")
restored = load_todos("todos.json")
print(f"Loaded {len(restored)} todos from file")
7.2 — JSON-Based Config File Manager
import json
import os
from datetime import datetime

class ConfigManager:
    """Manage application configuration with JSON persistence."""

    def __init__(self, config_path="app_config.json"):
        self.config_path = config_path
        self.config = self._load_or_create()

    def _load_or_create(self):
        """Load existing config or create default."""
        if os.path.exists(self.config_path):
            with open(self.config_path, "r") as f:
                return json.load(f)
        return self._default_config()

    def _default_config(self):
        """Return default configuration."""
        return {
            "app_name": "MyApp",
            "version": "1.0.0",
            "database": {
                "host": "localhost",
                "port": 5432,
                "name": "myapp_db"
            },
            "logging": {
                "level": "INFO",
                "file": "app.log"
            },
            "last_modified": datetime.now().isoformat()
        }

    def get(self, key, default=None):
        """Get a config value using dot notation: 'database.host'."""
        keys = key.split(".")
        value = self.config
        for k in keys:
            if isinstance(value, dict) and k in value:
                value = value[k]
            else:
                return default
        return value

    def set(self, key, value):
        """Set a config value using dot notation."""
        keys = key.split(".")
        config = self.config
        for k in keys[:-1]:
            config = config.setdefault(k, {})
        config[keys[-1]] = value
        self.config["last_modified"] = datetime.now().isoformat()
        self._save()

    def _save(self):
        """Persist config to disk."""
        with open(self.config_path, "w") as f:
            json.dump(self.config, f, indent=2)

# Usage
config = ConfigManager("app_config.json")
print(config.get("database.host"))     # localhost
print(config.get("logging.level"))     # INFO

config.set("database.host", "db.production.com")
config.set("logging.level", "WARNING")
print(config.get("database.host"))     # db.production.com
7.3 — Data Export/Import System (CSV + JSON)
import json
import csv
import os

class DataExporter:
    """Export and import data between JSON and CSV formats."""

    @staticmethod
    def json_to_csv(json_path, csv_path):
        """Convert a JSON array of objects to CSV."""
        with open(json_path, "r") as f:
            data = json.load(f)

        if not data:
            print("No data to export")
            return

        # Use keys from first record as CSV headers
        headers = list(data[0].keys())

        with open(csv_path, "w", newline="") as f:
            writer = csv.DictWriter(f, fieldnames=headers)
            writer.writeheader()
            writer.writerows(data)

        print(f"Exported {len(data)} records to {csv_path}")

    @staticmethod
    def csv_to_json(csv_path, json_path):
        """Convert CSV to JSON array of objects."""
        records = []
        with open(csv_path, "r") as f:
            reader = csv.DictReader(f)
            for row in reader:
                records.append(dict(row))

        with open(json_path, "w") as f:
            json.dump(records, f, indent=2)

        print(f"Imported {len(records)} records to {json_path}")

    @staticmethod
    def export_summary(data, output_path):
        """Export a summary report as JSON."""
        summary = {
            "total_records": len(data),
            "exported_at": __import__("datetime").datetime.now().isoformat(),
            "sample": data[:3] if len(data) >= 3 else data
        }
        with open(output_path, "w") as f:
            json.dump(summary, f, indent=2)
        print(f"Summary saved to {output_path}")

# Example usage
employees = [
    {"name": "Folau", "department": "Engineering", "salary": 95000},
    {"name": "Jane", "department": "Marketing", "salary": 85000},
    {"name": "Bob", "department": "Engineering", "salary": 90000},
]

# Save as JSON
with open("employees.json", "w") as f:
    json.dump(employees, f, indent=2)

# Convert JSON to CSV
exporter = DataExporter()
exporter.json_to_csv("employees.json", "employees.csv")
exporter.csv_to_json("employees.csv", "employees_restored.json")
7.4 — Caching Expensive Computations with pickle
import pickle
import os
import time
import hashlib
from functools import wraps

def pickle_cache(cache_dir=".cache"):
    """Decorator that caches function results using pickle."""

    def decorator(func):
        @wraps(func)
        def wrapper(*args, **kwargs):
            # Create cache directory if needed
            os.makedirs(cache_dir, exist_ok=True)

            # Generate a unique cache key from function name and arguments
            key_data = f"{func.__name__}:{args}:{sorted(kwargs.items())}"
            cache_key = hashlib.md5(key_data.encode()).hexdigest()
            cache_path = os.path.join(cache_dir, f"{cache_key}.pkl")

            # Return cached result if available
            if os.path.exists(cache_path):
                print(f"Cache HIT for {func.__name__}")
                with open(cache_path, "rb") as f:
                    return pickle.load(f)

            # Compute and cache the result
            print(f"Cache MISS for {func.__name__} — computing...")
            result = func(*args, **kwargs)

            with open(cache_path, "wb") as f:
                pickle.dump(result, f)

            return result
        return wrapper
    return decorator

@pickle_cache()
def expensive_computation(n):
    """Simulate a slow computation."""
    time.sleep(2)  # Pretend this takes a long time
    return {i: i ** 3 for i in range(n)}

# First call: takes 2 seconds (cache MISS)
start = time.time()
result1 = expensive_computation(1000)
print(f"First call: {time.time() - start:.2f}s")

# Second call: instant (cache HIT)
start = time.time()
result2 = expensive_computation(1000)
print(f"Second call: {time.time() - start:.2f}s")

print(f"Results match: {result1 == result2}")
8. Common Pitfalls
8.1 — Security: pickle and Untrusted Data
This is the single most important pitfall. As demonstrated earlier, pickle.loads() can execute arbitrary code. Never use pickle to deserialize data from user input, external APIs, or any untrusted source. Use JSON instead.
8.2 — Encoding Issues
import json

# Problem: non-ASCII characters
data = {"city": "Sao Paulo", "greeting": "Hola, como estas?"}

# Default behavior escapes non-ASCII
print(json.dumps(data))
# {"city": "Sao Paulo", "greeting": "Hola, \u00bfcomo est\u00e1s?"}

# Fix: use ensure_ascii=False
print(json.dumps(data, ensure_ascii=False))
# {"city": "Sao Paulo", "greeting": "Hola, como estas?"}

# When writing to files, always specify encoding
with open("data.json", "w", encoding="utf-8") as f:
    json.dump(data, f, ensure_ascii=False, indent=2)
8.3 — Circular References
import json

# This will raise ValueError: Circular reference detected
a = {}
b = {"ref": a}
a["ref"] = b

try:
    json.dumps(a)
except ValueError as e:
    print(f"Error: {e}")  # Circular reference detected

# Solution: break circular references before serializing
# or use a custom encoder that tracks visited objects
8.4 — datetime Handling
import json
from datetime import datetime

# Problem: datetime is not JSON-serializable
event = {"name": "Deploy", "timestamp": datetime.now()}

# Solution 1: Convert to ISO format string
event["timestamp"] = event["timestamp"].isoformat()
print(json.dumps(event))

# Solution 2: Use the default parameter
def default_handler(obj):
    if hasattr(obj, "isoformat"):
        return obj.isoformat()
    raise TypeError(f"Cannot serialize {type(obj)}")

event2 = {"name": "Deploy", "timestamp": datetime.now()}
print(json.dumps(event2, default=default_handler))

# Deserializing back to datetime
json_str = '{"name": "Deploy", "timestamp": "2024-01-15T10:30:00"}'
data = json.loads(json_str)
data["timestamp"] = datetime.fromisoformat(data["timestamp"])
print(type(data["timestamp"]))  # <class 'datetime.datetime'>
8.5 — JSON Keys Must Be Strings
import json

# Python allows non-string keys in dicts
data = {1: "one", 2: "two", (3, 4): "tuple_key"}

# JSON only allows string keys — this converts int keys to strings
result = json.dumps({1: "one", 2: "two"})
print(result)  # {"1": "one", "2": "two"}

parsed = json.loads(result)
print(parsed["1"])   # "one" — note the key is now a string!
# print(parsed[1])   # KeyError! The key is "1", not 1

# Tuple keys will raise TypeError
try:
    json.dumps(data)
except TypeError as e:
    print(f"Error: {e}")
9. Best Practices
After years of working with serialization in production systems, here are the practices that matter most:
- Use JSON for human-readable data exchange. It is the standard for APIs, configuration files that humans edit, and any data shared between different languages or systems.
- Use pickle only for Python-internal storage. Caching computation results, saving ML models, or storing session data between runs of the same Python application. Never expose pickle data to the outside world.
- Validate on deserialization. Never trust incoming data. Validate structure, types, and ranges after deserializing — whether from a file, API, or user input. Libraries like marshmallow and pydantic make this easy.
- Handle encoding explicitly. Always specify
encoding="utf-8"when opening files, and useensure_ascii=Falseif your data contains non-ASCII characters. - Use
yaml.safe_load(), neveryaml.load()without a Loader. The fullyaml.load()can execute arbitrary Python code, similar to pickle. - Define clear serialization boundaries. Use
to_dict()/from_dict()methods on your classes, or use schemas (marshmallow) to define exactly what gets serialized and how. - Version your serialized formats. Include a version field in your serialized data so you can handle format changes gracefully over time.
- Handle missing fields gracefully. When deserializing, use
.get()with defaults rather than direct key access. Data schemas evolve, and old serialized data may lack newer fields. - Keep serialization logic separate from business logic. Do not scatter
json.dumps()calls throughout your code. Centralize serialization in dedicated methods or schema classes. - Use appropriate formats for the job. YAML for config files that humans edit. JSON for API communication. pickle for Python-internal caching. CSV for tabular data that needs spreadsheet compatibility. XML only when integrating with systems that require it.
10. Key Takeaways
- Serialization converts Python objects to a storable/transmittable format; deserialization reverses the process.
- JSON (
jsonmodule) is the go-to format for APIs and human-readable data. Usedumps/loadsfor strings,dump/loadfor files. - pickle handles any Python object but produces binary, Python-only output. Never unpickle untrusted data.
- YAML (
PyYAML) excels at configuration files. Always usesafe_load(). - XML (
ElementTree) is for enterprise/legacy integrations. - dataclasses +
asdict()provide a clean, zero-dependency path from Python objects to JSON. - marshmallow adds validation and schema enforcement for production applications.
- Handle
datetime, encoding, and non-string keys explicitly — they are the most common sources of serialization bugs. - Always validate deserialized data. Never trust the source blindly.
Python Advanced – Map, Reduce, and Filter
Introduction
Functional programming is a paradigm that treats computation as the evaluation of mathematical functions. Rather than telling the computer how to do something step by step (imperative style), you describe what you want to achieve by composing pure functions that transform data without side effects.
Python is not a purely functional language, but it borrows heavily from the functional tradition. Three of the most important functional tools in Python are map(), filter(), and reduce(). These functions let you process collections of data in a declarative, composable way — and understanding them will make you a stronger Python developer.
Here is why these three functions matter:
- map() transforms every element in a collection.
- filter() selects elements that meet a condition.
- reduce() collapses a collection into a single value.
Together, they form the backbone of data processing pipelines. Whether you are cleaning datasets, transforming API responses, or building ETL jobs, you will reach for these tools constantly.
map()
Syntax
map(function, iterable, *iterables)
map() applies a function to every item in one or more iterables and returns a map object (an iterator). It does not modify the original data — it produces a new sequence of transformed values.
# Basic usage
numbers = [1, 2, 3, 4, 5]
squared = map(lambda x: x ** 2, numbers)

print(list(squared))
# Output: [1, 4, 9, 16, 25]
Notice that map() returns an iterator, not a list. You need to wrap it in list() to see all the values at once. This lazy evaluation is by design — it is memory efficient for large datasets.
Example 1: Converting Temperatures (Celsius to Fahrenheit)
def celsius_to_fahrenheit(celsius):
    return (celsius * 9/5) + 32

temperatures_c = [0, 20, 37, 100]
temperatures_f = list(map(celsius_to_fahrenheit, temperatures_c))

print(temperatures_f)
# Output: [32.0, 68.0, 98.6, 212.0]
This is clean, readable, and intention-revealing. The function name tells you exactly what transformation is happening. No loop boilerplate, no index management.
Example 2: Extracting Data from a List of Dictionaries
This is a pattern you will use all the time when working with API responses or database results.
employees = [
    {"name": "Alice", "department": "Engineering", "salary": 95000},
    {"name": "Bob", "department": "Marketing", "salary": 72000},
    {"name": "Charlie", "department": "Engineering", "salary": 105000},
    {"name": "Diana", "department": "HR", "salary": 68000},
]

# Extract just the names
names = list(map(lambda emp: emp["name"], employees))
print(names)
# Output: ['Alice', 'Bob', 'Charlie', 'Diana']

# Extract name and salary as tuples
name_salary = list(map(lambda emp: (emp["name"], emp["salary"]), employees))
print(name_salary)
# Output: [('Alice', 95000), ('Bob', 72000), ('Charlie', 105000), ('Diana', 68000)]
Example 3: Using map() with Multiple Iterables
When you pass multiple iterables to map(), the function must accept that many arguments. The iteration stops when the shortest iterable is exhausted.
# Add corresponding elements from two lists
list_a = [1, 2, 3, 4]
list_b = [10, 20, 30, 40]

sums = list(map(lambda a, b: a + b, list_a, list_b))
print(sums)
# Output: [11, 22, 33, 44]

# Calculate weighted scores
scores = [85, 92, 78, 95]
weights = [0.2, 0.3, 0.25, 0.25]

weighted = list(map(lambda s, w: round(s * w, 2), scores, weights))
print(weighted)
# Output: [17.0, 27.6, 19.5, 23.75]

total_weighted_score = sum(weighted)
print(f"Total weighted score: {total_weighted_score}")
# Output: Total weighted score: 87.85
map() vs List Comprehension
In Python, list comprehensions can do everything map() does and are often considered more Pythonic.
numbers = [1, 2, 3, 4, 5]

# Using map
squared_map = list(map(lambda x: x ** 2, numbers))

# Using list comprehension
squared_comp = [x ** 2 for x in numbers]

# Both produce: [1, 4, 9, 16, 25]
When to use map():
- When you already have a named function to apply —
list(map(str, numbers))is cleaner than[str(x) for x in numbers]. - When you need lazy evaluation (do not wrap in
list()). - When working with multiple iterables simultaneously.
When to use list comprehension:
- When the transformation logic is inline and simple.
- When you also need to filter (comprehensions combine map and filter naturally).
- When readability matters more than functional purity.
filter()
Syntax
filter(function, iterable)
filter() takes a function that returns True or False (a predicate) and an iterable. It returns an iterator containing only the elements for which the predicate returned True.
# Basic usage
numbers = [1, 2, 3, 4, 5, 6, 7, 8, 9, 10]
evens = list(filter(lambda x: x % 2 == 0, numbers))

print(evens)
# Output: [2, 4, 6, 8, 10]
Example 1: Filtering Even and Odd Numbers
numbers = range(1, 21)  # 1 through 20

evens = list(filter(lambda x: x % 2 == 0, numbers))
odds = list(filter(lambda x: x % 2 != 0, numbers))

print(f"Even: {evens}")
# Output: Even: [2, 4, 6, 8, 10, 12, 14, 16, 18, 20]

print(f"Odd: {odds}")
# Output: Odd: [1, 3, 5, 7, 9, 11, 13, 15, 17, 19]
Example 2: Filtering Valid Emails from a List
Here is a practical example you might encounter when processing user input or cleaning data.
import re

def is_valid_email(email):
    """Basic email validation."""
    pattern = r'^[a-zA-Z0-9._%+-]+@[a-zA-Z0-9.-]+\.[a-zA-Z]{2,}$'
    return bool(re.match(pattern, email))

emails = [
    "alice@example.com",
    "bob@company.org",
    "not-an-email",
    "charlie@",
    "diana@domain.co.uk",
    "@missing-local.com",
    "eve@valid.io",
]

valid_emails = list(filter(is_valid_email, emails))
print(valid_emails)
# Output: ['alice@example.com', 'bob@company.org', 'diana@domain.co.uk', 'eve@valid.io']

invalid_emails = list(filter(lambda e: not is_valid_email(e), emails))
print(invalid_emails)
# Output: ['not-an-email', 'charlie@', '@missing-local.com']
Example 3: Filtering Objects by Attribute
class Product:
    def __init__(self, name, price, in_stock):
        self.name = name
        self.price = price
        self.in_stock = in_stock

    def __repr__(self):
        return f"Product({self.name}, ${self.price}, {'In Stock' if self.in_stock else 'Out of Stock'})"

products = [
    Product("Laptop", 999.99, True),
    Product("Mouse", 29.99, True),
    Product("Keyboard", 79.99, False),
    Product("Monitor", 349.99, True),
    Product("Webcam", 69.99, False),
    Product("Headset", 149.99, True),
]

# Filter products that are in stock and under $200
affordable_in_stock = list(filter(
    lambda p: p.in_stock and p.price < 200,
    products
))

print(affordable_in_stock)
# Output: [Product(Mouse, $29.99, In Stock), Product(Headset, $149.99, In Stock)]
Using None as the filter function
If you pass None as the function, filter() removes all falsy values from the iterable.
mixed = [0, 1, "", "hello", None, True, False, [], [1, 2], {}, {"key": "val"}]

truthy_values = list(filter(None, mixed))
print(truthy_values)
# Output: [1, 'hello', True, [1, 2], {'key': 'val'}]
This is a clean way to strip out empty strings, zeros, None values, and empty collections in one shot.
filter() vs List Comprehension
numbers = [1, 2, 3, 4, 5, 6, 7, 8, 9, 10]

# Using filter
evens_filter = list(filter(lambda x: x % 2 == 0, numbers))

# Using list comprehension
evens_comp = [x for x in numbers if x % 2 == 0]

# Both produce: [2, 4, 6, 8, 10]
The list comprehension is arguably more readable here. But filter() shines when you already have a named predicate function — list(filter(is_valid_email, emails)) reads almost like English.
reduce()
Syntax
from functools import reduce

reduce(function, iterable[, initializer])
reduce() applies a function of two arguments cumulatively to the items in an iterable, from left to right, reducing the iterable to a single value. Unlike map() and filter(), reduce() is not a built-in — you must import it from the functools module.
Here is how it works step by step:
from functools import reduce

numbers = [1, 2, 3, 4, 5]

# Step-by-step: reduce(lambda a, b: a + b, [1, 2, 3, 4, 5])
# Step 1: a=1, b=2 -> 3
# Step 2: a=3, b=3 -> 6
# Step 3: a=6, b=4 -> 10
# Step 4: a=10, b=5 -> 15

total = reduce(lambda a, b: a + b, numbers)
print(total)
# Output: 15
Example 1: Summing Numbers
from functools import reduce

# Sum of all numbers
numbers = [10, 20, 30, 40, 50]
total = reduce(lambda acc, x: acc + x, numbers)
print(f"Sum: {total}")
# Output: Sum: 150

# Of course, Python has a built-in sum() for this.
# But reduce() generalizes to any binary operation.
print(f"Sum (built-in): {sum(numbers)}")
# Output: Sum (built-in): 150
Example 2: Finding the Maximum Value
from functools import reduce

numbers = [34, 12, 89, 45, 67, 23, 91, 56]

maximum = reduce(lambda a, b: a if a > b else b, numbers)
print(f"Maximum: {maximum}")
# Output: Maximum: 91

minimum = reduce(lambda a, b: a if a < b else b, numbers)
print(f"Minimum: {minimum}")
# Output: Minimum: 12
Again, Python has max() and min() built-ins for this. But this demonstrates the pattern: reduce() compresses a collection by repeatedly applying a binary operation.
Example 3: Flattening a List of Lists
from functools import reduce

nested = [[1, 2, 3], [4, 5], [6, 7, 8, 9], [10]]

flattened = reduce(lambda acc, lst: acc + lst, nested)
print(flattened)
# Output: [1, 2, 3, 4, 5, 6, 7, 8, 9, 10]
This works because the + operator concatenates lists. The accumulator starts with [1, 2, 3], then appends [4, 5] to get [1, 2, 3, 4, 5], and so on.
Example 4: Building a String from Parts
from functools import reduce

words = ["Python", "is", "a", "powerful", "language"]

sentence = reduce(lambda acc, word: acc + " " + word, words)
print(sentence)
# Output: Python is a powerful language

# In practice, you would use str.join() for this:
print(" ".join(words))
# Output: Python is a powerful language
The Initializer Parameter
The optional third argument to reduce() is the initializer. It serves as the starting value for the accumulation and is used as the default if the iterable is empty.
from functools import reduce

# Without initializer - fails on empty list
try:
    result = reduce(lambda a, b: a + b, [])
except TypeError as e:
    print(f"Error: {e}")
# Output: Error: reduce() of empty sequence with no initial value

# With initializer - returns the initializer for empty list
result = reduce(lambda a, b: a + b, [], 0)
print(f"Empty list with initializer: {result}")
# Output: Empty list with initializer: 0

# Counting word frequencies with reduce
words = ["apple", "banana", "apple", "cherry", "banana", "apple"]

word_counts = reduce(
    lambda acc, word: {**acc, word: acc.get(word, 0) + 1},
    words,
    {}  # initializer: empty dictionary
)
print(word_counts)
# Output: {'apple': 3, 'banana': 2, 'cherry': 1}
The initializer is critical when you need the accumulator to be a different type than the elements. In the word-counting example above, the elements are strings but the accumulator is a dictionary.
Combining map(), filter(), and reduce()
The real power of these functions emerges when you chain them together into data processing pipelines. Here is a real-world example: processing employee data to compute total salary expenditure for active engineering staff.
from functools import reduce

employees = [
    {"name": "Alice", "department": "Engineering", "salary": 95000, "active": True},
    {"name": "Bob", "department": "Marketing", "salary": 72000, "active": True},
    {"name": "Charlie", "department": "Engineering", "salary": 105000, "active": False},
    {"name": "Diana", "department": "HR", "salary": 68000, "active": True},
    {"name": "Eve", "department": "Engineering", "salary": 112000, "active": True},
    {"name": "Frank", "department": "Engineering", "salary": 89000, "active": True},
    {"name": "Grace", "department": "Marketing", "salary": 78000, "active": False},
]

# Pipeline: filter active engineers -> extract salaries -> compute total
active_engineers = filter(
    lambda emp: emp["active"] and emp["department"] == "Engineering",
    employees
)

salaries = map(lambda emp: emp["salary"], active_engineers)

total_salary = reduce(lambda acc, sal: acc + sal, salaries, 0)

print(f"Total salary for active engineers: ${total_salary:,}")
# Output: Total salary for active engineers: $296,000
Notice how each step has a single responsibility:
- filter() selects only active engineers.
- map() extracts the salary from each employee dict.
- reduce() sums all the salaries into one number.
Because filter() and map() return iterators, no intermediate lists are created. The data flows through the pipeline lazily, one element at a time.
Here is another example — computing the average score of students who passed:
from functools import reduce

students = [
    {"name": "Alice", "score": 92},
    {"name": "Bob", "score": 45},
    {"name": "Charlie", "score": 78},
    {"name": "Diana", "score": 34},
    {"name": "Eve", "score": 88},
    {"name": "Frank", "score": 65},
    {"name": "Grace", "score": 55},
]

# Step 1: Filter students who passed (score >= 60)
passed = list(filter(lambda s: s["score"] >= 60, students))

# Step 2: Extract scores
scores = list(map(lambda s: s["score"], passed))

# Step 3: Compute average using reduce
total = reduce(lambda acc, s: acc + s, scores, 0)
average = total / len(scores)

print(f"Passing students: {[s['name'] for s in passed]}")
# Output: Passing students: ['Alice', 'Charlie', 'Eve', 'Frank']

print(f"Average passing score: {average:.1f}")
# Output: Average passing score: 80.8
Lambda Functions with map, filter, and reduce
Lambda functions are anonymous, single-expression functions. They are the natural companion to map(), filter(), and reduce() because they let you define small transformation or predicate logic inline without naming a separate function.
# Lambda syntax: lambda arguments: expression

# Square numbers
list(map(lambda x: x ** 2, [1, 2, 3, 4]))
# [1, 4, 9, 16]

# Filter strings longer than 3 characters
list(filter(lambda s: len(s) > 3, ["hi", "hello", "hey", "howdy"]))
# ['hello', 'howdy']

# Multiply all numbers together
from functools import reduce
reduce(lambda a, b: a * b, [1, 2, 3, 4, 5])
# 120 (factorial of 5)
A word of caution: Lambdas are great for simple, obvious operations. But if your lambda spans multiple conditions or is hard to read at a glance, extract it into a named function. Readability always wins.
# Bad: complex lambda is hard to parse
result = list(filter(
    lambda x: x["active"] and x["age"] > 25 and x["department"] in ["Engineering", "Product"],
    employees
))

# Better: named function with a clear name
def is_eligible_engineer(emp):
    return (
        emp["active"]
        and emp["age"] > 25
        and emp["department"] in ["Engineering", "Product"]
    )

result = list(filter(is_eligible_engineer, employees))
When to Use What
Here is a practical decision guide for choosing between these tools.
map() vs List Comprehension
| Scenario | Prefer |
|---|---|
| Applying an existing named function | map(str, numbers) |
| Simple inline transformation | [x * 2 for x in numbers] |
| Multiple iterables | map(func, iter1, iter2) |
| Need lazy evaluation | map(func, iterable) |
| Transformation + filtering together | [x * 2 for x in numbers if x > 0] |
filter() vs List Comprehension
| Scenario | Prefer |
|---|---|
| Applying an existing predicate function | filter(is_valid, items) |
| Simple inline condition | [x for x in items if x > 0] |
| Removing falsy values | filter(None, items) |
| Need lazy evaluation | filter(func, iterable) |
When reduce() is Appropriate
- When you need to collapse a collection into a single value that is not a simple sum or product (use
sum(),math.prod()for those). - When building up a complex accumulator like a dictionary or nested structure.
- When the reduction logic cannot be expressed by a built-in function.
- Consider
itertools.accumulate()if you need intermediate results.
Performance Considerations
Lazy Evaluation
In Python 3, both map() and filter() return iterators, not lists. This means they compute values on demand, which has significant memory benefits for large datasets.
import sys

# List comprehension creates entire list in memory
big_list = [x ** 2 for x in range(1_000_000)]
print(f"List size: {sys.getsizeof(big_list):,} bytes")
# Output: List size: 8,448,728 bytes

# map() returns a tiny iterator object
big_map = map(lambda x: x ** 2, range(1_000_000))
print(f"Map size: {sys.getsizeof(big_map)} bytes")
# Output: Map size: 48 bytes
The map object is only 48 bytes regardless of how many elements it will produce. The values are computed only when you iterate over them.
When Generators Are Better
For complex transformations, generator expressions offer the same lazy evaluation benefits as map() and filter() with more readable syntax.
# Generator expression - lazy, like map/filter
squared_gen = (x ** 2 for x in range(1_000_000))

# You can chain filter and map logic in one generator
result = (
    x ** 2
    for x in range(1_000_000)
    if x % 2 == 0
)

# Process lazily - never loads everything into memory
for value in result:
    if value > 100:
        break
Performance Comparison
import timeit

numbers = list(range(10_000))

# map with lambda
t1 = timeit.timeit(lambda: list(map(lambda x: x * 2, numbers)), number=1000)

# list comprehension
t2 = timeit.timeit(lambda: [x * 2 for x in numbers], number=1000)

# map with named function
def double(x):
    return x * 2

t3 = timeit.timeit(lambda: list(map(double, numbers)), number=1000)

print(f"map + lambda:     {t1:.4f}s")
print(f"comprehension:    {t2:.4f}s")
print(f"map + named func: {t3:.4f}s")

# Typical results:
# map + lambda:     0.8500s
# comprehension:    0.5200s
# map + named func: 0.7100s
# List comprehensions are usually fastest for simple operations
The takeaway: list comprehensions tend to be slightly faster than map() with a lambda, because they avoid the overhead of a function call on each iteration. However, the difference is negligible for most applications — choose based on readability.
Common Pitfalls
1. Forgetting that reduce() is in functools
# This will fail in Python 3
# reduce(lambda a, b: a + b, [1, 2, 3])
# NameError: name 'reduce' is not defined

# Correct: import it first
from functools import reduce
reduce(lambda a, b: a + b, [1, 2, 3])
# 6
In Python 2, reduce() was a built-in. Guido van Rossum moved it to functools in Python 3 because he felt it was overused and often less readable than a simple loop.
2. map() and filter() Return Iterators, Not Lists
# This might surprise you
result = map(lambda x: x * 2, [1, 2, 3])
print(result)
# Output: <map object at 0x...>

# You need to consume the iterator
print(list(result))
# Output: [2, 4, 6]

# CAUTION: iterators are exhausted after one pass
result = map(lambda x: x * 2, [1, 2, 3])
print(list(result))  # [2, 4, 6]
print(list(result))  # [] -- empty! The iterator is spent.
This is a frequent source of bugs. If you need to iterate over the result multiple times, convert it to a list first.
3. Overusing Lambda Functions
# Overly clever - hard to debug and understand
result = list(map(lambda x: (lambda y: y ** 2 + 2 * y + 1)(x), range(10)))

# Just use a regular function
def transform(x):
    return x ** 2 + 2 * x + 1

result = list(map(transform, range(10)))
# Or better yet:
result = [x ** 2 + 2 * x + 1 for x in range(10)]
4. Using reduce() When a Built-in Will Do
from functools import reduce
import math

numbers = [1, 2, 3, 4, 5]

# Unnecessary reduce usage
total = reduce(lambda a, b: a + b, numbers)     # Use sum(numbers)
product = reduce(lambda a, b: a * b, numbers)   # Use math.prod(numbers)
biggest = reduce(lambda a, b: max(a, b), numbers)  # Use max(numbers)
joined = reduce(lambda a, b: a + " " + b, ["a", "b", "c"])  # Use " ".join(...)

# Python has built-ins for all of these. Use them.
Best Practices
1. Readability Over Cleverness
The goal is code that your teammates (and future you) can understand at a glance. Functional style should make code clearer, not more obscure.
# Clear and readable
active_users = [user for user in users if user.is_active]
usernames = [user.name for user in active_users]

# Also clear, different style
active_users = filter(lambda u: u.is_active, users)
usernames = list(map(lambda u: u.name, active_users))
2. Prefer Comprehensions for Combined Transform + Filter
# Comprehension handles both in one expression
result = [x ** 2 for x in numbers if x > 0]

# map + filter requires nesting or chaining
result = list(map(lambda x: x ** 2, filter(lambda x: x > 0, numbers)))
The comprehension is almost always more readable when you need both transformation and filtering.
3. Use Named Functions for Complex Logic
def calculate_tax(income):
    if income < 30000:
        return income * 0.1
    elif income < 70000:
        return income * 0.2
    else:
        return income * 0.3

incomes = [25000, 45000, 85000, 60000, 120000]
taxes = list(map(calculate_tax, incomes))
print(taxes)
# Output: [2500.0, 9000.0, 25500.0, 12000.0, 36000.0]
Named functions are testable, documentable, and reusable. Lambda functions are none of these.
4. Chain Operations for Data Pipelines
from functools import reduce

# Processing a log file: extract errors, get timestamps, find the latest
log_entries = [
    {"level": "INFO", "timestamp": "2024-01-15 10:30:00", "message": "Started"},
    {"level": "ERROR", "timestamp": "2024-01-15 10:31:00", "message": "DB timeout"},
    {"level": "INFO", "timestamp": "2024-01-15 10:32:00", "message": "Retrying"},
    {"level": "ERROR", "timestamp": "2024-01-15 10:33:00", "message": "DB timeout again"},
    {"level": "INFO", "timestamp": "2024-01-15 10:34:00", "message": "Recovered"},
]

errors = filter(lambda e: e["level"] == "ERROR", log_entries)
timestamps = map(lambda e: e["timestamp"], errors)
latest_error = reduce(lambda a, b: max(a, b), timestamps)

print(f"Latest error at: {latest_error}")
# Output: Latest error at: 2024-01-15 10:33:00
Key Takeaways
- map() transforms every element — use it when you have a function to apply across a collection.
- filter() selects elements by a condition — use it when you need to keep only items that pass a test.
- reduce() collapses a collection into one value — import it from
functoolsand use it for non-trivial aggregations. - All three return iterators in Python 3 (except reduce, which returns a single value). Wrap in
list()when you need a list. - List comprehensions are often more Pythonic for simple cases. Use
map()/filter()when you have named functions or need lazy evaluation. - Lambda functions pair naturally with these tools but should stay simple. Extract complex logic into named functions.
- Chain map, filter, and reduce together for clean data processing pipelines.
- Performance: comprehensions are slightly faster for simple operations, but the difference rarely matters. Choose readability.
- Use Python's built-ins (
sum(),max(),min(),str.join()) when they fit — do not reinvent the wheel withreduce(). - These patterns translate directly to other languages and frameworks (JavaScript, Java Streams, Spark, pandas) — learning them here pays dividends everywhere.
log4j
1. Why Logging?
Imagine you are a detective investigating a crime scene. Without evidence — fingerprints, security camera footage, witness statements — you would have no way to reconstruct what happened. Logging is the evidence trail for your application. It records what your program did, when it did it, and what went wrong.
Logging is the practice of recording messages from your application during runtime. These messages capture events, errors, state changes, and diagnostic information that help you understand your application’s behavior — especially when things go wrong in production at 3 AM and you cannot attach a debugger.
Why Not System.out.println?
Every Java developer starts with System.out.println() for debugging. It works, but it is the equivalent of using a flashlight when you need a full surveillance system. Here is why it falls short in real applications:
| Feature | System.out.println | Logging Framework |
|---|---|---|
| Severity levels | None — everything looks the same | TRACE, DEBUG, INFO, WARN, ERROR |
| On/off control | Must delete or comment out lines | Change config file, no code changes |
| Output destination | Console only | Console, files, databases, remote servers |
| Timestamps | Must add manually | Automatic |
| Thread info | Must add manually | Automatic |
| Class/method info | Must add manually | Automatic |
| File rotation | Not possible | Automatic (e.g., daily, by size) |
| Performance | Always executes string building | Lazy evaluation, skip if level disabled |
| Production ready | No | Yes |
What to Log
- Application startup and shutdown — configuration loaded, services initialized, graceful shutdown
- Business events — order placed, payment processed, user registered
- Errors and exceptions — failed database connections, invalid input, timeout errors
- Warnings — deprecated API usage, retry attempts, approaching resource limits
- Performance data — request duration, query execution time, cache hit/miss ratios
- External system interactions — API calls sent/received, database queries, message queue operations
What NOT to Log
- Passwords — never log user passwords, even encrypted ones
- Credit card numbers — PCI-DSS compliance requires masking (show only last 4 digits)
- Social Security Numbers — personally identifiable information (PII)
- API keys and secrets — attackers read log files too
- Session tokens — could enable session hijacking
- Medical or health data — HIPAA compliance
A simple rule: if you would not want it on a billboard, do not log it.
// BAD: System.out.println for debugging
public class BadDebugging {
    public void processOrder(Order order) {
        System.out.println("Processing order: " + order.getId());      // No timestamp
        System.out.println("Order total: " + order.getTotal());        // No severity
        System.out.println("Sending to payment...");                   // Cannot turn off
        // These println calls will clutter production logs forever
    }
}

// GOOD: Proper logging
import org.slf4j.Logger;
import org.slf4j.LoggerFactory;

public class GoodLogging {
    private static final Logger log = LoggerFactory.getLogger(GoodLogging.class);

    public void processOrder(Order order) {
        log.info("Processing order id={}, total={}", order.getId(), order.getTotal());
        log.debug("Sending order to payment gateway");
        // Output: 2026-02-28 10:15:32.451 [main] INFO  GoodLogging - Processing order id=12345, total=99.99
        // In production, DEBUG messages are automatically suppressed
    }
}
2. Java Logging Landscape
Java has multiple logging frameworks, which can be confusing for newcomers. Here is the landscape and how the pieces fit together:
| Framework | Type | Description | Status |
|---|---|---|---|
| java.util.logging (JUL) | Implementation | Built into the JDK since Java 1.4. No external dependencies needed. | Active but rarely used in modern projects |
| Log4j 1.x | Implementation | Was the de facto standard for years. Uses log4j.properties or log4j.xml. | END OF LIFE — Critical security vulnerability CVE-2021-44228. DO NOT USE. |
| Log4j 2 | Implementation | Complete rewrite of Log4j. Async logging, plugin architecture, modern design. | Active, maintained by Apache |
| Logback | Implementation | Created by the founder of Log4j as its successor. Native SLF4J implementation. | Active, default in Spring Boot |
| SLF4J | Facade (API) | Simple Logging Facade for Java. An abstraction layer — you code against SLF4J and swap implementations without changing code. | Active, industry standard |
The Facade Pattern: Why SLF4J Matters
Think of SLF4J like a universal remote control. You press the same buttons regardless of whether your TV is Samsung, LG, or Sony. Similarly, you write logging code using SLF4J’s API, and the actual logging is handled by whichever implementation (Logback, Log4j2) is on the classpath.
This means:
- Your application code uses
org.slf4j.Logger— never a specific implementation class - You can switch from Logback to Log4j2 by changing a Maven dependency — zero code changes
- Libraries you depend on can use SLF4J too, and their logs funnel through your chosen implementation
Recommended Stack
For most Java applications in 2026, use: SLF4J (facade) + Logback (implementation). This is the default in Spring Boot and the most widely adopted combination. This tutorial will focus primarily on this stack, but we will also cover JUL and Log4j2.
3. Log Levels
Log levels let you categorize messages by severity. You can then configure your application to show only messages at or above a certain level — for example, showing everything in development but only WARN and ERROR in production.
SLF4J Log Levels (from least to most severe)
| Level | Purpose | When to Use | Example |
|---|---|---|---|
| TRACE | Extremely detailed diagnostic information | Step-by-step algorithm execution, variable values in loops, entering/exiting methods | log.trace("Entering calculateTax with amount={}", amount) |
| DEBUG | Detailed information useful during development | SQL queries executed, cache hit/miss, intermediate calculation results, request/response payloads | log.debug("Query returned {} rows in {}ms", count, elapsed) |
| INFO | Important business or application events | Application started, user logged in, order processed, scheduled job completed | log.info("Order {} placed successfully by user {}", orderId, userId) |
| WARN | Potentially harmful situations that are recoverable | Retry attempts, deprecated API usage, approaching disk/memory limits, fallback to default | log.warn("Payment gateway timeout, retrying (attempt {}/3)", attempt) |
| ERROR | Serious failures that need attention | Unhandled exceptions, failed database connections, data corruption, business rule violations that halt processing | log.error("Failed to process payment for order {}", orderId, exception) |
Level Hierarchy
Levels form a hierarchy. When you set the log level to a certain value, all messages at that level and above are logged. Messages below that level are suppressed.
| Configured Level | TRACE | DEBUG | INFO | WARN | ERROR |
|---|---|---|---|---|---|
| TRACE | Yes | Yes | Yes | Yes | Yes |
| DEBUG | No | Yes | Yes | Yes | Yes |
| INFO | No | No | Yes | Yes | Yes |
| WARN | No | No | No | Yes | Yes |
| ERROR | No | No | No | No | Yes |
Rule of thumb: Development uses DEBUG or TRACE. Production uses INFO (or WARN for very high-throughput systems). You should be able to understand what your application is doing from INFO logs alone.
import org.slf4j.Logger;
import org.slf4j.LoggerFactory;

public class LogLevelDemo {
    private static final Logger log = LoggerFactory.getLogger(LogLevelDemo.class);

    public void processPayment(String orderId, double amount) {
        log.trace("Entering processPayment(orderId={}, amount={})", orderId, amount);

        log.debug("Validating payment amount: {}", amount);

        if (amount <= 0) {
            log.warn("Invalid payment amount {} for order {}, using minimum $0.01", amount, orderId);
            amount = 0.01;
        }

        try {
            log.info("Processing payment of ${} for order {}", amount, orderId);
            // ... payment logic ...
            log.info("Payment successful for order {}", orderId);
        } catch (Exception e) {
            log.error("Payment failed for order {} with amount ${}", orderId, amount, e);
            // The exception 'e' is passed as the LAST argument -- SLF4J will print the full stack trace
        }

        log.trace("Exiting processPayment for order {}", orderId);
    }
}
// If level is set to INFO, output would be:
// 2026-02-28 10:30:00.123 [main] INFO  LogLevelDemo - Processing payment of $49.99 for order ORD-001
// 2026-02-28 10:30:00.456 [main] INFO  LogLevelDemo - Payment successful for order ORD-001
// (TRACE and DEBUG messages are suppressed)
4. java.util.logging (JUL)
Java includes a built-in logging framework in the java.util.logging package. It requires no external dependencies, which makes it a good starting point for learning and for simple applications where you want zero third-party libraries.
JUL Log Levels
JUL uses its own level names, which differ from SLF4J:
| JUL Level | SLF4J Equivalent | Description |
|---|---|---|
| FINEST | TRACE | Highly detailed tracing |
| FINER | TRACE | Fairly detailed tracing |
| FINE | DEBUG | General debugging |
| CONFIG | - | Configuration info |
| INFO | INFO | Informational messages |
| WARNING | WARN | Potential problems |
| SEVERE | ERROR | Serious failures |
import java.util.logging.Level;
import java.util.logging.Logger;

public class JulExample {
    // Create a logger named after the class
    private static final Logger logger = Logger.getLogger(JulExample.class.getName());

    public static void main(String[] args) {
        // Basic logging at different levels
        logger.info("Application starting");
        logger.warning("Configuration file not found, using defaults");
        logger.severe("Database connection failed!");

        // Parameterized logging (JUL uses {0}, {1} style -- not {} like SLF4J)
        String user = "alice";
        int loginAttempts = 3;
        logger.log(Level.INFO, "User {0} logged in after {1} attempts", new Object[]{user, loginAttempts});

        // Logging an exception
        try {
            int result = 10 / 0;
        } catch (ArithmeticException e) {
            logger.log(Level.SEVERE, "Division error occurred", e);
        }

        // Check if level is enabled before expensive operations
        if (logger.isLoggable(Level.FINE)) {
            logger.fine("Debug data: " + expensiveToString());
        }
    }

    private static String expensiveToString() {
        // Imagine this method is costly to call
        return "detailed debug information";
    }
}
// Output:
// Feb 28, 2026 10:45:00 AM JulExample main
// INFO: Application starting
// Feb 28, 2026 10:45:00 AM JulExample main
// WARNING: Configuration file not found, using defaults
// Feb 28, 2026 10:45:00 AM JulExample main
// SEVERE: Database connection failed!
JUL Limitations
While JUL works for simple cases, it has significant drawbacks compared to modern frameworks:
- Verbose API --
logger.log(Level.INFO, "msg {0}", new Object[]{val})vs. SLF4J'slog.info("msg {}", val) - Limited formatting -- the default output format is ugly and multi-line (class name and method on separate lines)
- Poor configuration -- uses a global
logging.propertiesfile that is awkward to customize per-package - No native support for modern features -- no built-in JSON output, no MDC (Mapped Diagnostic Context), no async logging
- Performance -- slower than Logback and Log4j2 for high-throughput scenarios
Verdict: Use JUL for quick scripts or when you truly cannot add dependencies. For any real application, use SLF4J + Logback.
5. SLF4J + Logback (Recommended)
SLF4J (Simple Logging Facade for Java) + Logback is the most popular logging stack in the Java ecosystem. Spring Boot uses it by default. SLF4J provides the API you code against; Logback provides the engine that does the actual logging.
5.1 Maven Dependencies
        org.slf4j
        slf4j-api
        2.0.16


        ch.qos.logback
        logback-classic
        1.5.15
// Gradle: Add to build.gradle
dependencies {
    implementation 'org.slf4j:slf4j-api:2.0.16'
    implementation 'ch.qos.logback:logback-classic:1.5.15'
}
5.2 Basic Setup
The setup follows a consistent two-step pattern in every class:
- Import
org.slf4j.Loggerandorg.slf4j.LoggerFactory - Create a
private static final Loggerfield usingLoggerFactory.getLogger(YourClass.class)
Passing the class to getLogger() means the logger is named after your class, so log output shows exactly which class produced each message.
import org.slf4j.Logger;
import org.slf4j.LoggerFactory;

public class UserService {
    // Step 1: Declare the logger -- always private static final
    private static final Logger log = LoggerFactory.getLogger(UserService.class);

    public User findUserById(long id) {
        log.info("Looking up user with id={}", id);

        User user = userRepository.findById(id);

        if (user == null) {
            log.warn("User not found for id={}", id);
            return null;
        }

        log.debug("Found user: name={}, email={}", user.getName(), user.getEmail());
        return user;
    }
}
// Output with INFO level:
// 2026-02-28 10:30:00.123 [main] INFO  c.e.service.UserService - Looking up user with id=42
// 2026-02-28 10:30:00.125 [main] WARN  c.e.service.UserService - User not found for id=42
5.3 Parameterized Logging with {} Placeholders
This is one of SLF4J's most important features. Never use string concatenation in log statements. Use {} placeholders instead.
Why? With string concatenation, Java builds the string every time, even if the log level is disabled. With placeholders, SLF4J only builds the string if the message will actually be logged.
import org.slf4j.Logger;
import org.slf4j.LoggerFactory;

public class ParameterizedLogging {
    private static final Logger log = LoggerFactory.getLogger(ParameterizedLogging.class);

    public void demonstrate(Order order) {
        // BAD: String concatenation -- always builds the string, even if DEBUG is off
        log.debug("Processing order " + order.getId() + " for user " + order.getUserId()
                + " with " + order.getItems().size() + " items");

        // GOOD: Parameterized logging -- string built ONLY if DEBUG is enabled
        log.debug("Processing order {} for user {} with {} items",
                order.getId(), order.getUserId(), order.getItems().size());

        // Multiple placeholders -- they are filled in order
        log.info("User {} placed order {} with total ${}", "alice", "ORD-123", 99.99);
        // Output: User alice placed order ORD-123 with total $99.99

        // Logging exceptions -- exception is ALWAYS the last argument
        try {
            processPayment(order);
        } catch (Exception e) {
            // The exception goes last -- SLF4J recognizes it and prints the full stack trace
            log.error("Payment failed for order {}", order.getId(), e);
            // Output:
            // 2026-02-28 10:30:00.123 [main] ERROR ParameterizedLogging - Payment failed for order ORD-123
            // java.lang.RuntimeException: Insufficient funds
            //     at ParameterizedLogging.processPayment(ParameterizedLogging.java:35)
            //     at ParameterizedLogging.demonstrate(ParameterizedLogging.java:22)
            //     ...
        }
    }
}
5.4 Logging Exceptions Correctly
When logging exceptions, always pass the exception object as the last argument. SLF4J will automatically print the full stack trace. This is the single most important logging pattern to get right.
import org.slf4j.Logger;
import org.slf4j.LoggerFactory;

public class ExceptionLogging {
    private static final Logger log = LoggerFactory.getLogger(ExceptionLogging.class);

    public void demonstrateExceptionLogging() {
        try {
            riskyOperation();
        } catch (Exception e) {
            // BAD: Loses the stack trace entirely
            log.error("Something failed");

            // BAD: Only logs the exception message, no stack trace
            log.error("Something failed: " + e.getMessage());

            // BAD: Converts stack trace to string manually -- ugly and loses structure
            log.error("Something failed: " + e.toString());

            // GOOD: Pass exception as the last argument -- full stack trace is printed
            log.error("Something failed", e);

            // GOOD: With context AND exception -- placeholders first, exception last
            log.error("Failed to process order {} for user {}", orderId, userId, e);
            // SLF4J knows the last argument is an exception because {} count (2) < argument count (3)
        }
    }
}
6. Log4j2
Log4j2 is the modern successor to Log4j 1.x, built from the ground up by Apache. It is a completely different codebase from Log4j 1.x.
Critical Warning: Log4j 1.x (versions 1.2.x) reached end of life in 2015 and has the critical Log4Shell vulnerability (CVE-2021-44228), one of the most severe security vulnerabilities in Java history. If you are using Log4j 1.x, you must migrate immediately. Log4j2 (versions 2.x) is the safe, modern version.
6.1 Maven Dependencies
        org.slf4j
        slf4j-api
        2.0.16


        org.apache.logging.log4j
        log4j-slf4j2-impl
        2.24.3


        org.apache.logging.log4j
        log4j-core
        2.24.3
6.2 Log4j2 Configuration (log4j2.xml)
Place this file in src/main/resources/log4j2.xml:
6.3 Log4j2 Async Logging
Log4j2's standout feature is its async logging capability using the LMAX Disruptor library. This can dramatically improve performance in high-throughput applications by logging on a separate thread.
    com.lmax
    disruptor
    4.0.0
6.4 When to Choose Log4j2 Over Logback
| Feature | Logback | Log4j2 |
|---|---|---|
| Spring Boot default | Yes | No (requires exclusion + config) |
| Async performance | Good (AsyncAppender) | Excellent (LMAX Disruptor) |
| Garbage-free logging | No | Yes (reduces GC pauses) |
| Lambda support | No | Yes (lazy message construction) |
| Plugin architecture | Limited | Extensive |
| Community adoption | Higher (Spring ecosystem) | Strong (Apache ecosystem) |
| Configuration reload | Yes | Yes (automatic) |
Bottom line: Use Logback for most applications, especially with Spring Boot. Choose Log4j2 if you need maximum throughput with async logging (e.g., high-frequency trading, real-time data pipelines).
7. Logback Configuration
Logback is configured via an XML file named logback.xml (or logback-spring.xml in Spring Boot) placed in src/main/resources/. The configuration has three main components:
- Appenders -- Where log output goes (console, files, remote servers)
- Encoders/Patterns -- How log messages are formatted
- Loggers -- Which packages/classes log at which level
7.1 Basic logback.xml
            %d{yyyy-MM-dd HH:mm:ss.SSS} [%thread] %-5level %logger{36} - %msg%n


        logs/application.log

            %d{yyyy-MM-dd HH:mm:ss.SSS} [%thread] %-5level %logger{36} - %msg%n


        logs/application.log


            logs/application.%d{yyyy-MM-dd}.%i.log.gz
            10MB
            30
            1GB


            %d{yyyy-MM-dd HH:mm:ss.SSS} [%thread] %-5level %logger{36} - %msg%n
7.2 Encoder Pattern Reference
The pattern string controls how each log message is formatted. Here are the most common conversion specifiers:
| Specifier | Output | Example |
|---|---|---|
%d{pattern} |
Date/time | %d{yyyy-MM-dd HH:mm:ss.SSS} = 2026-02-28 10:30:00.123 |
%level or %-5level |
Log level (padded to 5 chars) | INFO, DEBUG, ERROR |
%logger{n} |
Logger name (abbreviated to n chars) | %logger{36} = c.e.service.UserService |
%msg |
The log message | User logged in successfully |
%n |
Newline (platform-specific) | \n or \r\n |
%thread |
Thread name | main, http-nio-8080-exec-1 |
%class |
Full class name (slow) | com.example.service.UserService |
%method |
Method name (slow) | findUserById |
%line |
Line number (slow) | 42 |
%X{key} |
MDC value | %X{requestId} = abc-123 |
%highlight() |
ANSI color by level (console only) | ERROR in red, WARN in yellow |
Performance note: %class, %method, and %line are computed by generating a stack trace, which is expensive. Avoid them in production patterns.
7.3 Common Patterns
// Development pattern (human-readable with colors)
%d{HH:mm:ss.SSS} %highlight(%-5level) %cyan(%logger{36}) - %msg%n
// Output: 10:30:00.123 INFO  c.e.service.UserService - Order placed

// Production pattern (full detail, no color)
%d{yyyy-MM-dd HH:mm:ss.SSS} [%thread] %-5level %logger{36} - %msg%n
// Output: 2026-02-28 10:30:00.123 [http-nio-8080-exec-1] INFO  c.e.service.UserService - Order placed

// Production with MDC (request tracking)
%d{yyyy-MM-dd HH:mm:ss.SSS} [%thread] %-5level %logger{36} [requestId=%X{requestId}] - %msg%n
// Output: 2026-02-28 10:30:00.123 [http-nio-8080-exec-1] INFO  c.e.service.UserService [requestId=abc-123-def] - Order placed

// JSON pattern for ELK/Splunk (see Section 12)
{"timestamp":"%d{yyyy-MM-dd'T'HH:mm:ss.SSSZ}","level":"%level","logger":"%logger","thread":"%thread","message":"%msg","requestId":"%X{requestId}"}%n
7.4 Filtering by Package
One of the most powerful configuration features is setting different log levels for different packages. This lets you see detailed logs from your code while keeping framework noise quiet.
%d{HH:mm:ss.SSS} %-5level %logger{36} - %msg%n
8. Logging Patterns and Formats
The format of your log messages matters more than you might think. In development, you want human-readable output. In production, you often want structured (JSON) output that can be parsed by log aggregation tools like the ELK stack (Elasticsearch, Logstash, Kibana) or Splunk.
8.1 Pattern Format Quick Reference
| Environment | Pattern | Why |
|---|---|---|
| Development | %d{HH:mm:ss} %-5level %logger{20} - %msg%n |
Short, readable, fast to scan |
| Staging | %d{yyyy-MM-dd HH:mm:ss.SSS} [%thread] %-5level %logger{36} - %msg%n |
Full detail for debugging issues that match production |
| Production (text) | %d{ISO8601} [%thread] %-5level %logger{36} [%X{requestId}] - %msg%n |
ISO timestamps, MDC context, full logger names |
| Production (JSON) | Use Logstash encoder (see below) | Machine-parseable for log aggregation |
8.2 JSON Logging for Production
For production environments using ELK stack, Splunk, or Datadog, structured JSON logs are essential. Each log line is a valid JSON object that these tools can parse, index, and search.
    net.logstash.logback
    logstash-logback-encoder
    8.0
            requestId
            userId
With JSON logging, each log line looks like this:
{"@timestamp":"2026-02-28T10:30:00.123Z","@version":"1","message":"Order ORD-123 placed successfully","logger_name":"com.myapp.service.OrderService","thread_name":"http-nio-8080-exec-1","level":"INFO","requestId":"abc-123-def","userId":"user-42"}
This structured output means you can search for all logs where userId="user-42" or find all ERROR-level messages for a specific requestId -- something that is extremely difficult with plain text logs.
9. MDC (Mapped Diagnostic Context)
Imagine you are a doctor in a busy emergency room, treating 20 patients simultaneously. Without patient wristbands (IDs), you would have no way to tell which vitals belong to which patient. MDC is the wristband for your application's requests.
MDC (Mapped Diagnostic Context) lets you attach key-value pairs to the current thread. These values are then automatically included in every log message produced by that thread. This is invaluable in multi-threaded web applications where dozens of requests are processed concurrently.
Common MDC Fields
- requestId -- A unique ID for each HTTP request, used to trace all log lines for one request
- userId -- The authenticated user making the request
- sessionId -- The user's session
- transactionId -- For tracing business transactions across services
- correlationId -- For tracing requests across microservices
import org.slf4j.Logger;
import org.slf4j.LoggerFactory;
import org.slf4j.MDC;

public class MdcExample {
    private static final Logger log = LoggerFactory.getLogger(MdcExample.class);

    public void handleRequest(String requestId, String userId) {
        // Put values into MDC at the start of the request
        MDC.put("requestId", requestId);
        MDC.put("userId", userId);

        try {
            log.info("Request received");
            processOrder();
            sendConfirmation();
            log.info("Request completed successfully");
        } finally {
            // CRITICAL: Always clear MDC when the request is done
            // Threads are reused in thread pools -- leftover MDC values leak into other requests!
            MDC.clear();
        }
    }

    private void processOrder() {
        // This log line automatically includes requestId and userId from MDC
        log.info("Processing order");
        // Output: 2026-02-28 10:30:00.123 [http-exec-1] INFO  MdcExample [requestId=abc-123, userId=user-42] - Processing order
    }

    private void sendConfirmation() {
        log.info("Sending confirmation email");
        // Output: 2026-02-28 10:30:00.456 [http-exec-1] INFO  MdcExample [requestId=abc-123, userId=user-42] - Sending confirmation email
    }
}
9.1 MDC with Web Applications (Servlet Filter)
In real applications, you set up MDC in a servlet filter or Spring interceptor so that every request automatically gets a unique ID. You never have to manually add MDC in individual controllers or services.
import org.slf4j.MDC;
import jakarta.servlet.*;
import jakarta.servlet.http.HttpServletRequest;
import java.io.IOException;
import java.util.UUID;

public class LoggingFilter implements Filter {
    private static final String REQUEST_ID = "requestId";
    private static final String USER_ID = "userId";

    @Override
    public void doFilter(ServletRequest request, ServletResponse response, FilterChain chain)
            throws IOException, ServletException {

        HttpServletRequest httpRequest = (HttpServletRequest) request;

        try {
            // Generate or extract request ID
            String requestId = httpRequest.getHeader("X-Request-ID");
            if (requestId == null || requestId.isBlank()) {
                requestId = UUID.randomUUID().toString().substring(0, 8);
            }

            // Set MDC values
            MDC.put(REQUEST_ID, requestId);

            // Extract user from security context (if authenticated)
            String userId = extractUserId(httpRequest);
            if (userId != null) {
                MDC.put(USER_ID, userId);
            }

            // Continue processing the request
            chain.doFilter(request, response);

        } finally {
            // Always clean up to prevent thread pool contamination
            MDC.clear();
        }
    }

    private String extractUserId(HttpServletRequest request) {
        // In a real app, extract from security context or JWT token
        return request.getRemoteUser();
    }
}
9.2 MDC in logback.xml
To display MDC values in your log output, use the %X{key} specifier in your pattern:
%d{yyyy-MM-dd HH:mm:ss.SSS} [%thread] %-5level %logger{36} [req=%X{requestId} user=%X{userId}] - %msg%n
10. Best Practices
These are the logging practices that separate junior developers from senior developers. Follow these in every Java project.
10.1 Use SLF4J as Your Logging Facade
Always code against the SLF4J API, never a specific implementation. This gives you the freedom to switch between Logback, Log4j2, or any future implementation without touching your code.
// BAD: Coupling to a specific implementation
import org.apache.logging.log4j.LogManager;
import org.apache.logging.log4j.Logger;
private static final Logger log = LogManager.getLogger(MyClass.class);

// BAD: Using java.util.logging directly
import java.util.logging.Logger;
private static final Logger log = Logger.getLogger(MyClass.class.getName());

// GOOD: SLF4J facade -- works with ANY implementation
import org.slf4j.Logger;
import org.slf4j.LoggerFactory;
private static final Logger log = LoggerFactory.getLogger(MyClass.class);
10.2 Use Parameterized Logging
This is the single most common logging mistake in Java code reviews. Never concatenate strings in log statements.
import org.slf4j.Logger;
import org.slf4j.LoggerFactory;

public class ParameterizedBestPractice {
    private static final Logger log = LoggerFactory.getLogger(ParameterizedBestPractice.class);

    public void process(Order order) {
        // BAD: String concatenation -- always builds the string even if DEBUG is off
        log.debug("Order " + order.getId() + " has " + order.getItems().size() + " items totaling $" + order.getTotal());
        // This calls order.getId(), order.getItems().size(), and order.getTotal()
        // PLUS concatenates 5 strings -- all wasted work if DEBUG is disabled

        // GOOD: Parameterized -- only builds string if DEBUG is enabled
        log.debug("Order {} has {} items totaling ${}", order.getId(), order.getItems().size(), order.getTotal());
    }
}
10.3 Log at the Appropriate Level
import org.slf4j.Logger;
import org.slf4j.LoggerFactory;

public class AppropriateLevel {
    private static final Logger log = LoggerFactory.getLogger(AppropriateLevel.class);

    public void processOrder(Order order) {
        // TRACE: Very fine-grained, method entry/exit
        log.trace("Entering processOrder with order={}", order);

        // DEBUG: Technical detail helpful during development
        log.debug("Validating order items against inventory");

        // INFO: Business event -- this is what operations teams monitor
        log.info("Order {} placed by user {} for ${}", order.getId(), order.getUserId(), order.getTotal());

        // WARN: Something unusual but recoverable
        if (order.getTotal() > 10000) {
            log.warn("High-value order {} for ${} -- flagged for review", order.getId(), order.getTotal());
        }

        // ERROR: Something failed -- needs human attention
        try {
            chargePayment(order);
        } catch (PaymentException e) {
            log.error("Payment failed for order {} with amount ${}", order.getId(), order.getTotal(), e);
        }
    }
}
10.4 Include Context in Messages
A log message without context is like a clue without a case number. Always include the relevant IDs and values that will help you investigate.
// BAD: No context -- useless for debugging
log.error("Payment failed");
log.info("User logged in");
log.warn("Retry attempt");

// GOOD: Context-rich -- you can trace exactly what happened
log.error("Payment failed for order={} user={} amount=${} gateway={}", orderId, userId, amount, gateway);
log.info("User {} logged in from IP {} using {}", userId, ipAddress, userAgent);
log.warn("Retry attempt {}/{} for order={} after {}ms delay", attempt, maxRetries, orderId, delay);
10.5 Use isDebugEnabled() for Expensive Operations
While parameterized logging avoids string concatenation overhead, it does not avoid the cost of computing the arguments. If computing an argument is expensive, guard the log statement.
import org.slf4j.Logger;
import org.slf4j.LoggerFactory;

public class ExpensiveLogging {
    private static final Logger log = LoggerFactory.getLogger(ExpensiveLogging.class);

    public void processLargeDataSet(List records) {
        // BAD: computeStats() is called EVERY TIME, even when DEBUG is off
        log.debug("Dataset statistics: {}", computeStats(records));
        // computeStats() might iterate over millions of records

        // GOOD: Guard expensive computation
        if (log.isDebugEnabled()) {
            log.debug("Dataset statistics: {}", computeStats(records));
        }

        // ALSO GOOD for simple arguments -- no guard needed
        log.debug("Processing {} records", records.size());
        // records.size() is O(1) and trivially cheap
    }

    private String computeStats(List records) {
        // Imagine this iterates the entire list, computes averages, etc.
        return "min=1, max=100, avg=42.5, stddev=12.3";
    }
}
10.6 Do Not Log Sensitive Data
import org.slf4j.Logger;
import org.slf4j.LoggerFactory;

public class SensitiveDataLogging {
    private static final Logger log = LoggerFactory.getLogger(SensitiveDataLogging.class);

    public void authenticateUser(String username, String password) {
        // BAD: NEVER log passwords
        log.info("Login attempt: user={}, password={}", username, password);

        // GOOD: Log the event without sensitive data
        log.info("Login attempt for user={}", username);
    }

    public void processPayment(String creditCardNumber, double amount) {
        // BAD: NEVER log full credit card numbers
        log.info("Charging card {} for ${}", creditCardNumber, amount);

        // GOOD: Mask the sensitive data
        String masked = maskCreditCard(creditCardNumber);
        log.info("Charging card {} for ${}", masked, amount);
        // Output: Charging card ****-****-****-4242 for $99.99
    }

    private String maskCreditCard(String number) {
        if (number == null || number.length() < 4) return "****";
        return "****-****-****-" + number.substring(number.length() - 4);
    }
}
10.7 Do Not Log Inside Tight Loops
import org.slf4j.Logger;
import org.slf4j.LoggerFactory;

public class LoopLogging {
    private static final Logger log = LoggerFactory.getLogger(LoopLogging.class);

    public void processRecords(List records) {
        // BAD: Logging inside a loop with 1 million records = 1 million log lines
        for (Record record : records) {
            log.debug("Processing record: {}", record.getId());
            process(record);
        }

        // GOOD: Log summary information
        log.info("Starting to process {} records", records.size());
        int successCount = 0;
        int failCount = 0;

        for (Record record : records) {
            try {
                process(record);
                successCount++;
            } catch (Exception e) {
                failCount++;
                // Only log individual failures -- these are exceptional
                log.warn("Failed to process record {}: {}", record.getId(), e.getMessage());
            }
        }

        log.info("Completed processing: {} succeeded, {} failed out of {} total",
                successCount, failCount, records.size());
    }
}
Best Practices Summary
| Practice | Do | Do Not |
|---|---|---|
| API | Use SLF4J facade | Use implementation-specific API (JUL, Log4j directly) |
| Parameters | log.info("User {}", userId) |
log.info("User " + userId) |
| Exceptions | log.error("Msg", exception) |
log.error("Msg: " + e.getMessage()) |
| Levels | INFO for business events, DEBUG for technical details | Everything at INFO or everything at DEBUG |
| Context | Include IDs, amounts, counts | Vague messages like "Error occurred" |
| MDC | Set requestId/userId in filter | Manually add IDs to every message |
| Sensitive data | Mask or omit | Log passwords, credit cards, tokens |
| Loops | Log summary before/after | Log every iteration |
| Guards | if (log.isDebugEnabled()) for expensive computation |
Call expensive methods as log arguments |
| Logger declaration | private static final Logger |
Creating new Logger per method call |
11. Common Mistakes
Every experienced Java developer has made these mistakes. Recognizing them in code reviews will make you a better developer.
Mistake 1: Using System.out.println Instead of a Logger
// MISTAKE: System.out.println scattered through production code
public class OrderService {
    public void placeOrder(Order order) {
        System.out.println("Placing order: " + order);        // No level, no timestamp, no thread
        System.out.println("Validating...");                   // Cannot turn off without deleting
        System.out.println("Done!");                           // Goes to stdout only
    }
}

// FIX: Use a proper logger
import org.slf4j.Logger;
import org.slf4j.LoggerFactory;

public class OrderService {
    private static final Logger log = LoggerFactory.getLogger(OrderService.class);

    public void placeOrder(Order order) {
        log.info("Placing order {}", order.getId());
        log.debug("Validating order items");
        log.info("Order {} placed successfully", order.getId());
    }
}
Mistake 2: String Concatenation in Log Statements
// MISTAKE: String concatenation is evaluated even when the level is disabled
log.debug("User " + user.getName() + " has " + user.getOrders().size() + " orders"
        + " totaling $" + calculateTotal(user.getOrders()));
// If DEBUG is off, Java still:
//   1. Calls user.getName()
//   2. Calls user.getOrders().size()
//   3. Calls calculateTotal() -- potentially expensive!
//   4. Concatenates 5 strings
//   5. Throws the result away

// FIX: Use parameterized logging
log.debug("User {} has {} orders totaling ${}",
        user.getName(), user.getOrders().size(), calculateTotal(user.getOrders()));
// With parameterized logging, if DEBUG is off, SLF4J skips building the string.
// NOTE: The arguments are still evaluated. For expensive arguments, use isDebugEnabled() guard.
Mistake 3: Not Logging Exceptions Properly
try {
    connectToDatabase();
} catch (SQLException e) {

    // MISTAKE 1: Swallowing the exception entirely
    // (empty catch block -- the worst possible thing)

    // MISTAKE 2: Only logging the message, losing the stack trace
    log.error("Database error: " + e.getMessage());
    // Output: Database error: Connection refused
    // WHERE did it fail? Which line? What was the root cause? All lost.

    // MISTAKE 3: Using printStackTrace() instead of logging
    e.printStackTrace();
    // This goes to System.err, bypassing the logging framework entirely.
    // No timestamp, no level, no file output, no MDC.

    // CORRECT: Pass the exception as the last argument
    log.error("Failed to connect to database", e);
    // Output includes the full stack trace:
    // 2026-02-28 10:30:00.123 [main] ERROR DatabaseService - Failed to connect to database
    // java.sql.SQLException: Connection refused
    //     at com.mysql.cj.jdbc.ConnectionImpl.createNewIO(ConnectionImpl.java:839)
    //     at com.mysql.cj.jdbc.ConnectionImpl.(ConnectionImpl.java:453)
    //     at DatabaseService.connectToDatabase(DatabaseService.java:42)
    //     ...
    // Caused by: java.net.ConnectException: Connection refused (Connection refused)
    //     at java.base/java.net.PlainSocketImpl.socketConnect(Native Method)
    //     ...
}
Mistake 4: Logging Too Much or Too Little
// MISTAKE: Logging too much -- "log diarrhea"
public double calculateTax(double amount, String state) {
    log.info("calculateTax called");                    // Noise
    log.info("amount = " + amount);                     // Noise + concatenation
    log.info("state = " + state);                       // Noise + concatenation
    double rate = getTaxRate(state);
    log.info("tax rate = " + rate);                     // Noise
    double tax = amount * rate;
    log.info("tax = " + tax);                           // Noise
    log.info("returning tax");                          // Noise
    return tax;
}
// This method generates 6 log lines for a simple calculation.
// Multiply by 1000 requests/second and you have 6000 lines/second of noise.

// MISTAKE: Logging too little
public double calculateTax(double amount, String state) {
    return amount * getTaxRate(state);
    // No logging at all. If tax calculations are wrong, where do you start?
}

// CORRECT: Log meaningful events at the right level
public double calculateTax(double amount, String state) {
    log.debug("Calculating tax for amount={} state={}", amount, state);
    double rate = getTaxRate(state);
    double tax = amount * rate;
    log.debug("Tax calculated: amount={} state={} rate={} tax={}", amount, state, rate, tax);
    return tax;
}
// Two DEBUG lines that can be turned off in production but enabled when needed.
Mistake 5: Logging Sensitive Data
// MISTAKE: Logging user data verbatim
public void registerUser(UserRegistration reg) {
    log.info("Registering user: {}", reg);
    // If UserRegistration.toString() includes password, SSN, or credit card... game over.
    // Log files are often stored in plain text, backed up to multiple servers,
    // and accessed by many team members.
}

// CORRECT: Log only safe, relevant fields
public void registerUser(UserRegistration reg) {
    log.info("Registering user: email={}", reg.getEmail());
    // Or override toString() to exclude sensitive fields:
    // @Override public String toString() {
    //     return "UserRegistration{email='" + email + "', name='" + name + "'}";
    //     // password, ssn, creditCard intentionally excluded
    // }
}
Mistake 6: Using Log4j 1.x
// MISTAKE: Still using Log4j 1.x (versions 1.2.x)
import org.apache.log4j.Logger;   // <-- This is Log4j 1.x -- SECURITY VULNERABILITY!

// Log4j 1.x reached End of Life in August 2015.
// CVE-2021-44228 (Log4Shell) allows Remote Code Execution -- attackers can take over your server.
// This is a CRITICAL vulnerability rated 10.0 out of 10.0 on the CVSS scale.

// FIX: Migrate to SLF4J + Logback (or Log4j2)
// Step 1: Remove log4j 1.x dependency
// Step 2: Add SLF4J + Logback dependencies (see Section 5)
// Step 3: Replace imports:
import org.slf4j.Logger;          // <-- SLF4J facade
import org.slf4j.LoggerFactory;

// Step 4: Replace logger creation:
// OLD: private static final Logger log = Logger.getLogger(MyClass.class);
// NEW:
private static final Logger log = LoggerFactory.getLogger(MyClass.class);

// Step 5: Replace log4j.properties with logback.xml (see Section 7)
// Step 6: The logging method calls (log.info, log.error, etc.) are almost identical
12. Logging in Production
Production logging has different requirements than development logging. In production, your logs are the primary tool for understanding what is happening across hundreds of servers processing thousands of requests per second.
12.1 Structured Logging (JSON)
In production, logs should be machine-parseable. Plain text logs like 2026-02-28 10:30 INFO OrderService - Order placed are hard for log aggregation tools to parse reliably. JSON format solves this.
With JSON logging, tools like Elasticsearch, Splunk, Datadog, and Grafana Loki can index every field and let you write queries like:
- Show all ERROR logs from the last hour
- Show all logs where userId = "alice" and orderId = "ORD-123"
- Count the number of payment failures per minute
- Alert when error rate exceeds 5% of total requests
12.2 The ELK Stack
The ELK stack (Elasticsearch, Logstash, Kibana) is the most popular open-source log aggregation platform:
| Component | Role | Description |
|---|---|---|
| Elasticsearch | Store and search | Distributed search engine that indexes log data for fast queries |
| Logstash | Collect and transform | Ingests logs from multiple sources, parses them, and sends to Elasticsearch |
| Kibana | Visualize | Web UI for searching logs, building dashboards, and setting up alerts |
12.3 Log Rotation
Without log rotation, log files grow until they fill the disk and your application crashes. Always configure rolling policies:
    logs/application.log


        logs/application.%d{yyyy-MM-dd}.%i.log.gz


        50MB


        90


        5GB


        %d{yyyy-MM-dd HH:mm:ss.SSS} [%thread] %-5level %logger{36} [%X{requestId}] - %msg%n
12.4 Performance Considerations
| Concern | Solution |
|---|---|
| High-throughput logging blocks threads | Use async appenders (Logback's AsyncAppender or Log4j2's AsyncLogger) |
| Disk I/O bottleneck | Write to a local buffer, ship to remote collector (Logstash, Fluentd) |
| Large stack traces | Logback automatically shortens repeated stack frames with ... 42 common frames omitted |
| GC pressure from log string building | Use parameterized logging ({}), consider Log4j2's garbage-free mode |
| Log file size | Use GZIP compression on rolled files (.log.gz) |
| Too many DEBUG/TRACE in production | Set root level to INFO, use DEBUG only for your packages when investigating |
12.5 Async Appender Example
        logs/application.log

            logs/application.%d{yyyy-MM-dd}.log.gz
            30


            %d{yyyy-MM-dd HH:mm:ss.SSS} [%thread] %-5level %logger{36} - %msg%n


        1024
        0
        false
13. Complete Practical Example: OrderService
Let us tie everything together with a realistic, production-quality example. This OrderService demonstrates all the logging concepts we have covered: appropriate log levels, parameterized messages, exception handling, MDC for request tracking, and best practices throughout.
13.1 Dependencies (pom.xml)
        org.slf4j
        slf4j-api
        2.0.16


        ch.qos.logback
        logback-classic
        1.5.15
13.2 Configuration (logback.xml)
            %d{yyyy-MM-dd HH:mm:ss.SSS} [%thread] %-5level %logger{30} [orderId=%X{orderId} user=%X{userId}] - %msg%n


        logs/orders.log

            logs/orders.%d{yyyy-MM-dd}.%i.log.gz
            10MB
            30
            1GB


            %d{yyyy-MM-dd HH:mm:ss.SSS} [%thread] %-5level %logger{36} [orderId=%X{orderId} user=%X{userId}] - %msg%n
13.3 Order Model
package com.example.orders;

import java.util.List;

public class Order {
    private final String id;
    private final String userId;
    private final List items;
    private double total;
    private OrderStatus status;

    public Order(String id, String userId, List items) {
        this.id = id;
        this.userId = userId;
        this.items = items;
        this.total = items.stream().mapToDouble(OrderItem::getSubtotal).sum();
        this.status = OrderStatus.PENDING;
    }

    public String getId() { return id; }
    public String getUserId() { return userId; }
    public List getItems() { return items; }
    public double getTotal() { return total; }
    public OrderStatus getStatus() { return status; }
    public void setStatus(OrderStatus status) { this.status = status; }
    public void setTotal(double total) { this.total = total; }

    // toString excludes any sensitive user data
    @Override
    public String toString() {
        return "Order{id='" + id + "', items=" + items.size() + ", total=" + total + ", status=" + status + "}";
    }
}

enum OrderStatus { PENDING, VALIDATED, PAID, SHIPPED, CANCELLED }

class OrderItem {
    private final String productName;
    private final int quantity;
    private final double price;

    public OrderItem(String productName, int quantity, double price) {
        this.productName = productName;
        this.quantity = quantity;
        this.price = price;
    }

    public String getProductName() { return productName; }
    public int getQuantity() { return quantity; }
    public double getPrice() { return price; }
    public double getSubtotal() { return quantity * price; }
}
13.4 OrderService with Production-Quality Logging
package com.example.orders;

import org.slf4j.Logger;
import org.slf4j.LoggerFactory;
import org.slf4j.MDC;

import java.util.List;

public class OrderService {
    private static final Logger log = LoggerFactory.getLogger(OrderService.class);

    private static final double HIGH_VALUE_THRESHOLD = 1000.0;
    private static final double TAX_RATE = 0.08;
    private static final double DISCOUNT_THRESHOLD = 500.0;
    private static final double DISCOUNT_RATE = 0.10;

    /**
     * Process an order end-to-end with proper logging at every stage.
     */
    public void processOrder(Order order) {
        // Set MDC context for this order -- all subsequent log lines include these values
        MDC.put("orderId", order.getId());
        MDC.put("userId", order.getUserId());

        long startTime = System.currentTimeMillis();

        try {
            // INFO: Business event -- order processing started
            log.info("Order processing started: {} items, total=${}",
                    order.getItems().size(), order.getTotal());

            // Step 1: Validate
            validateOrder(order);

            // Step 2: Apply discounts
            applyDiscounts(order);

            // Step 3: Calculate tax
            calculateTax(order);

            // Step 4: Process payment
            processPayment(order);

            // Step 5: Ship
            shipOrder(order);

            long elapsed = System.currentTimeMillis() - startTime;
            // INFO: Business event -- order completed with timing
            log.info("Order processing completed successfully in {}ms, finalTotal=${}",
                    elapsed, order.getTotal());

        } catch (Exception e) {
            long elapsed = System.currentTimeMillis() - startTime;
            order.setStatus(OrderStatus.CANCELLED);
            // ERROR: Something went wrong -- include the exception for stack trace
            log.error("Order processing failed after {}ms", elapsed, e);
        } finally {
            // CRITICAL: Always clear MDC to prevent thread contamination
            MDC.clear();
        }
    }

    private void validateOrder(Order order) {
        log.debug("Validating order");

        if (order.getItems() == null || order.getItems().isEmpty()) {
            // ERROR: Invalid input -- this should not happen if upstream validation works
            log.error("Order has no items");
            throw new IllegalArgumentException("Order must have at least one item");
        }

        for (OrderItem item : order.getItems()) {
            if (item.getQuantity() <= 0) {
                log.error("Invalid quantity {} for product '{}'",
                        item.getQuantity(), item.getProductName());
                throw new IllegalArgumentException("Quantity must be positive for: " + item.getProductName());
            }
            if (item.getPrice() < 0) {
                log.error("Negative price ${} for product '{}'",
                        item.getPrice(), item.getProductName());
                throw new IllegalArgumentException("Price cannot be negative for: " + item.getProductName());
            }
        }

        order.setStatus(OrderStatus.VALIDATED);
        // DEBUG: Technical detail about validation result
        log.debug("Order validated: {} items passed all checks", order.getItems().size());
    }

    private void applyDiscounts(Order order) {
        double originalTotal = order.getTotal();
        log.debug("Checking discounts for total=${}", originalTotal);

        if (originalTotal >= DISCOUNT_THRESHOLD) {
            double discount = originalTotal * DISCOUNT_RATE;
            order.setTotal(originalTotal - discount);
            // INFO: Business event -- discount applied (operations wants to track this)
            log.info("Discount applied: {}% off ${} = -${}, newTotal=${}",
                    (int)(DISCOUNT_RATE * 100), originalTotal, discount, order.getTotal());
        } else {
            log.debug("No discount applied: total ${} below threshold ${}",
                    originalTotal, DISCOUNT_THRESHOLD);
        }
    }

    private void calculateTax(Order order) {
        double beforeTax = order.getTotal();
        double tax = beforeTax * TAX_RATE;
        order.setTotal(beforeTax + tax);
        // DEBUG: Technical calculation detail
        log.debug("Tax calculated: ${} * {} = ${}, newTotal=${}",
                beforeTax, TAX_RATE, tax, order.getTotal());
    }

    private void processPayment(Order order) {
        // INFO: Business event -- payment attempt
        log.info("Processing payment of ${}", order.getTotal());

        // WARN: Flag high-value orders
        if (order.getTotal() > HIGH_VALUE_THRESHOLD) {
            log.warn("High-value order detected: ${} exceeds threshold ${}",
                    order.getTotal(), HIGH_VALUE_THRESHOLD);
        }

        // Simulate payment processing
        try {
            simulatePaymentGateway(order);
            order.setStatus(OrderStatus.PAID);
            log.info("Payment processed successfully for ${}", order.getTotal());
        } catch (RuntimeException e) {
            // ERROR: Payment failed -- include the exception
            log.error("Payment gateway rejected transaction for ${}", order.getTotal(), e);
            throw e;
        }
    }

    private void simulatePaymentGateway(Order order) {
        // Simulate: orders with total over $5000 fail (for demo purposes)
        if (order.getTotal() > 5000) {
            throw new RuntimeException("Payment declined: exceeds single transaction limit");
        }
        log.debug("Payment gateway returned: APPROVED");
    }

    private void shipOrder(Order order) {
        log.info("Initiating shipment");
        order.setStatus(OrderStatus.SHIPPED);
        log.info("Order shipped to user {}", order.getUserId());
    }
}
13.5 Running the Example
package com.example.orders;

import java.util.List;

public class OrderApp {
    public static void main(String[] args) {
        OrderService service = new OrderService();

        // Scenario 1: Normal order
        System.out.println("=== Scenario 1: Normal Order ===");
        Order normalOrder = new Order("ORD-001", "alice",
                List.of(new OrderItem("Laptop Stand", 1, 45.99),
                        new OrderItem("USB-C Cable", 2, 12.99)));
        service.processOrder(normalOrder);

        System.out.println();

        // Scenario 2: High-value order with discount
        System.out.println("=== Scenario 2: High-Value Order ===");
        Order highValue = new Order("ORD-002", "bob",
                List.of(new OrderItem("MacBook Pro", 1, 2499.00),
                        new OrderItem("AppleCare+", 1, 399.00)));
        service.processOrder(highValue);

        System.out.println();

        // Scenario 3: Order that exceeds payment limit (will fail)
        System.out.println("=== Scenario 3: Failed Payment ===");
        Order tooExpensive = new Order("ORD-003", "charlie",
                List.of(new OrderItem("Server Rack", 3, 2500.00)));
        service.processOrder(tooExpensive);

        System.out.println();

        // Scenario 4: Invalid order (empty items)
        System.out.println("=== Scenario 4: Invalid Order ===");
        Order emptyOrder = new Order("ORD-004", "dave", List.of());
        service.processOrder(emptyOrder);
    }
}
13.6 Expected Output
=== Scenario 1: Normal Order ===
2026-02-28 10:30:00.001 [main] INFO  c.e.orders.OrderService [orderId=ORD-001 user=alice] - Order processing started: 2 items, total=$71.97
2026-02-28 10:30:00.002 [main] DEBUG c.e.orders.OrderService [orderId=ORD-001 user=alice] - Validating order
2026-02-28 10:30:00.002 [main] DEBUG c.e.orders.OrderService [orderId=ORD-001 user=alice] - Order validated: 2 items passed all checks
2026-02-28 10:30:00.002 [main] DEBUG c.e.orders.OrderService [orderId=ORD-001 user=alice] - Checking discounts for total=$71.97
2026-02-28 10:30:00.002 [main] DEBUG c.e.orders.OrderService [orderId=ORD-001 user=alice] - No discount applied: total $71.97 below threshold $500.0
2026-02-28 10:30:00.003 [main] DEBUG c.e.orders.OrderService [orderId=ORD-001 user=alice] - Tax calculated: $71.97 * 0.08 = $5.7576, newTotal=$77.7276
2026-02-28 10:30:00.003 [main] INFO  c.e.orders.OrderService [orderId=ORD-001 user=alice] - Processing payment of $77.7276
2026-02-28 10:30:00.003 [main] DEBUG c.e.orders.OrderService [orderId=ORD-001 user=alice] - Payment gateway returned: APPROVED
2026-02-28 10:30:00.003 [main] INFO  c.e.orders.OrderService [orderId=ORD-001 user=alice] - Payment processed successfully for $77.7276
2026-02-28 10:30:00.003 [main] INFO  c.e.orders.OrderService [orderId=ORD-001 user=alice] - Initiating shipment
2026-02-28 10:30:00.003 [main] INFO  c.e.orders.OrderService [orderId=ORD-001 user=alice] - Order shipped to user alice
2026-02-28 10:30:00.004 [main] INFO  c.e.orders.OrderService [orderId=ORD-001 user=alice] - Order processing completed successfully in 3ms, finalTotal=$77.7276

=== Scenario 2: High-Value Order ===
2026-02-28 10:30:00.005 [main] INFO  c.e.orders.OrderService [orderId=ORD-002 user=bob] - Order processing started: 2 items, total=$2898.0
2026-02-28 10:30:00.005 [main] DEBUG c.e.orders.OrderService [orderId=ORD-002 user=bob] - Validating order
2026-02-28 10:30:00.005 [main] DEBUG c.e.orders.OrderService [orderId=ORD-002 user=bob] - Order validated: 2 items passed all checks
2026-02-28 10:30:00.005 [main] DEBUG c.e.orders.OrderService [orderId=ORD-002 user=bob] - Checking discounts for total=$2898.0
2026-02-28 10:30:00.005 [main] INFO  c.e.orders.OrderService [orderId=ORD-002 user=bob] - Discount applied: 10% off $2898.0 = -$289.8, newTotal=$2608.2
2026-02-28 10:30:00.006 [main] DEBUG c.e.orders.OrderService [orderId=ORD-002 user=bob] - Tax calculated: $2608.2 * 0.08 = $208.656, newTotal=$2816.856
2026-02-28 10:30:00.006 [main] INFO  c.e.orders.OrderService [orderId=ORD-002 user=bob] - Processing payment of $2816.856
2026-02-28 10:30:00.006 [main] WARN  c.e.orders.OrderService [orderId=ORD-002 user=bob] - High-value order detected: $2816.856 exceeds threshold $1000.0
2026-02-28 10:30:00.006 [main] DEBUG c.e.orders.OrderService [orderId=ORD-002 user=bob] - Payment gateway returned: APPROVED
2026-02-28 10:30:00.006 [main] INFO  c.e.orders.OrderService [orderId=ORD-002 user=bob] - Payment processed successfully for $2816.856
2026-02-28 10:30:00.006 [main] INFO  c.e.orders.OrderService [orderId=ORD-002 user=bob] - Initiating shipment
2026-02-28 10:30:00.006 [main] INFO  c.e.orders.OrderService [orderId=ORD-002 user=bob] - Order shipped to user bob
2026-02-28 10:30:00.007 [main] INFO  c.e.orders.OrderService [orderId=ORD-002 user=bob] - Order processing completed successfully in 2ms, finalTotal=$2816.856

=== Scenario 3: Failed Payment ===
2026-02-28 10:30:00.008 [main] INFO  c.e.orders.OrderService [orderId=ORD-003 user=charlie] - Order processing started: 3 items, total=$7500.0
2026-02-28 10:30:00.008 [main] DEBUG c.e.orders.OrderService [orderId=ORD-003 user=charlie] - Validating order
2026-02-28 10:30:00.008 [main] DEBUG c.e.orders.OrderService [orderId=ORD-003 user=charlie] - Order validated: 3 items passed all checks
2026-02-28 10:30:00.008 [main] DEBUG c.e.orders.OrderService [orderId=ORD-003 user=charlie] - Checking discounts for total=$7500.0
2026-02-28 10:30:00.008 [main] INFO  c.e.orders.OrderService [orderId=ORD-003 user=charlie] - Discount applied: 10% off $7500.0 = -$750.0, newTotal=$6750.0
2026-02-28 10:30:00.009 [main] DEBUG c.e.orders.OrderService [orderId=ORD-003 user=charlie] - Tax calculated: $6750.0 * 0.08 = $540.0, newTotal=$7290.0
2026-02-28 10:30:00.009 [main] INFO  c.e.orders.OrderService [orderId=ORD-003 user=charlie] - Processing payment of $7290.0
2026-02-28 10:30:00.009 [main] WARN  c.e.orders.OrderService [orderId=ORD-003 user=charlie] - High-value order detected: $7290.0 exceeds threshold $1000.0
2026-02-28 10:30:00.009 [main] ERROR c.e.orders.OrderService [orderId=ORD-003 user=charlie] - Payment gateway rejected transaction for $7290.0
java.lang.RuntimeException: Payment declined: exceeds single transaction limit
    at com.example.orders.OrderService.simulatePaymentGateway(OrderService.java:112)
    ...
2026-02-28 10:30:00.010 [main] ERROR c.e.orders.OrderService [orderId=ORD-003 user=charlie] - Order processing failed after 2ms

=== Scenario 4: Invalid Order ===
2026-02-28 10:30:00.011 [main] INFO  c.e.orders.OrderService [orderId=ORD-004 user=dave] - Order processing started: 0 items, total=$0.0
2026-02-28 10:30:00.011 [main] DEBUG c.e.orders.OrderService [orderId=ORD-004 user=dave] - Validating order
2026-02-28 10:30:00.011 [main] ERROR c.e.orders.OrderService [orderId=ORD-004 user=dave] - Order has no items
2026-02-28 10:30:00.011 [main] ERROR c.e.orders.OrderService [orderId=ORD-004 user=dave] - Order processing failed after 0ms
java.lang.IllegalArgumentException: Order must have at least one item
    at com.example.orders.OrderService.validateOrder(OrderService.java:70)
    ...
13.7 What This Example Demonstrates
| # | Concept | Where in Code |
|---|---|---|
| 1 | Logger declaration (private static final) | OrderService class field |
| 2 | MDC for request tracking | processOrder() -- MDC.put/MDC.clear |
| 3 | MDC cleanup in finally block | processOrder() -- prevents thread contamination |
| 4 | INFO for business events | "Order processing started", "Payment processed", "Order shipped" |
| 5 | DEBUG for technical details | "Validating order", "Tax calculated", "Payment gateway returned" |
| 6 | WARN for recoverable issues | "High-value order detected" |
| 7 | ERROR with exception | "Payment gateway rejected" -- exception passed as last argument |
| 8 | Parameterized logging ({}) | Every log statement uses {} instead of string concatenation |
| 9 | Context in messages | Order ID, user ID, amounts, item counts included |
| 10 | Performance tracking | Elapsed time measured and logged on completion/failure |
| 11 | No sensitive data logged | toString() excludes user details; no passwords/tokens |
| 12 | Separate logback.xml configuration | Console + rolling file, package-level filtering, MDC in pattern |
14. Quick Reference
| Topic | Key Point |
|---|---|
| Recommended stack | SLF4J (facade) + Logback (implementation) |
| Logger declaration | private static final Logger log = LoggerFactory.getLogger(MyClass.class) |
| Parameterized logging | log.info("User {} placed order {}", userId, orderId) |
| Exception logging | log.error("Something failed for order {}", orderId, exception) -- exception is always the last argument |
| Log levels | TRACE < DEBUG < INFO < WARN < ERROR. Use INFO for business events, DEBUG for technical details. |
| MDC | MDC.put("requestId", id) in filter/interceptor, %X{requestId} in pattern, MDC.clear() in finally |
| Configuration file | logback.xml in src/main/resources |
| Production format | JSON via logstash-logback-encoder for ELK/Splunk/Datadog |
| Log rotation | SizeAndTimeBasedRollingPolicy with maxFileSize, maxHistory, totalSizeCap |
| Async logging | Logback AsyncAppender or Log4j2 AsyncLogger for high throughput |
| Never log | Passwords, credit cards, SSNs, API keys, session tokens |
| Never use | Log4j 1.x (CVE-2021-44228), System.out.println, string concatenation in log calls |
Hasura – Authorization
Roles
Every table/view can have permission rules for users based on their role. By default, there is an admin role that can perform any operation on any table. You can define roles and then create permissions for each of those roles.
Permission rules can also refer to as session variables. Session variables are key-value pairs in the JWT custom claims. These session variables are used to defined permissions for rows and columns of a table. Permissions are essentially a combination of boolean expressions and column selections that impose constraints on the data being returned or modified.
Row level permission
Limit access to a subset of the rows in the table based on this permission. Row-level permissions are essentially boolean expressions that, when evaluated against any row, determine access to it. These permissions are constructed from the values in columns, session variables and static values to build this boolean expression.
Column level permission
For the rows that are accessible based on the above, limit access to a subset of the columns based on this permission rule.
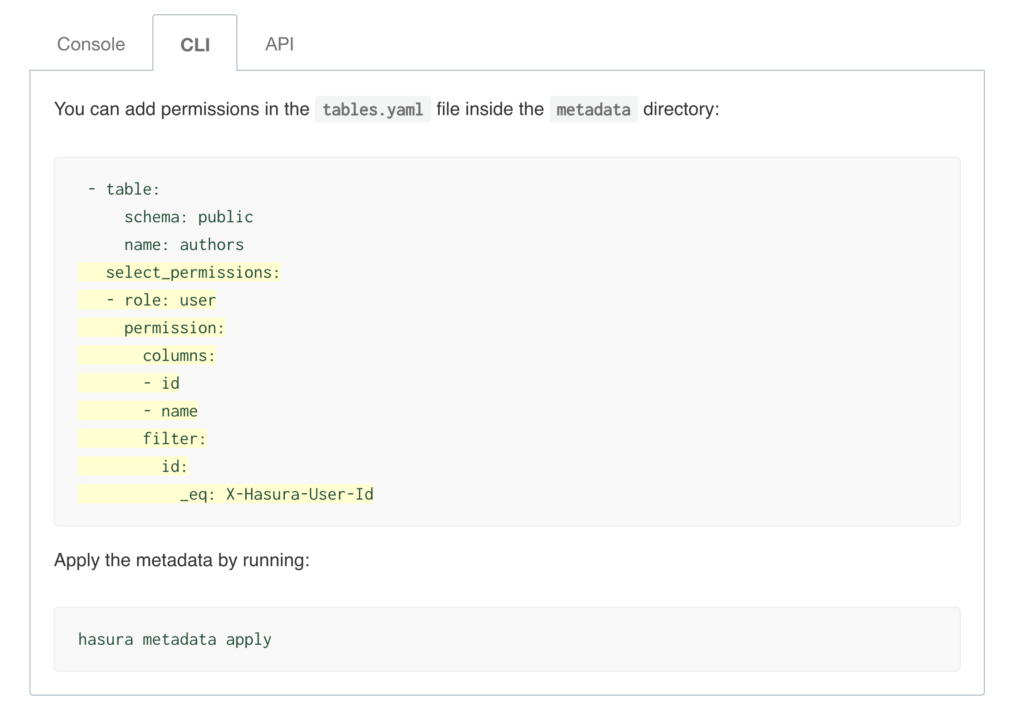
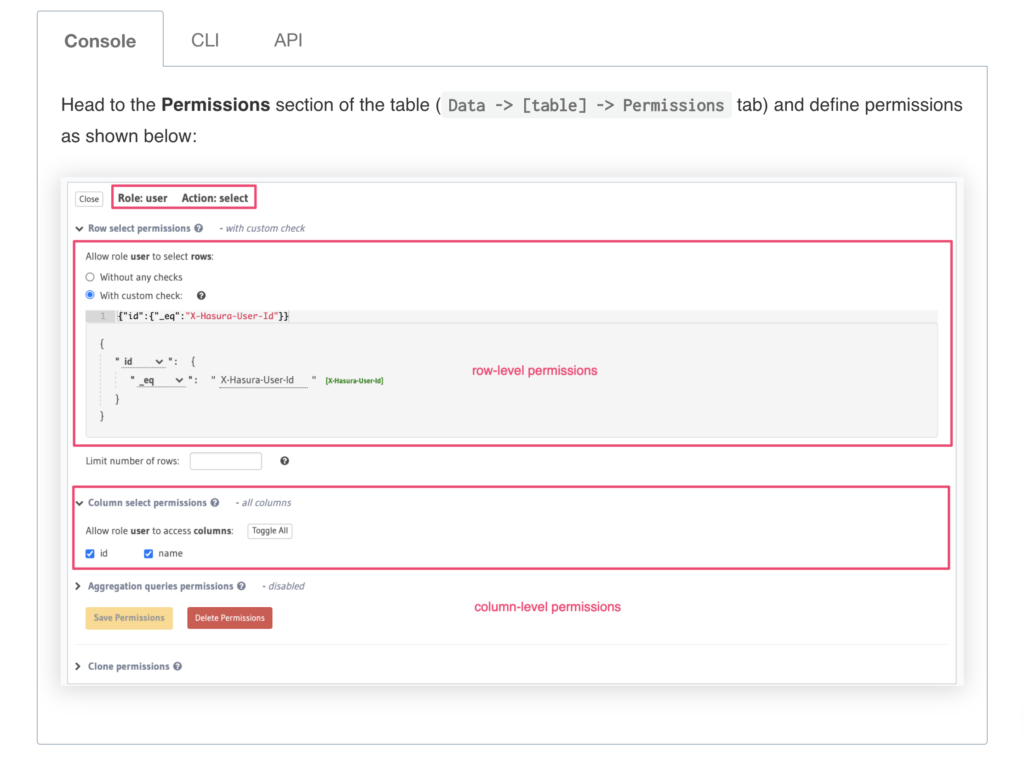
You can also allow users to have access all rows and all columns of a particular table. You can do that by selecting “Without any checks” option