AWS – CLI
How to set up AWS CLI on your computer
Run this command to create the default profile
aws configure
If you have multiple aws accounts then you will need to specify a profile.
aws configure [--profile profile-name]
For example:
aws configure --profile company
Then when you make a CLI call you will need to specify the profile like this, (command to login to ECR)
aws ecr get-login --profile company
Load AWS CLI parameters from a file
Sometimes it’s convenient to load a parameter value from a file instead of trying to type it all as a command line parameter value, such as when the parameter is a complex JSON string. To specify a file that contains the value, specify a file URL in the following format.
file://complete/path/to/file
// Read from a file in the current directory
aws ec2 describe-instances --filters file://filter.json
AWS – Route 53
Amazon Route 53 is a highly available and scalable cloud Domain Name System (DNS) web service. It is designed to give developers and businesses an extremely reliable and cost-effective way to route end users to Internet applications by translating names like www.example.com into the numeric IP addresses like 192.0.2.1 that computers use to connect to each other. Amazon Route 53 is fully compliant with IPv6 as well.
Amazon Route 53 effectively connects user requests to infrastructure running in AWS – such as Amazon EC2 instances, Elastic Load Balancing load balancers, or Amazon S3 buckets – and can also be used to route users to infrastructure outside of AWS. You can use Amazon Route 53 to configure DNS health checks to route traffic to healthy endpoints or to independently monitor the health of your application and its endpoints. Amazon Route 53 Traffic Flow makes it easy for you to manage traffic globally through a variety of routing types, including Latency Based Routing, Geo DNS, Geoproximity, and Weighted Round Robin—all of which can be combined with DNS Failover in order to enable a variety of low-latency, fault-tolerant architectures. Using Amazon Route 53 Traffic Flow’s simple visual editor, you can easily manage how your end-users are routed to your application’s endpoints—whether in a single AWS region or distributed around the globe. Amazon Route 53 also offers Domain Name Registration – you can purchase and manage domain names such as example.com and Amazon Route 53 will automatically configure DNS settings for your domains.
August 5, 2019AWS – Load Balancer
ELB automatically distributes incoming application traffic across multiple targets, such as Amazon EC2 instances, containers, IP addresses, and Lambda functions.
A load balancer serves as the single point of contact for clients. The load balancer distributes incoming application traffic across multiple targets, such as EC2 instances, in multiple Availability Zones. This increases the availability of your application. You add one or more listeners to your load balancer.
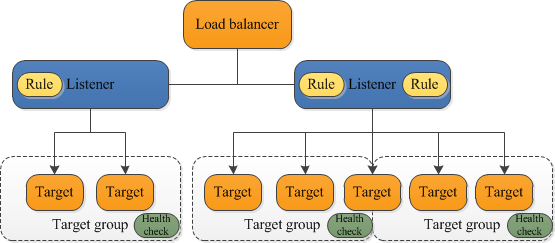
Types of Load Balancer
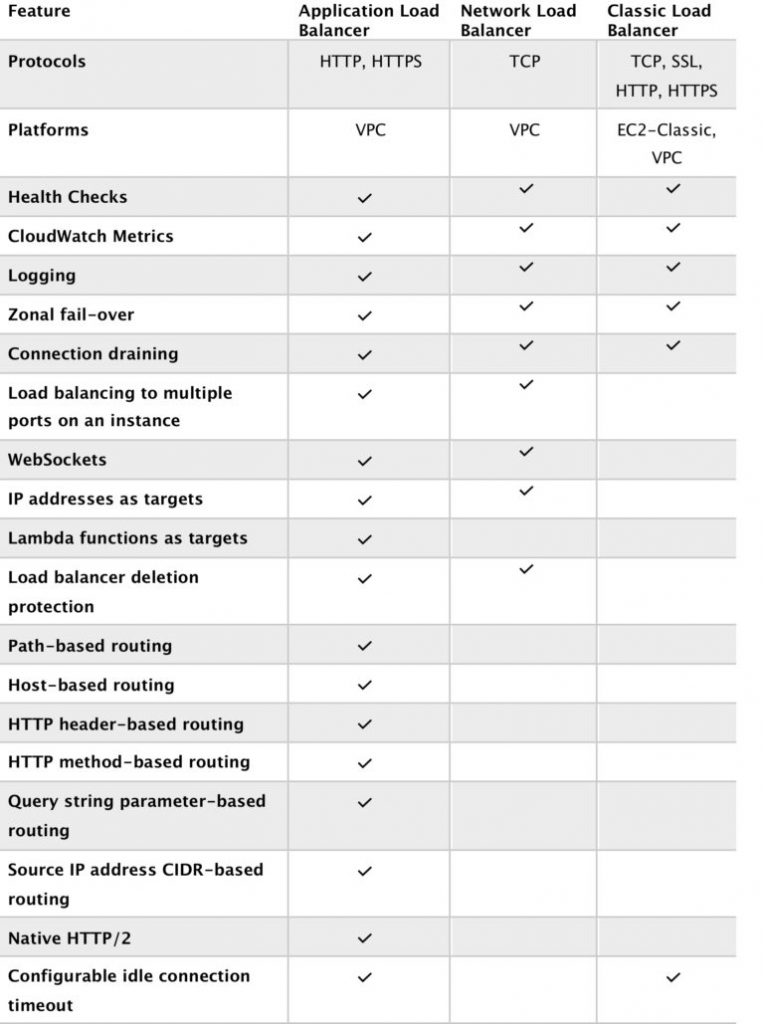
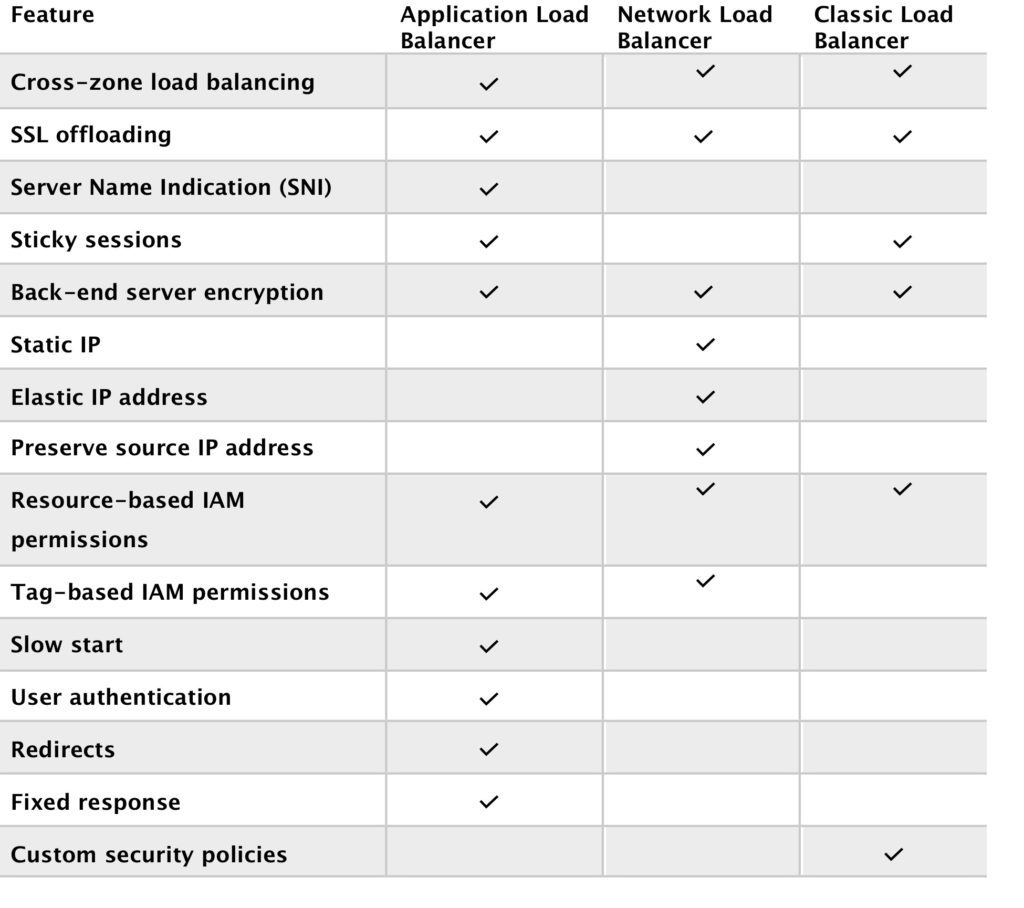
- Application Load Balancer – an Application Load Balancer functions at the application layer, the seventh layer of the Open Systems Interconnection (OSI) model. After the load balancer receives a request, it evaluates the listener rules in priority order to determine which rule to apply and then selects a target from the target group for the rule action. You can configure listener rules to route requests to specific webservers or different target groups based on the content of the application traffic. Routing is performed independently for each target group, even when a target is registered with multiple target groups.
- Network Load Balancer – a Network Load Balancer functions at the 4th layer of the (OSI) model. It can handle millions of requests per second. After the load balancer receives a connection request, it selects a target from the target group for the default rule. It attempts to open a TCP connection to the selected target on the port specified in the listener configuration. It is best suited for load balancing of TCP traffic where extreme performance is required.
- Classic Load Balancer – a load balancer distributes incoming application traffic across multiple EC2 instances in multiple Availability Zones. This increases the fault tolerance of your applications. Elastic Load Balancing detects unhealthy instances and routes traffic only to healthy instances. It is a legacy load balancer. You can load balancer HTTP/HTTPS applications and use layer 7-specific features, such as X-forwarded and sticky sessions. You can also use strict layer 4 load balancing for applications that rely purely on the TCP protocol.
Load Balancer Benefits
- Using a load balancer increases the availability and fault tolerance of your applications. A load balancer distributes workloads across multiple compute resources, such as virtual servers.
- You can add and remove compute resources from your load balancer as your needs change, without disrupting the overall flow of requests to your applications.
- You can configure health checks, which are used to monitor the health of the compute resources so that the load balancer can send requests only to the healthy ones.
- You can also offload the work of encryption and decryption to your load balancer so that your compute resources can focus on their main work.
Load Balancer Errors
If load balancer stops working or timeouts, the classic load balancer will return 504 error.
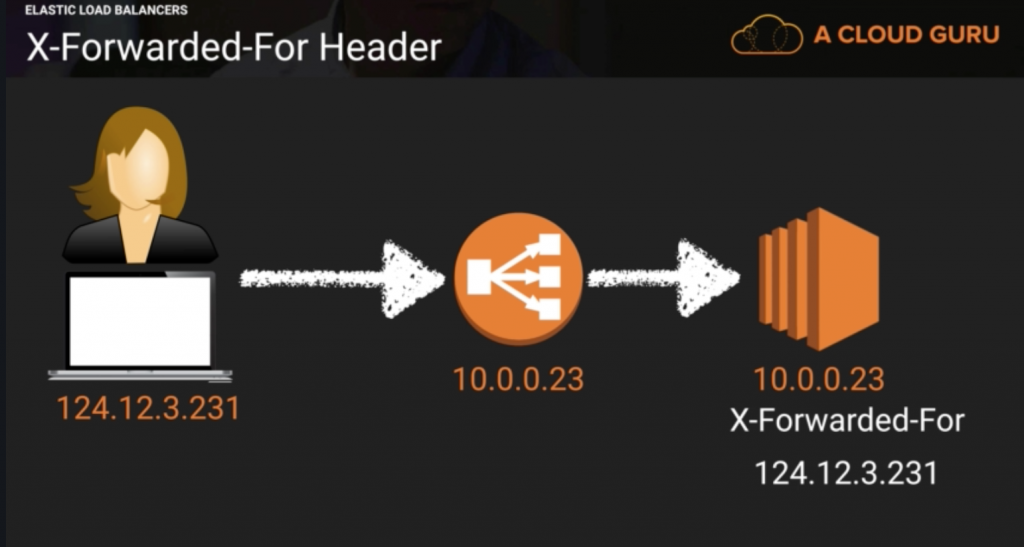
X-Forwarded-For Header
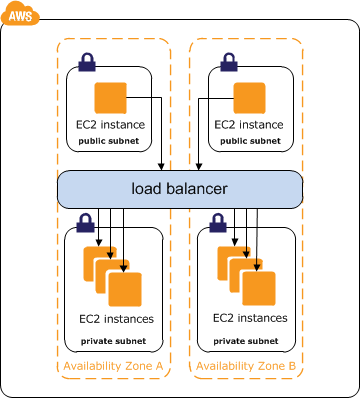
Internet Facing ELB
- ELB nodes have public IPs
- Routes traffic to the private IP addresses of the EC2 instances
- Need one public subnet in each AZ where the ELB is defined
- ELB DNS name format: <name>-<id-number>.<region>.elb.amazonaws.com
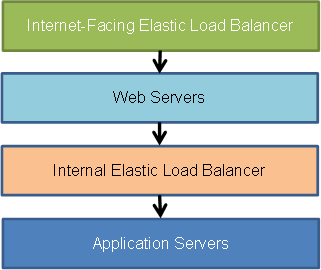
- The internet-facing load balancer has public IP addresses and the usual Elastic Load Balancer DNS name. Your web servers can use private IP addresses and restrict traffic to the requests coming from the internet-facing load balancer. The web servers, in turn, will make requests to the internal load balancer, using private IP addresses that are resolved from the internal load balancers DNS name, which begins with internal-. The internal load balancer will route requests to the application servers, which are also using private IP addresses and only accept requests from the internal load balancer.
Internal Load Balancer
- ELB nodes have private IPs
- Routes traffic to the private IP addresses of the EC2 instances
- ELB DNS name format: internal-<name>-<id-number>.<region>.elb.amazonaws.com
AWS Load Balancer Developer Guide
August 5, 2019AWS – EC2
EC2 is an AWS web service that provides scalable and resizable compute capacity in the cloud. Using Amazon EC2 eliminates your need to invest in hardware upfront, so you can develop and deploy applications faster. You can use Amazon EC2 to launch as many or as few virtual servers as you need, configure security and networking, and manage storage. Amazon EC2 enables you to scale up or down to handle changes in requirements or spikes in popularity, reducing your need to forecast traffic.
EC2 Options
On-Demand – allows to pay a fixed rate by the hour with no upfront commitment.
Reserved – provides you with a capacity reservation and offer a discount on the hourly charge for an instance. This requires an upfront commitment.
Spot – enables you to bid whatever price you like for an instance. This is a great fit if your application is flexible with start and end time. If a sport instance is terminated by AWS you will be charged for a partial hour of usage. However, if you terminate it yourself then you will be charged the full hour.
Dedicated Hosts – physical servers dedicated for your use. This can help you reduce cost as you will use your own software license.
EC2 Instance Types – FIGHT MC PIX
F – FPGA (Field Programmable Gate Array)
I – IOPS (High-Speed Storage)
G – Graphics Intensive
H – High disk throughput
D – Density (Dense Storage)
R – RAM
M – Main choice for general-purpose apps
C – Compute (Compute Optimize)
P – Graphics (think pics) (General Purpose GPU)
X – Extreme Memory
EBS
Amazon EBS allows you to create storage volumes and attach them to EC2 instances. Once attached, you can create a file system on top of these volumes such as installing a database. EBS volumes are placed in multiple AZ to protect you from data loss.
- General Purpose SSD – General purpose SSD volume that balances price and performance for a wide variety of workloads.
- Provisioned IOPS SSD – Highest-performance SSD volume for mission-critical low-latency or high-throughput workloads. It is designed for high-intensity applications such as SQL or NoSQL database servers.
- Throughput Optimized HDD – Low-cost HDD volume designed for frequently accessed, throughput-intensive workloads. It can handle big data and data warehousing. It can’t be a boot volume.
- Cold HDD – Lowest cost HDD volume designed for less frequently accessed workloads. It can’t be a boot volume. It can be a file server.
- Magnetic – Lowest cost per gigabyte of all EBS types that is bootable. Magnetic volumes are a good fit for data that is accessed infrequently.
- Use instance storage to store temporary data.
- Understand the implications of the root device type for data persistence, backup, and recovery.
- Use separate Amazon EBS volumes for the operating system versus your data. Ensure that the volume with your data persists after instance termination.
- Use the instance store available for your instance to store temporary data. Remember that the data stored in instance store is deleted when you stop or terminate your instance.
- Regularly patch, update, and secure the operating system and applications on your instance.
- Implement the least permissive rules for your security group.
- Manage access to AWS resources and APIs using identity federation, IAM users, and IAM roles. Establish credential management policies and procedures for creating, distributing, rotating, and revoking AWS access credentials.
- View your current limits for Amazon EC2. Plan to request any limit increases in advance of the time that you’ll need them.
- Ensure that you are prepared to handle failover. For a basic solution, you can manually attach a network interface or Elastic IP address to a replacement instance.
- Regularly test the process of recovering your instances and Amazon EBS volumes if they fail.
- Deploy critical components of your application across multiple Availability Zones, and replicate your data appropriately.
- Regularly back up your EBS volumes.
AWS – IAM
IAM stands for Identity and Access Management, is Amazon web service that manages your users and their access to your AWS resources. You use IAM to control who is authenticated and authorized to use AWS resources such as EC2 servers, SQS queues, or Route53. It is so important for you to know what IAM is and how it works if you are managing your company’s AWS infrastructure.
IAM role is universal which means that you have one IAM web service for all regions.
The “root account” is the account that you set up when you sign up with AWS. This account has admin access to your AWS resources. As a best practice, do not use your root user credentials for your daily work. Instead, create IAM entities (users and roles) for your daily work. It is highly recommended that you do not share your root user credentials with anyone because doing so gives them unrestricted access to your account. It is not possible to restrict the permissions that are granted to the root user.
It is highly recommended that you create an IAM user for yourself and then assign yourself administrative permissions for your account. You can then sign in as that user and add more users as needed. Also set up multifactor authentication for you and for all the users within your AWS account. This will add another layer of security to your AWS environment.
What does IAM do?
- Authenticates and authorizes your users (users and roles) to perform actions on AWS resources (biggest task).
- Centralize control of your AWS account.
- Share access to your account.
- Granular permissions.
- Multi-Factor authentication for users.
- Rotate user password.
Secret and Access keys
You only see the secret and access keys once, when creating a new user or when generating new keys, so save them in a secure location.
You use secret and access keys to make requests to AWS APIs from your code or from CLI.
You don’t use your secret and access keys to log in to your AWS console.
Users – a user is an entity that you create in AWS to represent the person or application that uses it to interact with AWS. A user in AWS consists of a name and credentials. Think of this as people who have access to your AWS account. An IAM user doesn’t have to represent an actual person; you can create an IAM user in order to generate an access key for an application that runs in your corporate network and needs AWS access.
Groups – a collection of users under a set of permissions.
Roles – a role specifies a set of permissions that you can use to access AWS resources that you need. It is like a user. You mostly use roles when you are already in one AWS resource and you want to use another AWS resource.
Policies – a policy is an object (document) in AWS that, when associated with an identity or resource, defines their permissions. AWS evaluates these policies when a principal entity (user or role) makes a request. Permissions in the policies determine whether the request is allowed or denied.
Principals – a person or application that uses the AWS account root user, an IAM user, or an IAM role to sign in and make requests to AWS.
Authentication – to authenticate from the console as a root user, you must sign in with your email address and password. As an IAM user, provide your account ID or alias, and then your user name and password. To authenticate from the API or AWS CLI, you must provide your access key and secret key. You might also be required to provide additional security information.
Authorization – you must also be authorized (allowed) to complete your request. During authorization, AWS uses values from the request context to check for policies that apply to the request. It then uses the policies to determine whether to allow or deny the request.
Resource – an AWS resource is an object that exists within a service. Examples include an Amazon EC2 instance, an IAM user, and an Amazon S3 bucket.
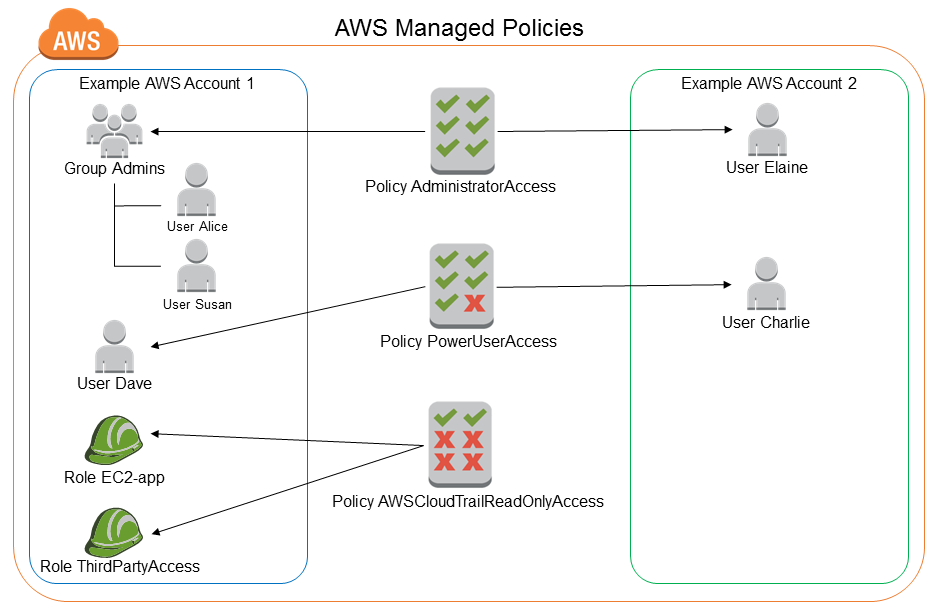
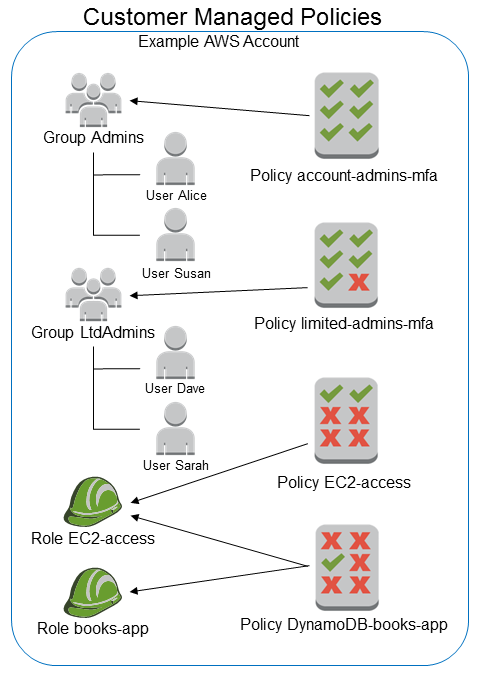
Policy – 3 types of IAM policies
AWS Managed Policy – an AWS policy is created and administered by AWS and can’t be changed by users. AWS managed policies are designed to provide permissions for many common use cases. Full access AWS managed policies such as AmazonDynamoDBFullAccess and IAMFullAccess define permissions for service administrators by granting full access (Create, Read, Update, Deleted) to a service.
Customer Managed Policy – Customer managed policies are policies that you create and that you can attach to multiple users, groups, or roles in your AWS account. You have complete control over these policies. A great way to create a customer-managed policy is to start by copying an existing AWS managed policy. That way you know that the policy is correct at the beginning and all you need to do is customize it to your environment.
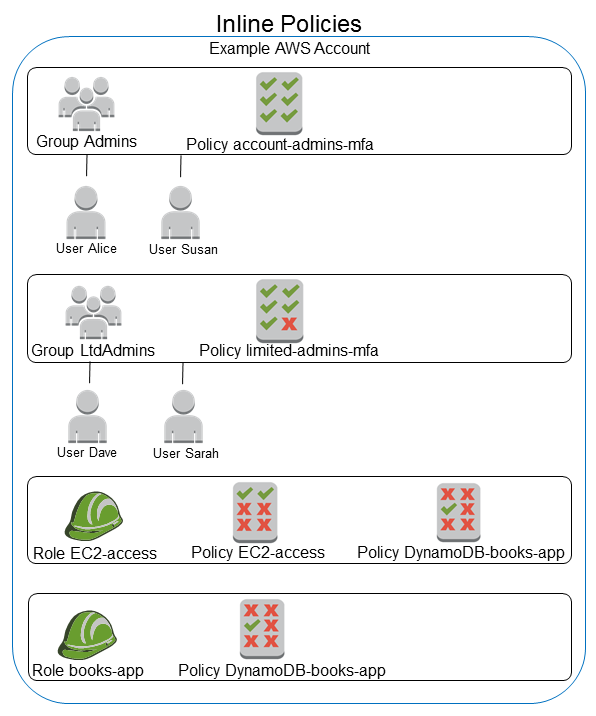
Inline Policy – an inline policy is a policy that’s embedded in a principal entity (a user, group, or role)—that is, the policy is an inherent part of the principal entity. Once you delete the entity the inline policy goes with it.
- Throw away your root account access keys. In 99% of cases, you don’t need them. I have not found a reason to use root user access keys.
- Create individual users for whoever needs access to your AWS environment. Don’t share credentials especially root account console login and access keys.
- Use groups to give users permission like backend-dev for backend developers, frontend-dev for frontend developers, data for data developers, or dev-ops.
- Grant the least privilege. When you create IAM policies, grant only the permissions required to perform a task. Determine what users (and roles) need to do and then craft policies that allow them to perform only those tasks.
- Use an AWS managed policy before creating a customer-managed policy.
- Use a customer-managed policy before creating an inline policy.