AWS – CloudFront
Amazon CloudFront is a fast content delivery network (CDN) service that securely delivers data, videos, applications, and APIs to customers globally with low latency, high transfer speeds, all within a developer-friendly environment. CloudFront is integrated with AWS – both physical locations that are directly connected to the AWS global infrastructure, as well as other AWS services. CloudFront works seamlessly with services including AWS Shield for DDoS mitigation, Amazon S3, Elastic Load Balancing or Amazon EC2 as origins for your applications, and Lambda@Edge to run custom code closer to customers’ users and to customize the user experience. Lastly, if you use AWS origins such as Amazon S3, Amazon EC2 or Elastic Load Balancing, you don’t pay for any data transferred between these services and CloudFront.
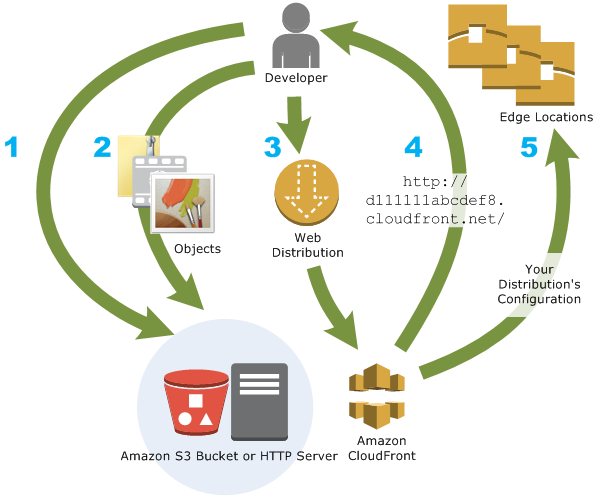
Amazon CloudFront is a web service that speeds up distribution of your static and dynamic web content, such as .html, .css, .js, and image files, to your users. CloudFront delivers your content through a worldwide network of data centers called edge locations. When a user requests content that you’re serving with CloudFront, the user is routed to the edge location that provides the lowest latency (time delay), so that content is delivered with the best possible performance.
- If the content is already in the edge location with the lowest latency, CloudFront delivers it immediately.
- If the content is not in that edge location, CloudFront retrieves it from an origin that you’ve defined—such as an Amazon S3 bucket, a MediaPackage channel, or an HTTP server (for example, a web server) that you have identified as the source for the definitive version of your content.
Use cases:
- Accelerate static website content delivery – CloudFront can speed up the delivery of your static content (for example, images, style sheets, JavaScript, and so on) to viewers across the globe.
- Serve on-demand or live streaming video – you can cache media fragments at the edge, so that multiple requests for the manifest file that delivers the fragments in the right order can be combined, to reduce the load on your origin server.
- Encrypt Specific Fields Throughout System Processing – When you configure HTTPS with CloudFront, you already have secure end-to-end connections to origin servers. When you add field-level encryption, you can protect specific data throughout system processing in addition to HTTPS security, so that only certain applications at your origin can see the data.
- Customize at the Edge – Running serverless code at the edge opens up a number of possibilities for customizing the content and experience for viewers, at reduced latency. For example, you can return a custom error message when your origin server is down for maintenance, so viewers don’t get a generic HTTP error message. Or you can use a function to help authorize users and control access to your content, before CloudFront forwards a request to your origin.
- Serve Private Content by using Lambda@Edge Customizations – Using Lambda@Edge can help you configure your CloudFront distribution to serve private content from your own custom origin, as an option to using signed URLs or signed cookies.
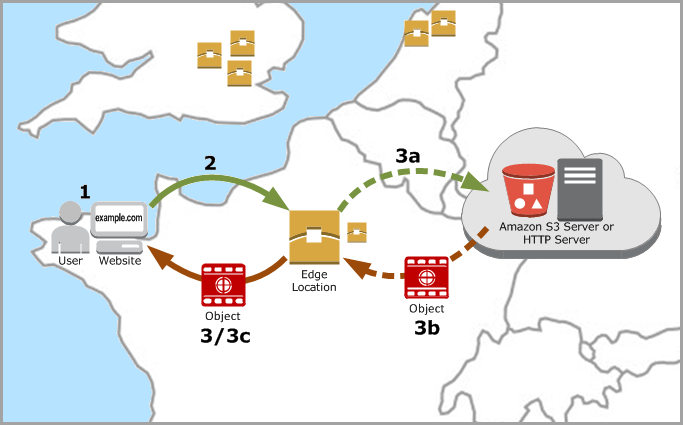
How CloudFront Delivers Content to Your Users
- A user accesses your website or application
- DNS routes the request to the CloudFront POP (edge location) that can best serve the request—typically the nearest CloudFront POP in terms of latency—and routes the request to that edge location.
- CloudFront checks its cache for the requested files. If the files are in the cache, CloudFront returns them to the user. If the files are not in the cache, it calls the origin server.
When you deploy resources to a S3 bucket that uses Cloudfront for distribution, you need to invalidate those resources so they can reflect new changes.
Use CLI
aws cloudfront –profile awsProfile create-invalidation –distribution-id distribution_id –paths “/*”
Example: aws cloudfront –profile folauk110 create-invalidation –distribution-id 123321test –paths “/*”
AWS Cloudfront Developer Guide
AWS – S3
Amazon Simple Storage Service (Amazon S3) is an object storage service that offers industry-leading scalability, data availability, security, and performance. This means customers of all sizes and industries can use it to store and protect any amount of data for a range of use cases, such as websites, mobile applications, backup and restore, archive, enterprise applications, IoT devices, and big data analytics. Amazon S3 provides easy-to-use management features so you can organize your data and configure finely-tuned access controls to meet your specific business, organizational, and compliance requirements. Amazon S3 is designed for 99.999999999% (11 9’s) of durability, and stores data for millions of applications for companies all around the world.
Use cases:
- Backup and restore
- Disaster recovery
- Archive
- Data lakes and big data analytics
- Hybrid cloud storage
- Cloud-native application data
Overview of S3
Amazon S3 has a simple web services interface that you can use to store and retrieve any amount of data, at any time, from anywhere on the web.
S3 Bucket
S3 Bucket Restrictions and Limitations
- By default, you can create up to 100 buckets per account. You can go more than 100 buckets per account by submitting a support ticket. You can increase your account bucket limit to a maximum of 1,000 buckets.
- Bucket ownership is not transferable; however, if a bucket is empty, you can delete it. After a bucket is deleted, the name becomes available to reuse, but the name might not be available for you to reuse for various reasons. For example, some other account could create a bucket with that name. Note, too, that it might take some time before the name can be reused. So if you want to use the same bucket name, don’t delete the bucket.
- There is no limit to the number of objects that can be stored in a bucket and no difference in performance whether you use many buckets or just a few. You can store all of your objects in a single bucket, or you can organize them across several buckets.
- After you have created a bucket, you can’t change its Region.
- You cannot create a bucket within another bucket.
- If your application automatically creates buckets, choose a bucket naming scheme that is unlikely to cause naming conflicts. Ensure that your application logic will choose a different bucket name if a bucket name is already taken.
- After you create an S3 bucket, you can’t change the bucket name, so choose the name wisely.
Rules for bucket naming
- Bucket names must be unique across all existing bucket names in Amazon S3.
- Bucket names must comply with DNS naming conventions.
- Bucket names must be at least 3 and no more than 63 characters long.
- Bucket names must not contain uppercase characters or underscores.
- Bucket names must start with a lowercase letter or number.
- Bucket names must not be formatted as an IP address (for example, 192.168.5.4).
When you use server-side encryption, Amazon S3 encrypts an object before saving it to disk in its data centers and decrypts it when you download the objects.
- Key – The name that you assign to an object. You use the object key to retrieve the object.
- Version Id – Within a bucket, a key and version ID uniquely identify an object. The version ID is a string that Amazon S3 generates when you add an object to a bucket.
- Value – The content that you are storing. An object value can be any sequence of bytes. Objects can range in size from zero to 5 TB.
- Metadata – A set of name-value pairs with which you can store information regarding the object. You can assign metadata, referred to as user-defined metadata, to your objects in Amazon S3. Amazon S3 also assigns system-metadata to these objects, which it uses for managing objects.
- Subresources – Amazon S3 uses the subresource mechanism to store object-specific additional information.
- Access Control Information – You can control access to the objects you store in Amazon S3. Amazon S3 supports both the resource-based access control, such as an access control list (ACL) and bucket policies and user-based access control. Because subresources are subordinates to objects, they are always associated with some other entity such as an object or a bucket
Object key (or key name) uniquely identifies the object in a bucket. Object metadata is a set of name-value pairs. You can set object metadata at the time you upload it. After you upload the object, you cannot modify object metadata. The only way to modify object metadata is to make a copy of the object and set the metadata.
The Amazon S3 data model is a flat structure: you create a bucket, and the bucket stores objects. There is no hierarchy of sub buckets or subfolders. However, you can infer logical hierarchy using key name prefixes and delimiters as the Amazon S3 console does. The Amazon S3 console supports a concept of folders.
Amazon S3 supports buckets and objects, and there is no hierarchy in Amazon S3. However, the prefixes and delimiters in an object key name enable the Amazon S3 console and the AWS SDKs to infer hierarchy and introduce the concept of folders.
System Metadata – For each object stored in a bucket, Amazon S3 maintains a set of system metadata. Amazon S3 processes this system metadata as needed. For example, Amazon S3 maintains object creation date and size metadata and uses this information as part of object management.
User-defined Metadata – When uploading an object, you can also assign metadata to the object.
![]()
AmazonS3 s3Client = AmazonS3ClientBuilder.standard()
                    .withCredentials(new ProfileCredentialsProvider())
                    .withRegion(clientRegion)
                    .build();

            if (!s3Client.doesBucketExistV2(bucketName)) {
                // Because the CreateBucketRequest object doesn't specify a region, the
                // bucket is created in the region specified in the client.
                s3Client.createBucket(new CreateBucketRequest(bucketName));

                // Verify that the bucket was created by retrieving it and checking its location.
                String bucketLocation = s3Client.getBucketLocation(new GetBucketLocationRequest(bucketName));
                System.out.println("Bucket location: " + bucketLocation);
            }
AmazonS3 s3Client = AmazonS3ClientBuilder.standard()
                    .withRegion(clientRegion)
                    .build();

            // Upload a text string as a new object.
            s3Client.putObject(bucketName, stringObjKeyName, "Uploaded String Object");

            // Upload a file as a new object with ContentType and title specified.
            PutObjectRequest request = new PutObjectRequest(bucketName, fileObjKeyName, new File(fileName));
            ObjectMetadata metadata = new ObjectMetadata();
            metadata.setContentType("plain/text");
            metadata.addUserMetadata("x-amz-meta-title", "someTitle");
            request.setMetadata(metadata);
            s3Client.putObject(request);
You need to santize your key names because they must be presentable as urls. Read here about that.
So I have a method to strip out invalid characters from file name because creating a key off of it.
public static String replaceInvalidCharacters(String fileName) {
    /**
     * Valid characters<br>
     * alphabets a-z <br>
     * digits 0-9 <br>
     * underscore _ <br>
     * dash - <br>
     *
     */
    String alphaAndDigits = "[^a-zA-Z0-9._-]+";

    // remove invalid characters

    String newFileName = fileName.replaceAll(alphaAndDigits, "");

    return newFileName;
}
AmazonS3 s3Client = AmazonS3ClientBuilder.standard()
                    .withRegion(clientRegion)
                    .withCredentials(new ProfileCredentialsProvider())
                    .build();

            // Get an object and print its contents.
            System.out.println("Downloading an object");
            fullObject = s3Client.getObject(new GetObjectRequest(bucketName, key));
            System.out.println("Content-Type: " + fullObject.getObjectMetadata().getContentType());
            System.out.println("Content: ");
            displayTextInputStream(fullObject.getObjectContent());

            // Get a range of bytes from an object and print the bytes.
            GetObjectRequest rangeObjectRequest = new GetObjectRequest(bucketName, key)
                    .withRange(0, 9);
            objectPortion = s3Client.getObject(rangeObjectRequest);
            System.out.println("Printing bytes retrieved.");
            displayTextInputStream(objectPortion.getObjectContent());

            // Get an entire object, overriding the specified response headers, and print the object's content.
            ResponseHeaderOverrides headerOverrides = new ResponseHeaderOverrides()
                    .withCacheControl("No-cache")
                    .withContentDisposition("attachment; filename=example.txt");
            GetObjectRequest getObjectRequestHeaderOverride = new GetObjectRequest(bucketName, key)
                    .withResponseHeaders(headerOverrides);
            headerOverrideObject = s3Client.getObject(getObjectRequestHeaderOverride);
            displayTextInputStream(headerOverrideObject.getObjectContent());
AmazonS3 s3Client = AmazonS3ClientBuilder.standard()
                    .withRegion(clientRegion)
                    .withCredentials(new ProfileCredentialsProvider())
                    .build();

            // Set the presigned URL to expire after one hour.
            java.util.Date expiration = new java.util.Date();
            long expTimeMillis = expiration.getTime();
            expTimeMillis += 1000 * 60 * 60;
            expiration.setTime(expTimeMillis);

            // Generate the presigned URL.
            System.out.println("Generating pre-signed URL.");
            GeneratePresignedUrlRequest generatePresignedUrlRequest =
                    new GeneratePresignedUrlRequest(bucketName, objectKey)
                            .withMethod(HttpMethod.GET)
                            .withExpiration(expiration);
            URL url = s3Client.generatePresignedUrl(generatePresignedUrlRequest);

            System.out.println("Pre-Signed URL: " + url.toString());
How to create a S3 bucket from AWS CLI
aws s3 mb s3://mybucket
aws s3 cp test.txt s3://mybucket/test2.txt --expires 2014-10-01T20:30:00Z
aws s3 mv test.txt s3://mybucket/test2.txt

// upload all contents within the current directory to mybucket
aws s3 mv . s3://mybucket
Download files from a S3 bucket
aws s3 mv s3://mybucket/test.txt test2.txt

//download all files in mybucket to a local director(local_mybucket)
aws s3 mv s3://mybucket local_mybucket --recursive
Sync files
// sync(upload all files) within the current directory to S3 mybucket
aws s3 sync s3://mybucket .

// sync mybucket to mybucket2
aws s3 sync s3://mybucket s3://mybucket2

// download all content of mybucket to the current directory
aws s3 sync s3://mybucket . --recursive

//any files existing in the local directory but not existing in bucket will be deleted.
aws s3 sync . s3://mybucket --delete

// all files matching the pattern existing both in s3 and locally will be excluded from the sync.
aws s3 sync . s3://mybucket --exclude "*.jpg"
List s3 buckets within your account
aws s3api list-buckets

//The query option filters the output of list-buckets down to only the bucket names.
aws s3api list-buckets --query "Buckets[].Name"
aws s3api list-objects --bucket bucketName


// get objects that start with (--prefix)
aws s3api list-objects --bucket sidecarhealth-dev-file-form --prefix prefixValue
AWS – Elasticache
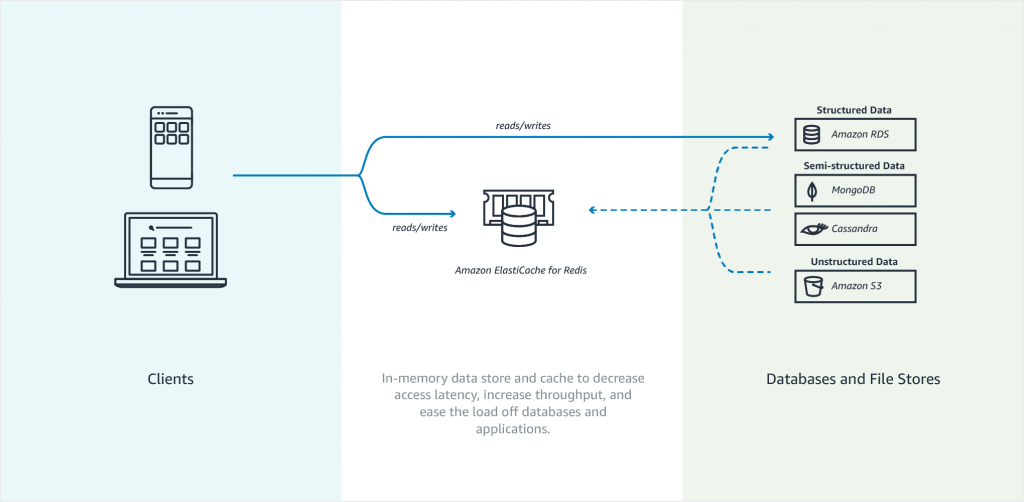
Amazon Elasticache is an in-memory data store. It also works as a cache data store to support the most demanding applications requiring sub-millisecond response times. You no longer need to perform management tasks such as hardware provisioning, software patching, setup, configuration, monitoring, failure recovery, and backups. ElastiCache continuously monitors your clusters to keep your workloads up and running so that you can focus on higher-value application development.
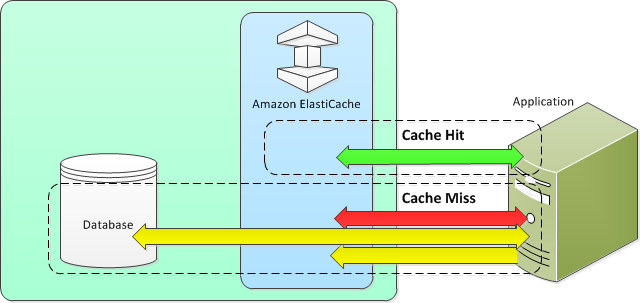
Elasticache sits between your application and your database. When your application needs to query the database, it first checks with Elasticache, if the data is there then it will return that data. if the data is not in Elasticache then it will query the database. This increases the performance of your application significantly.
Amazon Elasticache Redis
Features to enhance reliability
- Automatic detection and recovery from cache node failures.
- Multi-AZ with automatic failover of a failed primary cluster to a read replica in Redis clusters that support replication.
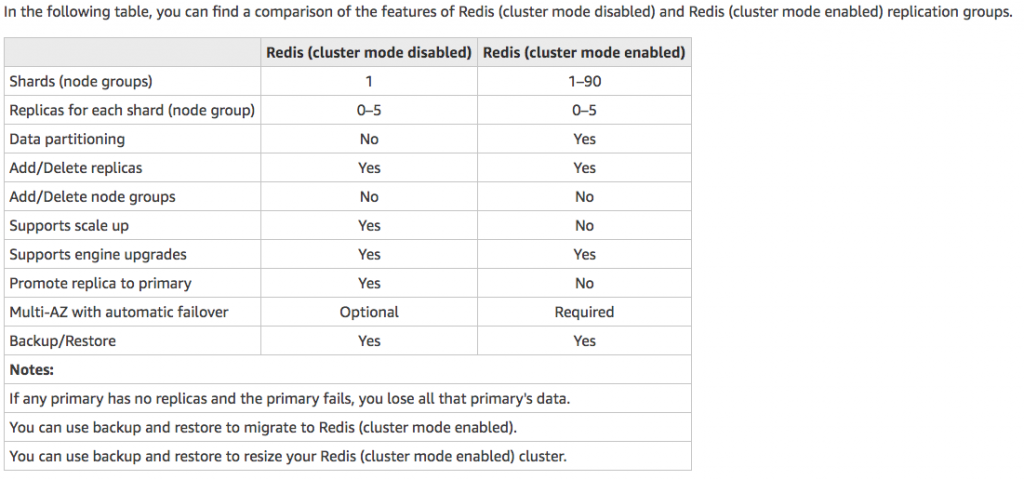
- Redis (cluster mode enabled) supports partitioning your data across up to 90 shards.
- Starting with Redis version 3.2.6, all subsequent supported versions support in-transit and at-rest encryption with authentication so you can build HIPAA-compliant applications.
- Flexible Availability Zone placement of nodes and clusters for increased fault tolerance.
- Integration with other AWS services such as Amazon EC2, Amazon CloudWatch, AWS CloudTrail, and Amazon SNS to provide a secure, high-performance, managed in-memory caching solution.
Use cases of when to use Elasticache
- Selling tickets to an event
- Selling products that are hot on the market
- Generating Ads
- Loading web pages that need to be loaded faster. Users tend to opt-out of the slower site in favor of the faster site. Webpage Load Time Is Related to Visitor Loss, revealed that for every 100-ms (1/10 second) increase in load time, sales decrease 1 percent. If someone wants data, whether, for a webpage or a report that drives business decisions, you can deliver that data much faster if it’s cached.
What should I cache?
- Speed and Expense – It’s always slower and more expensive to acquire data from a database than from a cache. Some database queries are inherently slower and more expensive than others. For example, queries that perform joins on multiple tables are significantly slower and more expensive than simple, single table queries. If the interesting data requires a slow and expensive query to acquire, it’s a candidate for caching. If acquiring the data requires a relatively quick and simple query, it might still be a candidate for caching, depending on other factors.
- Data and Access Pattern – Determining what to cache also involves understanding the data itself and its access patterns. For example, it doesn’t make sense to cache data that is rapidly changing or is seldom accessed. For caching to provide a meaningful benefit, the data should be relatively static and frequently accessed, such as a personal profile on a social media site. Conversely, you don’t want to cache data if caching it provides no speed or cost advantage. For example, it doesn’t make sense to cache webpages that return the results of a search because such queries and results are almost always unique.
- Staleness – By definition, cached data is stale data—even if in certain circumstances it isn’t stale, it should always be considered and treated as stale. In determining whether your data is a candidate for caching, you need to determine your application’s tolerance for stale data. Your application might be able to tolerate stale data in one context, but not another. For example, when serving a publicly-traded stock price on a website, staleness might be acceptable, with a disclaimer that prices might be up to n minutes delayed. But when serving up the price for the same stock to a broker making a sale or purchase, you want real-time data.
Consider caching your data if the following is true: It is slow or expensive to acquire when compared to cache retrieval. It is accessed with sufficient frequency. It is relatively static, or if rapidly changing, staleness is not a significant issue.
- Nodes – A node is a fixed-size chunk of secure, network-attached RAM. Each node runs an instance of the engine and version that was chosen when you created your cluster. If necessary, you can scale the nodes in a cluster up or down to a different instance type.You can purchase nodes on a pay-as-you-go basis, where you only pay for your use of a node. Or you can purchase reserved nodes at a significantly reduced hourly rate. If your usage rate is high, purchasing reserved nodes can save you money.
- Shards – is a group of one to six related nodes. A Redis cluster always has one shard but can have 1-90 shards. One of the nodes in a shard is a read/write primary node. Others are replica nodes.
- Clusters – a Redis cluster is a logical group of one or more shards. For improved fault tolerance, we recommend having at least two nodes in a Redis cluster and enabling Multi-AZ with automatic failover. If your application is read-intensive, we recommend adding read-only replicas Redis (cluster mode disabled) cluster so you can spread the reads across a more appropriate number of nodes. ElastiCache supports changing a Redis (cluster mode disabled) cluster’s node type to a larger node type dynamically.
- Replica – Replication is implemented by grouping from two to six nodes in a shard. One of these nodes is the read/write primary node. All the other nodes are read-only replica nodes. Each replica node maintains a copy of the data from the primary node. Replica nodes use asynchronous replication mechanisms to keep synchronized with the primary node. Applications can read from any node in the cluster but can write only to primary nodes. Read replicas enhance scalability by spreading reads across multiple endpoints. Read replicas also improve fault tolerance by maintaining multiple copies of the data. Locating read replicas in multiple Availability Zones further improves fault tolerance.
- Endpoints – An endpoint is a unique address your application uses to connect to an ElastiCache node or cluster. Single Node Redis has a single endpoint for both reads and writes. Multi-Node Redis has two separate endpoints. One for reads and one(primary) for writes. If cluster mode is enabled then you will have a single endpoint through which writes are done and also reads.
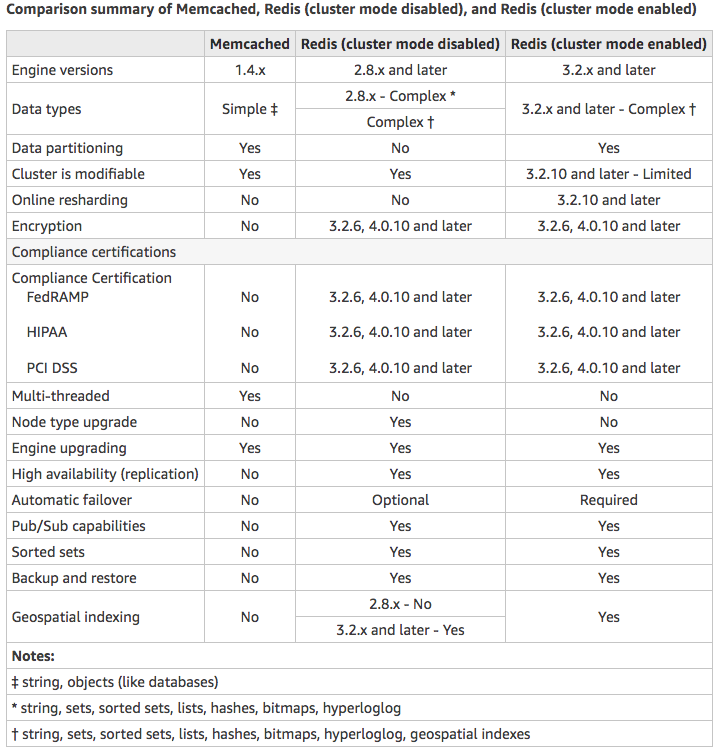
Choose Memcached if:
- You need the simplest model possible.
- You need to run large nodes with multiple cores or threads.
- You need the ability to scale out and in, adding and removing nodes as demand on your system increases and decreases.
- You need to cache objects, such as a database.
Choose Redis if:
- You need In-transit encryption.
- You need At-rest encryption.
- You need HIPAA compliance.
- You need to partition your data across two to 90 node groups
- You don’t need to scale-up to larger node types.
- You don’t need to change the number of replicas in a node group (partition).
- You need complex data types, such as strings, hashes, lists, sets, sorted sets, and bitmaps.
- You need to sort or rank in-memory datasets.
- You need persistence of your key store.
- You need to replicate your data from the primary to one or more read replicas for read-intensive applications.
- You need automatic failover if your primary node fails.
- You need publish and subscribe (pub/sub) capabilities—to inform clients about events on the server.
- You need backup and restore capabilities.
- You need to support multiple databases.
Caching Strategies
Lazy Loading –Lazy loading is a caching strategy that loads data into the cache only when necessary. How it works is that ElastiCache is an in-memory key/value store that sits between your application and the data store (database) that it accesses. Whenever your application requests data, it first makes the request to the ElastiCache cache. If the data exists in the cache and is current, ElastiCache returns the data to your application. If the data does not exist in the cache, or the data in the cache has expired, your application requests the data from your data store which returns the data to your application. Your application then writes the data received from the store to the cache so it can be more quickly retrieved next time it is requested.
Advantages of Lazy Loading
- Only requested data is cached. Since most data is never requested, lazy loading avoids filling up the cache with data that isn’t requested.
- Node failures are not fatal. When a node fails and is replaced by a new, empty node the application continues to function, though with increased latency. As requests are made to the new node each cache miss results in a query of the database and adding the data copy to the cache so that subsequent requests are retrieved from the cache.
Disadvantages of Lazy Loading
- There is a cache miss penalty – Each cache miss results in 3 trips, Initial request for data from the cache, Query of the database for the data, Writing the data to the cache. This can be a noticeable delay in data getting to the application.
- Stale data – If data is only written to the cache when there is a cache miss, data in the cache can become stale since there are no updates to the cache when data is changed in the database.
Write Through – The write-through strategy adds data or updates data in the cache whenever data is written to the database.
Advantages of Write Through
- Data in the cache is never stale. Since the data in the cache is updated every time it is written to the database, the data in the cache is always current.
- Write penalty vs. Read penalty. Every write involves two trips: A write to the cache and a write to the database. This will add latency to the process. That said, end users are generally more tolerant of latency when updating data than when retrieving data. There is an inherent sense that update requires more work and thus take longer.
Disadvantages of Write Through
- Missing data. In the case of spinning up a new node, whether due to a node failure or scaling out, there is missing data which continues to be missing until it is added or updated on the database. This can be minimized by implementing Lazy Loading in conjunction with Write Through.
- Cache churn. Since most data is never read, there can be a lot of data in the cluster that is never read. This is a waste of resources. By Adding TTL you can minimize wasted space.
Adding TTL Stragegy – Lazy loading allows for stale data, but won’t fail with empty nodes. Write through ensures that data is always fresh, but may fail with empty nodes and may populate the cache with superfluous data. By adding a time to live (TTL) value to each write, we are able to enjoy the advantages of each strategy and largely avoid cluttering up the cache with superfluous data. Time to live (TTL) is an integer value that specifies the number of seconds (Redis can specify seconds or milliseconds) until the key expires. When an application attempts to read an expired key, it is treated as though the key is not found, meaning that the database is queried for the key and the cache is updated. This does not guarantee that a value is not stale, but it keeps data from getting too stale and requires that values in the cache are occasionally refreshed from the database.
Amazon ElastiCache for Memcached is a Memcached-compatible in-memory key-value store service that can be used as a cache or a data store. It delivers the performance, ease-of-use, and simplicity of Memcached. ElastiCache for Memcached is fully managed, scalable, and secure – making it an ideal candidate for use cases where frequently accessed data must be in-memory. It is a popular choice for use cases such as Web, Mobile Apps, Gaming, Ad-Tech, and E-Commerce.
Amazon ElastiCache for Memcached is a great choice for implementing an in-memory cache to decrease access latency, increase throughput, and ease the load off your relational or NoSQL database. Amazon ElastiCache can serve frequently requested items at sub-millisecond response times , and enables you to easily scale for higher loads without growing the costlier backend database layer. Database query results caching, persistent session caching, and full-page caching are all popular examples of caching with ElastiCache for Memcached.
Session stores are easy to create with Amazon ElastiCache for Memcached. Simply use the Memcached hash table, that can be distributed across multiple nodes. Scaling the session store is as easy as adding a node and updating the clients to take advantage of the new node.
Features to enhance reliability:
- Automatic detection and recovery from cache node failures.
- Automatic discovery of nodes within a cluster enabled for automatic discovery so that no changes need to be made to your application when you add or remove nodes.
- Flexible Availability Zone placement of nodes and clusters.
- Integration with other AWS services such as Amazon EC2, Amazon CloudWatch, AWS CloudTrail, and Amazon SNS to provide a secure, high-performance, managed in-memory caching solution.
AWS – DynamoDB
Dynamodb is a low latency NoSQL database like MongoDB or Cassandra. It is fully managed by AWS so you don’t have to maintain any server for your database. Literally, there are no servers to provision, patch, or manage and no software to install, maintain or operate. DynamoDB automatically scales tables up and down to adjust for capacity and maintain performance. It supports both document and key-value data models. It uses SSD storage so it is very fast and supports Multi-AZ. DynamoDB global tables replicate your data across multiple AWS Regions to give you fast, local access to data for your globally distributed applications. For use cases that require even faster access with microsecond latency, DynamoDB Accelerator (DAX) provides a fully managed in-memory cache.
As with other AWS services, DynamoDB requires a role or user to have the right privileges to access DynamoDB. Make sure you add DynamoDB full access to the role or user(access keys) your server is using. You can also use a special IAM condition to restrict users to only access their data.
DynamoDB supports ACID transactions to enable you to build business-critical applications at scale. DynamoDB encrypts all data by default and provides fine-grained identity and access control on all your tables.
DynamoDB provides both provisioned and on-demand capacity modes so that you can optimize costs by specifying capacity per workload or paying for only the resources you consume.
When to use:
a. Gaming
b. User, vehicle, and driver data stores
c. Ads technology
d. Player session history data stores
e. Inventory tracking and fulfillment
f. Shopping carts
g. User transactions
There are two ways Dynamodb supports read:
1. Eventually consistent read – When data is saved to Dynamodb, it takes about 1 second for the data to propagate across multiple availability zones. This does not guarantee that your users will see the recent data from 1 second ago.
2. Strongly consistent read – This returns the most recent or up to date data. It will detect if there is a write operation happening at the time. If there is, then it will wait to read data afterward which results in a longer but more consistent read.
DynamoDB Tables
- Tables
- Items (rows in SQL DB)
- Attributes (columns in SQL DB)
- Data can be in JSON, HTML, or XML
DynamoDB Primary Keys
1. Unique Partition Key – This key must be unique across items or rows i.e user_id. This value is input into a hash function which calculates the physical location of which data will be stored.
2. Composite Key (Partition key + Sort key) – This is useful for post or comment tables where rows belong to another entity i.e user_id as the partition key and post_timestamp for the sort key. Two or more items can have the same partition key but they must have different sort keys. These items stored physically together but sorted with their sort key.
DynamoDB Indexes
Local Secondary Index
– Can only be created when creating your table and you cannot change, remove, or add it later.
– Has the same partition as your original table.
– Has a different sort key from your original table.
– Queries based on the local secondary indexes are faster than regular queries.
Global Secondary Index
– Can add when creating your table or later.
– Has different partition and sort keys.
– Speeds up queries.
DynamoDB with Java. I am using DynamoDB wrapper.
For local development, I am using a docker image. There are other ways to install DynamoDB locally.
Run DynamoDB locally on your computer
@Bean
	public AmazonDynamoDB amazonDynamoDB() {
		AmazonDynamoDB client =  AmazonDynamoDBClientBuilder.standard()
				.withCredentials(amazonAWSCredentialsProvider())
				.withEndpointConfiguration(new AwsClientBuilder.EndpointConfiguration(amazonDynamoDBEndpoint, Regions.US_WEST_2.getName()))
				.build();
		return client;
	}

	@Bean
	public DynamoDBMapper dynamoDBMapper() {
		return new DynamoDBMapper(amazonDynamoDB());
	}
@DynamoDBTable(tableName="user")
public class User implements Serializable {

	private static final long serialVersionUID = 1L;

	@DynamoDBHashKey(attributeName="uuid")
	@DynamoDBAttribute
	private String uuid;

	@DynamoDBAttribute
	private String email;

	@DynamoDBAttribute
	private String firstName;

	@DynamoDBAttribute
	private String lastName;

	@DynamoDBAttribute
	private String phoneNumber;

	@DynamoDBAttribute
	private Date createdAt;

        // setters and getters
}
@Repository
public class UserRepositoryImp implements UserRepository {

	private Logger log = LoggerFactory.getLogger(this.getClass());

	@Autowired
	private AmazonDynamoDB amazonDynamoDB;

	@Autowired
	private DynamoDBMapper dynamoDBMapper;

	@Override
	public User create(User user) {
		user.setUuid(RandomGeneratorUtils.getUserUuid());
		user.setCreatedAt(new Date());
		dynamoDBMapper.save(user);
		return getById(user.getUuid());
	}

	@Override
	public User getById(String id) {
		User user = dynamoDBMapper.load(User.class, id);
		return user;
	}


	@Override
	public List<User> getAllUser() {
		PaginatedScanList<User> users = dynamoDBMapper.scan(User.class, new DynamoDBScanExpression());

		return (users!=null) ? users.subList(0, users.size()) : null;
	}

	@Override
	public boolean createTable() {


		// check if table has been created
		try {
			DescribeTableResult describeTableResult = amazonDynamoDB.describeTable("user");

			if(describeTableResult.getTable()!=null){
				log.debug("user table has been created already!");
				return true;
			}
		} catch (Exception e) {

		}

		// table hasn't been created so start a createTableRequest
		CreateTableRequest createTableRequest = dynamoDBMapper.generateCreateTableRequest(User.class);
		createTableRequest.withProvisionedThroughput(new ProvisionedThroughput(5L,5L));

		// create table
		CreateTableResult createTableResult = amazonDynamoDB.createTable(createTableRequest);

		long count = createTableResult.getTableDescription().getItemCount();

		log.debug("item count={}",count);

		return false;
	}

}
Transaction
Here is an example of sending money(balance) from one user to another.
	@Override
	public boolean tranferBalance(double amount, User userA, User userB) {
		final String USER_TABLE_NAME = "user";
		final String USER_PARTITION_KEY = "userid";

		try {
			// user A
			HashMap<String, AttributeValue> userAKey = new HashMap<>();
			userAKey.put(USER_PARTITION_KEY, new AttributeValue(userA.getUuid()));

			ConditionCheck checkUserAValid = new ConditionCheck()
			        .withTableName(USER_TABLE_NAME)
			        .withKey(userAKey)
			        .withConditionExpression("attribute_exists(" + USER_PARTITION_KEY + ")");

			Map<String, AttributeValue> expressionAttributeValuesA = new HashMap<>();
			expressionAttributeValuesA.put(":balance", new AttributeValue().withN("" + (userA.getBalance() - amount)));

			Update withdrawFromA = new Update().withTableName(USER_TABLE_NAME).withKey(userAKey)
					.withUpdateExpression("SET balance = :balance")
					.withExpressionAttributeValues(expressionAttributeValuesA);

		    log.debug("user A setup!");

			// user B
			HashMap<String, AttributeValue> userBKey = new HashMap<>();
			userAKey.put(USER_PARTITION_KEY, new AttributeValue(userB.getUuid()));

			ConditionCheck checkUserBValid = new ConditionCheck()
			        .withTableName(USER_TABLE_NAME)
			        .withKey(userBKey)
			        .withConditionExpression("attribute_exists(" + USER_PARTITION_KEY + ")");

			Map<String, AttributeValue> expressionAttributeValuesB = new HashMap<>();
			expressionAttributeValuesB.put(":balance", new AttributeValue().withN("" + (userB.getBalance() + amount)));

			Update depositToB = new Update().withTableName(USER_TABLE_NAME).withKey(userBKey)
					.withUpdateExpression("SET balance = :balance")
					.withExpressionAttributeValues(expressionAttributeValuesB);

			log.debug("user B setup!");


			HashMap<String, AttributeValue> withdrawItem = new HashMap<>();
			withdrawItem.put(USER_PARTITION_KEY, new AttributeValue(userA.getUuid()));
			withdrawItem.put("balance", new AttributeValue("100"));

			// actions
			Collection<TransactWriteItem> actions = Arrays.asList(
					new TransactWriteItem().withConditionCheck(checkUserAValid),
					new TransactWriteItem().withConditionCheck(checkUserBValid),
					new TransactWriteItem().withUpdate(withdrawFromA),
					new TransactWriteItem().withUpdate(depositToB));

			log.debug("actions setup!");

			// transaction request
			TransactWriteItemsRequest withdrawTransaction = new TransactWriteItemsRequest()
					.withTransactItems(actions)
					.withReturnConsumedCapacity(ReturnConsumedCapacity.TOTAL);

			log.debug("transaction request setup!");

			// Execute the transaction and process the result.

			TransactWriteItemsResult transactWriteItemsResult = amazonDynamoDB.transactWriteItems(withdrawTransaction);
			log.debug("consumed capacity={}",ObjectUtils.toJson(transactWriteItemsResult.getConsumedCapacity()));

			return (transactWriteItemsResult.getConsumedCapacity()!=null) ? true : false;
		} catch (ResourceNotFoundException e) {
			log.error("One of the table involved in the transaction is not found " + e.getMessage());
		} catch (InternalServerErrorException e) {
			log.error("Internal Server Error " + e.getMessage());
		} catch (TransactionCanceledException e) {
			log.error("Transaction Canceled " + e.getMessage());
		} catch (Exception e) {
			log.error("Exception, msg={}",e.getLocalizedMessage());
		}

		return false;
	}
August 5, 2019 AWS – RDS
Amazon Relational Database Service (Amazon RDS) is a web service that makes it easier to set up, operate, and scale a relational database in the cloud. AWS RDS takes over many of the difficult or tedious management tasks of a relational database. When you use Amazon RDS, you can choose to use on-demand DB instances or reserved DB instances.
Relational Database Types
- SQL Server
- Oracle
- MySQL Server
- PostgreSQL
- Aurora
- MariaDB
What AWS does with RDS?
- When you set up an RDS instance, you get CPU, memory, storage, and IOPS, all bundled together. With Amazon RDS, these are split apart so that you can scale them independently. If you need more CPU, fewer IOPS, or more storage, you can easily allocate them.
- Amazon RDS manages backups, software patching, automatic failure detection, and recovery.
- Since AWS manages RDS instances, Amazon RDS doesn’t provide shell access to DB instances, and it restricts access to certain system procedures and tables that require advanced privileges.
- You can have automated backups performed when you need them, or manually create your own backup snapshot. You can use these backups to restore a database. The Amazon RDS restore process works reliably and efficiently.
- You can get high availability with a primary instance and a synchronous secondary instance that you can fail over to when problems occur. You can also use MySQL, MariaDB, or PostgreSQL Read Replicas to increase read scaling.
- In addition to the security in your database package, you can help control who can access your RDS databases by using AWS Identity and Access Management (IAM) to define users and permissions. You can also help protect your databases by putting them in a virtual private cloud.
- You can create and modify a DB instance by using the AWS Command Line Interface, the Amazon RDS API, or the AWS Management Console.
DB Instances
A DB instance can contain multiple user-created databases, and you can access it by using the same tools and applications that you use with a stand-alone database instance. You can create and modify a DB instance by using the AWS Command Line Interface, the Amazon RDS API, or the AWS Management Console.
You can select the DB instance that best meets your needs. If your needs change over time, you can change DB instances. DB instance storage comes in three types: Magnetic, General Purpose (SSD), and Provisioned IOPS (PIOPS). They differ in performance characteristics and price, allowing you to tailor your storage performance and cost to the needs of your database.
Security
A security group controls access to a DB instance. It does so by allowing access to IP address ranges or Amazon EC2 instances that you specify.
There are several ways that you can track the performance and health of a DB instance. You can use the free Amazon CloudWatch service to monitor the performance and health of a DB instance; performance charts are shown in the Amazon RDS console. You can subscribe to Amazon RDS events to be notified when changes occur with a DB instance, DB Snapshot, DB parameter group, or DB security group.
Get list of database instances
aws rds describe-db-instances
aws rds start-db-instance --db-instance-identifier test-instance
aws rds stop-db-instance --db-instance-identifier test-instance
aws rds reboot-db-instance --db-instance-identifier test-instance