MySQL Insert
The INSERT command inserts one or more rows into a table. Let’s see how the syntax works.
INSERT INTO table_name(column_name1,column_name2,..)
VALUES (column_value1,column_value2,...);
INSERT INTO `employee`
(`age`, `email`, `first_name`, `last_name`, `title`)
VALUES
('20', 'test@gmail.com', 'John', 'Brown', 'Manager');
INSERT INTO table_name – this query is an insert query into a table.
VALUES – values for the columns you have chosen.
* The number of columns and values must be equal otherwise it won’t work.
* It is very important that you insert string data within single quotes to avoid abnormal behavior.
For example if your string data has a comma in it, mysql will complain as it thinks you are inserting into more columns than specified.
-- it seems like we are inserting data into 3 columns which is not true
INSERT INTO `employee`
(`first_name`, `last_name`)
VALUES
(John,roe, Brown);

-- using single quotes
INSERT INTO `employee`
(`first_name`, `last_name`)
VALUES
('John,roe', 'Brown');
You can also add multiple rows in a single insert call.
Insert with multiple rows in a single call
INSERT INTO table_name(column_name1,column_name2,..)
VALUES
(column_value1,column_value2,...),
(column_value1,column_value2,...),
(column_value1,column_value2,...);
INSERT INTO `employee`
(`age`, `email`, `first_name`, `last_name`, `title`)
VALUES
('20', 'test@gmail.com', 'John', 'Brown', 'Manager'),
('35', 'test1@gmail.com', 'James', 'Brown', 'Manager');
Insert into a table what is selected from another table
Let’s say you have a table and for whatever reason, you want to copy it to another table. What you would do is, create the new table and then move the data from the old table to the new table.
INSERT INTO table_name1(column_name1,column_name2,...)
/* replace VALUES with this */
(SELECT
   column_name1,column_name2,...
FROM
   table_name2);
VALUES is replaced by a SELECT statement which reads the data from table_name2.
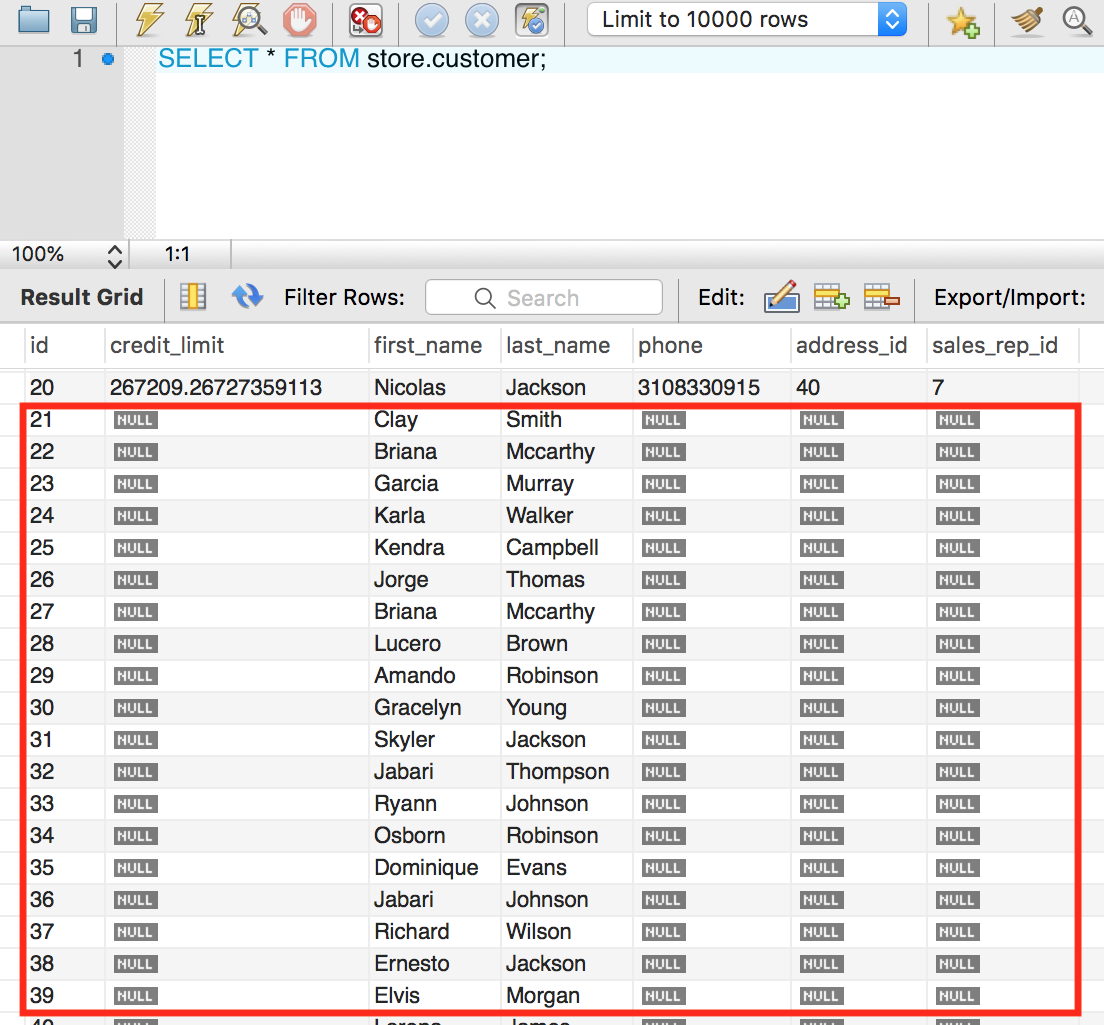
INSERT INTO `customer`(`first_name`,`last_name`)

(SELECT `first_name`,`last_name`
FROM `store`.`employee`);
As you can see, we just inserted all first names and last names from our employee table into the first_name and last_name columns for the customer table.
Insert with ignore
When we are inserting multiple rows into a table and something goes wrong, mysql will roll back all transactions so none of the rows are added. If we want to ignore any error and continue the sql execution then we have to use IGNORE. IGNORE indicates that if any of the row fails that other rows that are good should be inserted.
INSERT IGNORE INTO table_name(column_name1,column_name2,..)
VALUES
(column_value1,column_value2,...),
(column_value1,column_value2,...),
(column_value1,column_value2,...);
INSERT IGNORE INTO `customer`
(`first_name`,`address_id`)
VALUES
('James',20),
('Peter','Rollin'),
('John',3);

As you can see, James was added but Peter Rollin was not added because ‘Rollin’ was an invalid value for that column. The SQL execution did not stop and roll back instead it continued to add John.
Spring Boot Migration from Spring
March 19, 2019Spring Boot Web MVC
Spring boot makes easy for us developers to get up and running with a spring mvc project. You add the following dependencies and you are ready to go.
<dependency>
			<groupId>org.springframework.boot</groupId>
			<artifactId>spring-boot-starter-web</artifactId>
</dependency>
<dependency>
			<groupId>org.springframework.boot</groupId>
			<artifactId>spring-boot-starter-tomcat</artifactId>
			<scope>provided</scope>
</dependency>
<dependency>
			<groupId>org.springframework.boot</groupId>
			<artifactId>spring-boot-devtools</artifactId>
			<scope>runtime</scope>
</dependency>
<dependency>
			<groupId>org.springframework.boot</groupId>
			<artifactId>spring-boot-starter-thymeleaf</artifactId>
</dependency>
We are using thymeleaf for our views.
Create a controller.
Pay attention to the @Controller annotation which turns this class, UserController, into a spring controller component.
@Controller
public class UserController {
}
Create a request handler within @Controller.
In this case we are using a Get request handler. Use the Model class to pass data to you view.
@GetMapping("/home")
public String home(Model model){
		log.debug("home(..)");

		model.addAttribute("message", "Welcome to my page");

		log.debug("model={}",ObjectUtils.toJson(model));

		return "home";
}
Create a view.
Views are generally located in the templates folder under resources folder. Here we are creating a view for our home page.
<!DOCTYPE HTML>
<html lang="en" xmlns:th="http://www.thymeleaf.org">
<head>
<meta charset="utf-8">
<meta name="viewport"
	content="width=device-width, initial-scale=1, shrink-to-fit=no">

<title>Spring Boot Thymeleaf Hello World Example</title>

<link rel="stylesheet" th:href="@{/css/main.css}" />

<!-- Latest compiled and minified CSS -->
<link rel="stylesheet"
	href="https://maxcdn.bootstrapcdn.com/bootstrap/4.3.1/css/bootstrap.min.css">


</head>

<body>

	<nav class="navbar navbar-expand-md navbar-dark bg-dark fixed-top">
		<a class="navbar-brand" href="#">Folau Kaveinga</a>
	</nav>

	<div role="main" class="container">

		<div class="starter-template">
			<h1>Spring Boot Web Thymeleaf Example</h1>
			<h2>
				<span th:text="'Hello, ' + ${message}"></span>
			</h2>
		</div>

	</div>
	<!-- /.container -->
</body>

<!-- jQuery library -->
<script
	src="https://ajax.googleapis.com/ajax/libs/jquery/3.4.0/jquery.min.js"></script>

<!-- Popper JS -->
<script
	src="https://cdnjs.cloudflare.com/ajax/libs/popper.js/1.14.7/umd/popper.min.js"></script>

<!-- Latest compiled JavaScript -->
<script
	src="https://maxcdn.bootstrapcdn.com/bootstrap/4.3.1/js/bootstrap.min.js"></script>
</html>
Static files
Static files such as css and js files can be served from the static folder under the resources folder.
For demo purposes, let create a main css file to style our home page.
body {
  padding-top: 5rem;
}
.starter-template {
  padding: 3rem 1.5rem;
  text-align: center;
}

h1{
	color:#0000FF;
}

h2{
	color:#FF0000;
}
If you start your server and go to /home, your should see the home page being displayed.
March 19, 2019Spring Boot Hibernate
Hibernate has been used with spring for as long as I can remember. Now that spring boot and spring data have taken the game by storm spring boot with hibernate are no longer relevant. But just in case you are not too familiar with Spring data or you want to keep using hibernate the old school way. Here is how you can use hibernate with spring boot.
Step 1 – Create a spring boot project using spring initializr and make sure you include these dependencies.
<dependency>
			<groupId>org.springframework</groupId>
			<artifactId>spring-orm</artifactId>
</dependency>
<dependency>
			<groupId>org.hibernate</groupId>
			<artifactId>hibernate-core</artifactId>
</dependency>
<dependency>
			<groupId>org.hibernate</groupId>
			<artifactId>hibernate-c3p0</artifactId>
</dependency>
<dependency>
			<groupId>com.zaxxer</groupId>
			<artifactId>HikariCP</artifactId>
</dependency>
Step 2 – Configure hibernate using java
@Configuration
@EnableTransactionManagement
public class HibernateConfig {

	@Bean
	public LocalSessionFactoryBean sessionFactory() {
		LocalSessionFactoryBean sessionFactory = new LocalSessionFactoryBean();
		sessionFactory.setDataSource(dataSource());

		sessionFactory.setHibernateProperties(hibernateProperties());
		sessionFactory.setAnnotatedClasses(User.class, Role.class, Address.class);

		return sessionFactory;
	}

	private final Properties hibernateProperties() {
		final Properties hibernateProperties = new Properties();
		hibernateProperties.setProperty("hibernate.hbm2ddl.auto", "create");
		hibernateProperties.setProperty("hibernate.dialect", "org.hibernate.dialect.MySQL5InnoDBDialect");
		hibernateProperties.setProperty("hibernate.show_sql", "true");
		hibernateProperties.setProperty("hibernate.format_sql", "true");
		return hibernateProperties;
	}

	@Bean
	public DataSource dataSource() {
		Integer port = 3306;
		String host = "localhost";
		String username = "root";
		String password = "";
		String dbName = "spring_boot_hibernate";
		String url = "jdbc:mysql://" + host + ":" + port + "/" + dbName
				+ "?useUnicode=true&characterEncoding=utf8&useSSL=false&serverTimezone=UTC";
		return DataSourceBuilder.create().password(password).username(username).url(url).type(HikariDataSource.class)
				.build();
	}

	@Bean
	public PlatformTransactionManager hibernateTransactionManager() {
		HibernateTransactionManager transactionManager = new HibernateTransactionManager();
		transactionManager.setSessionFactory(sessionFactory().getObject());
		return transactionManager;
	}


}
If you using a hibernate xml file, you can simply just import to your java hibernate class.
@Configuration
@EnableTransactionManagement
@ImportResource({"classpath:hibernateConfiguration.xml"})
public class HibernateConfig {
    //
}
Step 3 – Create a DAO class for accessing the database.
@Repository
public class UserDAO {

	private Logger log = LoggerFactory.getLogger(this.getClass());

	@Autowired
    private SessionFactory sessionFactory;


	public User saveAndFlush(User user) {
		log.debug("saveAndFlush(..)");
		Session session = sessionFactory.openSession();
		Transaction transaction = session.getTransaction();
		transaction.begin();
		Object id = session.save(user);
		transaction.commit();
		session.close();
		log.debug("id={}",ObjectUtils.toJson(id));
		user.setId((long)id);

		return user;
	}

	public User update(User user) {
		log.debug("update(..)");
		Session session = sessionFactory.openSession();
		Transaction transaction = session.getTransaction();
		transaction.begin();
		session.update(user);
		transaction.commit();
		session.close();

		return this.getById(user.getId());
	}

	public User getById(Long memberId) {
		Session session = sessionFactory.openSession();
		return session.get(User.class, memberId);
	}
}
Just like that and you back in business with spring boot and hibernate. Springboot makes you life as a developer so much easier.
March 19, 2019Spring Boot JDBC
Most springboot projects are going with either Hibernate, JPA, or Spring Data. If you are still using JDBC to communicate directly with the database then this tutorial is for you.
Step 1 – Add this dependency to your springboot project
<dependency>
			<groupId>org.springframework.boot</groupId>
			<artifactId>spring-boot-starter-jdbc</artifactId>
</dependency>
Step 2 – Add your data source configuration to your application.properties file.
# database
spring.datasource.url=jdbc:mysql://localhost:3306/spring_boot_jdbc?useUnicode=true&characterEncoding=utf8&useSSL=false&serverTimezone=UTC
spring.datasource.username=root
spring.datasource.password=
spring.datasource.name=spring_boot_jdbc
spring.datasource.driver-class-name=com.mysql.jdbc.Driver
Step 3 – Auto wire an instance of JdbcTemplate
@Autowired
private JdbcTemplate jdbcTemplate;
Create a method to create tables.
public void setup() {
		jdbcTemplate.execute(
				"CREATE TABLE IF NOT EXISTS member(id bigint(20) NOT NULL AUTO_INCREMENT, email varchar(255) NOT NULL, password varchar(255) NOT NULL, uid varchar(255) NOT NULL, PRIMARY KEY (`id`))");
}
INSERT operation
public User create(User user) {
		StringBuilder query = new StringBuilder("INSERT INTO member(uid, email, password) VALUES (?, ?, ?)");
		KeyHolder keyHolder = new GeneratedKeyHolder();

		jdbcTemplate.update(connection -> {
			PreparedStatement ps = connection.prepareStatement(query.toString(), Statement.RETURN_GENERATED_KEYS);

			ps.setString(1, user.getUid());
			ps.setString(2, user.getEmail());
			ps.setString(3, user.getPassword());
			return ps;

		}, keyHolder);

		long id = keyHolder.getKey().longValue();

		user.setId(id);

		return user;
}
It is just that simple to get up and running with JdbcTemplate in springboot.
March 19, 2019