Spring Boot AOP
March 19, 2019Spring Boot Events
Spring has events that can help facility functionalities of your application such as sending emails, calling a third party API, or processing an event asynchronously. The design pattern publisher and subscribers is exactly what spring boot events are.
First, create a spring event
To create a spring event, your event class has to extend the spring ApplicationEvent class. Here is an example of UserCreateEvent.
public class UserCreateEvent extends ApplicationEvent {

	private Logger log = LoggerFactory.getLogger(this.getClass());

	public UserCreateEvent(User user) {
		super(user);
		log.info("UserCreateEvent, user={}", ObjectUtils.toJson(user));
	}

}
Second, create a publisher
A publisher has to be a spring bean. A publisher has to have a ApplicationEventPublisher field. You can create a method to call the publishEvent method on the ApplicationEventPublish class. Here is an example of a publisher.
@Component
public class UserEventPublisher {

	private Logger log = LoggerFactory.getLogger(this.getClass());

	@Autowired
    private ApplicationEventPublisher applicationEventPublisher;

	public void processUserCreate(User user) {

		UserCreateEvent userEvent = new UserCreateEvent(user);
		log.info("processUserCreate, userEvent={}",ObjectUtils.toJson(userEvent));

		applicationEventPublisher.publishEvent(userEvent);
	}
}
Lastly, create a listener
A spring event listener must be a spring bean. Anotate the event listener with @EventListener. There can be multiple listeners for an event. Listeners are by default synchronous. You can make listeners asychronous by adding @Async the method. Here is an example of a spring event listener.
@Component
public class UserEventListener{

	private Logger log = LoggerFactory.getLogger(this.getClass());


	@Async
    @EventListener
    public void handleUserCreateEvent(UserCreateEvent createEvent) {
		log.info("handleUserCreateEvent, event={}",ObjectUtils.toJson(createEvent));
    }
}
March 19, 2019 Spring Boot Dependency Injection(IoC)
What is IoC or dependency injection?
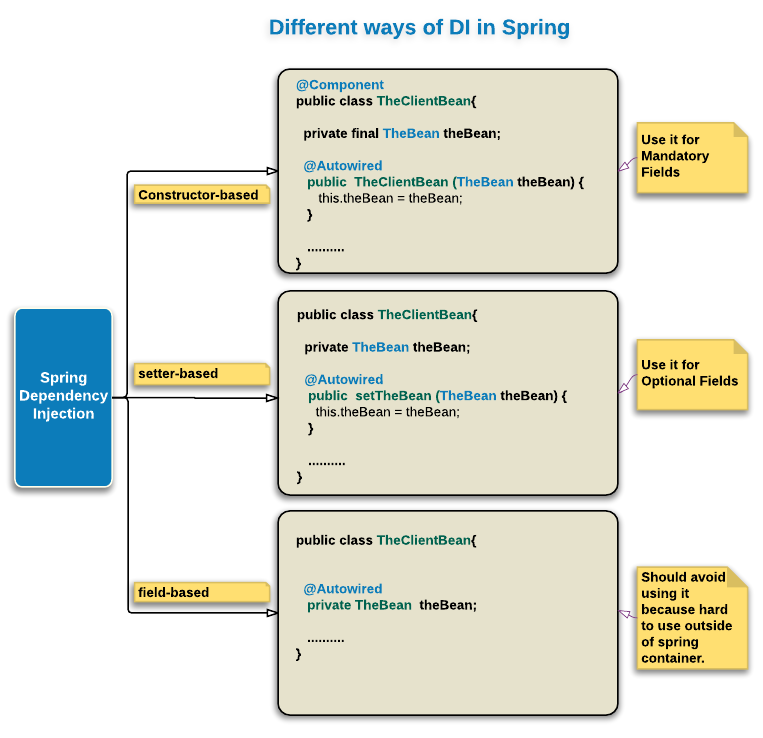
IoC is also known as dependency injection (DI). It is a process whereby objects define their dependencies (that is, the other objects they work with) only through constructor arguments, arguments to a factory method, or properties that are set on the object instance after it is constructed or returned from a factory method.
The container then injects those dependencies when it creates the bean. This process is fundamentally the inverse (hence the name, Inversion of Control) of the bean itself controlling the instantiation or location of its dependencies by using direct construction of classes or a mechanism such as the Service Locator pattern.
Container Overview
The org.springframework.context.ApplicationContext interface represents the Spring IoC container and is responsible for instantiating, configuring, and assembling the beans.
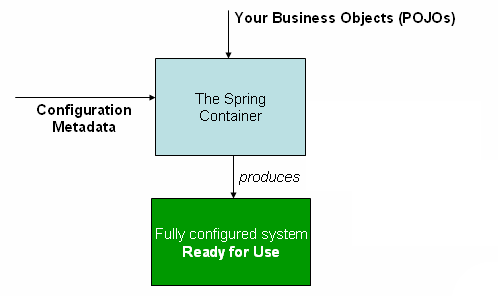
The container gets its instructions on what objects to instantiate, configure, and assemble by reading configuration metadata. The configuration metadata is represented in XML, Java annotations, or Java code. It lets you express the objects that compose your application and the rich interdependencies between those objects.
The following diagram shows a high-level view of how Spring works. Your application classes are combined with configuration metadata so that, after the ApplicationContext is created and initialized, you have a fully configured and executable system or application.
In stand-alone applications, it is common to create an instance of ClassPathXmlApplicationContext or FileSystemXmlApplicationContext. In a web application, you can add a simple web.xml for XML-based configuration or use @Configuration for Java-based configuration.
XML-based configuration
// create and configure beans
ApplicationContext context = new ClassPathXmlApplicationContext("services.xml", "daos.xml");

// retrieve configured instance
PetStoreService service = context.getBean("petStore", PetStoreService.class);

// use configured instance
List<String> userList = service.getUsernameList();
The configuration metadata represents how you, as an application developer, tell the Spring container to instantiate, configure, and assemble the objects in your application.
There are 3 ways now to implement configuration metadata: XML based configuration, Java-based configuration, annotation-based configuration.
These days, developers prefer to use Java-based configuration for their projects.
Spring configuration consists of at least one and typically more than one bean definition that the container must manage. XML-based configuration metadata configures these beans as <bean/> elements inside a top-level <beans/> element. Java configuration typically uses @Bean-annotated methods within a @Configuration class.
The convention is to use the standard Java convention for instance field names when naming beans. That is, bean names start with a lowercase letter and are camel-cased from there. Examples of such names include accountManager,accountService, userDao, loginController, and so forth.
Naming beans consistently makes your configuration easier to read and understand. Also, if you use Spring AOP, it helps a lot when applying advice to a set of beans related by name.
Circular dependencies exist, when one or more collaborating beans are being injected into a dependent bean, each collaborating bean is totally configured prior to being injected into the dependent bean. This means that, if bean A has a dependency on bean B, the Spring IoC container completely configures bean B prior to invoking the setter method on bean A.
@DependsOn – The depends-on attribute can explicitly force one or more beans to be initialized before the bean using this element is initialized.
By default, Spring eagerly instantiates all beans in the container when it starts up. But if needed you can lazy instantiate such beans so that they are created when they are first requested. However, when a lazy-initialized bean is a dependency of a singleton bean that is not lazy-initialized, Spring creates the lazy-initialized bean at startup, because it must satisfy the singleton’s dependencies. The lazy-initialized bean is injected into a singleton bean elsewhere that is not lazy-initialized.
Spring Boot Introduction
Hello and welcome to my spring boot tutorial. In this tutorial we are going to learn about spring boot and how we can use it to create APIs, web services, and web applications. Spring boot is very easy to set up and to use for development.
This tutorial is for you if you are:
1. Learning the spring framework for the first time.
2. Learning spring boot so you can move from spring.
3. Coming from another stack like LAMP.
We expect you to know basic java for this tutorial. If you are not familiar with java please go through our java tutorial first.
We are going to develop an ecommerce site that we can use to show how spring boot or spring works in a real application.
Our expectation for you once you are through with this tutorial is:
1. Know how to create a spring boot application.
2. Know and understand why spring is so popular.
3. Know and understand how spring boot accelerates software development.
4. Know and understand how spring boot receives and responds to HTTP requests.
5. Know and understand how to upload and download files.
6. Know and understand spring dependency injection.
7. Know and understand the spring bean life cycle and definition.
8. Know and understand how spring uses an ORM such as Hibernate and JPA to perform database operations.
9. Know and understand how to use spring security to secure API endpoints.
10. Know and understand how to use AOP.
*** At the end of this tutorial, you should know how to develop a full web API ***